How to make the computer 64 bit
The installer will independently put the "top ten" of the bit that the previous OS had. In other words, if you had 32-bit Windows 7, then the new system will also be 32-bit. Consider how you can increase the bit when updating the system.
Compatibility check
Before starting any actions, it is recommended to check whether your processor supports the 64-bit architecture. Click "Start" - "Settings" - "System", go to the subsection "About the system". If the processor supports x64, then most likely installing the 64-bit “ten” will work.
Sometimes there are x64 processors that are incompatible with 64-bit Windows 10. You can check compatibility using the free CPU-Z utility. Download and run it, then check the “Instructions Set” section.
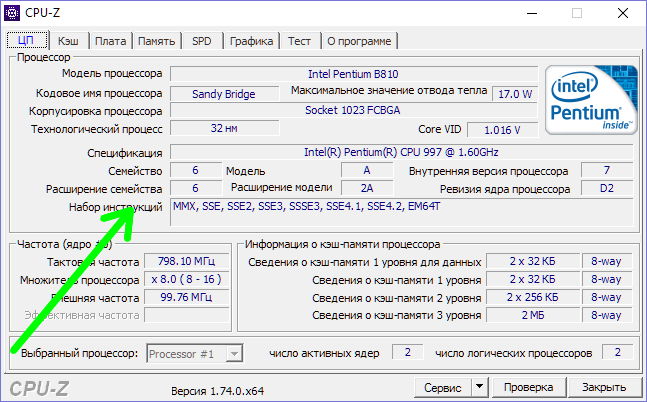
The processor must support one of the following instruction sets:
- SSE2, EMT64T;
- AMD64, VT-x;
- AMD64, VT-d.
In addition, the settings must be set to support NX or XD.
Drivers
If your PC is older than 5 years, check for 64-bit hardware drivers. If these are available on the manufacturer's website - everything is in order, Windows 10 will download and install them independently.
How to upgrade the system
We do not advise you to immediately upgrade from a 32-bit OS to a 64-bit Windows 10 - you can lose your license key. Therefore, we first upgrade the system to 32-bit Windows 10.
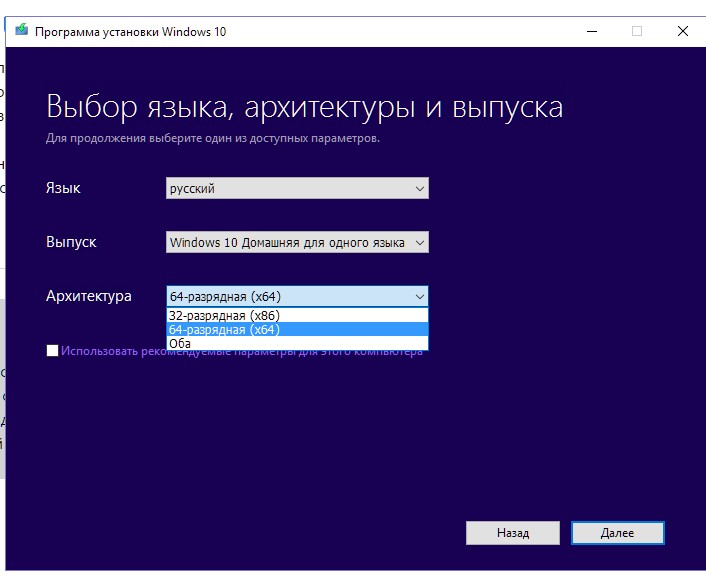
The next step is to download a 32-bit tool for creating installation media on the Microsoft website. Run it, select "Create a disk for another computer" and then the bit "x64".
Reinstall the system on top of the 32-bit one. The stage where you need to enter the activation key is skipped.
P.S.
Before starting any action, be sure to save or write down Windows. Remember: do nothing if you are not confident in your abilities.
Laptop computers are a slightly different story. Many laptops sold over the past 18 months support 64-bit mode, but this is not guaranteed.
You will find that the 64-bit version of Windows 7 runs much faster than the 32-bit version. True, there are several problems. For example, Windows normally runs only 64-bit drivers. Previously, this could mean the need to use universal drivers in some cases. The good news about Windows 7 is that for the most part, we finally have a good moment for 64-bit technology.
The hardware vendors do their preparatory work for 64-bit systems, and also implement and approve 64-bit drivers for most major products. However, you should first make sure that your hardware vendor has 64-bit drivers available.
And while the hardware is finally ready to use 64-bit mode, this cannot be said about software. As for the current 64-bit sentences, get ready to read the fine print. Some applications in certain packages may be entirely based on a 64-bit architecture (and not on disguised 32-bit software). For other applications, the situation may differ.
Why now?
Why upgrade to the 64-bit version if the software is not yet completely ready? The 64-bit version itself runs faster and better. The advantage of using 64-bit drivers is phenomenal performance. In addition, the 64-bit version of Windows has access to more than 4 GB of RAM. Windows 7 Home Base can use up to 8 GB of RAM; Windows 7 Home Premium - up to 16 GB of RAM; Newer releases of Windows 7 may have more than 128 GB of RAM.
You’ve probably heard about the upgrade and migration features available for Windows 7. Although Windows vista a radical departure from previous releases of Windows desktop operating systems was introduced, Windows 7 continues this trend. It presents many new features and capabilities, including:
- language independence;
- modularity;
- equipment independence;
- windows images
- Windows PE 2.0 (MS-DOS replacement);
- windows preloading environment
This brave new world clearly distinguishes between the early releases of Windows desktop systems and all subsequent ones. This is the reason why you cannot upgrade Windows 95, Windows 98, Windows ME or Windows XP to Windows 7.
Only Windows Vista includes upgrade paths from Windows XP. The luggage required to support the transition from Windows XP to a new architecture is huge. If the upgrade is absolutely necessary, you can upgrade from Windows XP to Windows Vista, and then upgrade Windows Vista to Windows 7.
Since Windows Vista and Windows 7 are implementing a new architecture, you can upgrade Windows Vista to Windows 7. The upgrade capabilities are pretty simple, but there are some problems because Windows provides too many features.
Getting Started
First you need to make sure that your computers are running at least Windows Vista with Service Pack 1 (SP1). On Windows 7, you can upgrade only Windows Vista Service Pack 1 (SP1) or Windows Vista Service Pack 2 (SP2). In fact, you can update similar or subsequent versions. This means that you can upgrade the following systems:
- Windows Vista Home Basic on Windows 7 Home Basic, Home Premium or Ultimate;
- Windows Vista Home Premium on Windows 7 Home Premium or Ultimate;
- Windows Vista Business on Windows 7 Professional, Enterprise or Ultimate;
- Windows Vista Enterprise on Windows 7 Enterprise;
- Windows Vista Ultimate on Windows 7 Ultimate.
If you purchased a computer running Windows Vista Home Edition, you can upgrade to Windows 7 for Business (Professional, Enterprise or Ultimate). This can be done without additional investment in Windows 7 Ultimate. Like Windows Vista, Windows 7 supports updates at any time. The ability to upgrade at any time allows you to switch from major releases of Windows 7 to later versions. This means that you can upgrade the following systems:
- Windows 7 Home Basic on Windows 7 Home Premium, Professional or Ultimate;
- Windows 7 Home Premium on Windows 7 Professional or Ultimate;
- Windows 7 Professional on Windows 7 Ultimate.
You can upgrade from Windows Vista Home Edition to Window 7 Home Basic or Home Premium, and then upgrade to Windows 7 Professional at any time. If you previously performed updates at any time, you know that this is easy and fast.
Updates and Migration
There are several other issues of the upgrade process that may affect migration. The most important affect the following:
- interarchitectural updates;
- interlanguage updates;
- intervariant updates.
When upgrading from Windows Vista to Windows 7, you need to upgrade the same architecture, language, and version. This means that you must do the following.
- Upgrade 32-bit Windows Vista to 32-bit Windows 7 (or 64-bit Windows Vista to 64-bit Windows 7)
- Update the same version of the language, for example, English (US) to English (US) (and not English (US) to Japanese, for example). If you have additional language packs installed, you may also need to remove them to upgrade.
- Update to the same or older version in accordance with the options. Unable to perform windows update Vista on options N, K, KN and E Windows 7.
These restrictions are quite logical. For example, the 64-bit version of Windows is completely different from the 32-bit version of Windows. Calculations go to 64-bit mode, and you do not want to lag behind. In addition, there are always options and workarounds. The User State Migration Tool (USMT) 4.0 allows you to migrate 32-bit settings to 64-bit environments. For this you need to get the current status before install windows 7.
When upgrading from Windows Vista to Windows 7, the Windows.old directory is created with the Windows Vista settings and files. If you are performing a typical installation (and do not modify or delete partitions during installation), the Windows.old directory is available. USMT 4.0 can use this directory to transfer settings and files from Windows Vista to Windows 7. In most cases, this can be done after the upgrade.
Although you cannot upgrade Windows XP directly to Windows 7, you can save the Windows XP settings when installing Windows 7 on a computer running Windows XP. To do this, before installing Windows 7, you must transfer files and settings.
The Windows Easy Transfer tool can help with parameter transfer. It is available on the Windows 7 installation media in the Support \\ Migwiz folder. You can use Windows Easy Transfer to transfer files and settings from any computer running Windows XP or Windows Vista to Windows 7.
You can transfer files using a network drive, a USB flash drive, or a transfer media cable. Of these three options, my favorite is a USB flash drive. When using network drives, data transfer over the network is required. Therefore, I prefer to use a USB flash drive. Make sure you are using a new high-speed flash drive with a large amount of memory, such as 16 or 32 GB. A 32 GB flash drive is sufficient for most transfers, and the transfer itself will be performed much faster than using a network drive.
The Windows Easy Transfer tool cannot be used to transfer program files or system files, such as fonts or drivers. The Windows Easy Transfer tool is used only for transferring files and program settings. It is necessary to carry out the transfer and subsequent installation of the necessary programs, fonts and drivers. If you cannot perform an in-place upgrade, you can transfer files and settings.
The transfer is supported by two scenarios. You can do the following.
- Transfer files and settings from Windows XP or Windows Vista to Windows 7 on the same computer.
- Transfer files and settings from Windows XP or Windows Vista to Windows 7 on a new computer.
Both scenarios use similar transfer methods. In one scenario, the transfer is performed to a new OS, in another - to a new computer. The two primary migration tools are still Windows Easy Transfer and USMT.
When using Windows Easy Transfer, files and settings are usually transferred in two steps. Using Windows Easy Transfer, they are copied to a network folder or USB flash drive. After that, the copied files are transferred to the new OS or to the new computer. You can also use the transfer tool cable to copy files and settings directly from the old computer to the new one. Note that the transfer cable is not standard. uSB cable. You must purchase this cable if you do not have one.
Although the Windows Easy Transfer tool a good choice To upgrade multiple computers running Windows XP or Windows Vista to Windows 7, it is not suitable for transferring data from more than ten computers. If there are more computers, you will need to automate the process, in which the USMT tool can help.
ATTENTION!!! We rented a new detailed course of 5 videos about how PERYTI From 32 to 64 bits IN WINDOWS 10 WITHOUT DATA LOSS - https://www.youtube.com/watch?v=OT0foFiV9ss&list=PLKDDH8kTj2vxapOeGNbB7fwl1xMBkcN0x earn on their purchases! Registration - goo.gl/AvWhps Google Chrome extension from Letyshops: goo.gl/33umJ2 INSTRUCTION ON OUR WEBSITE - http://goo.gl/ebYUBt IS A QUESTION? SET IT WITH US ON FORUM - http://forum.techza.net PARTNER YOUTUBE NETWORK - http://videospray.net CONNECT! We welcome the viewers of the channel ChavoTV. Today we will teach you to switch from a 32-bit Windows 7 system to a 64-bit one. First, insert the installation disk into the drive, or connect a flash drive. Installation can also be made from other storage media. Go to "My Computer" and open the drive. Run the setup file. We agree with the control of accounts by clicking "Yes". Choose "My language is Russian." In the next window we also leave Russian and click “Next”. Click "Install". The installation process begins. In the window that appears, select "Do not download the latest updates." Next, a window will appear where we can choose the architecture of the operating system. Select Windows Ultimate X64 and click "Next." Put a tick "I accept the license conditions" and click "Next." Choose the type of installation - "Full installation". Now select the partition where the operating system will be installed and click "Next". The Windows installer informs us that if the partition on which the installation will be performed contains another operating system Windows then all files and folder will be moved to the Windows.old folder. Click "OK". The installation of Windows begins. It will take some time. During Windows installation, the computer will restart several times. Upon completion of the installation, we will create a username for our account. The name of the Computer in the network location will be applied automatically. If necessary, you can change it. Click "Next". In the next window, if you wish, you can set a password. And again, "Next." Remove the checkbox next to "Automatically activate Windows when connected to the Internet," and click "Next." In the next window you can set the date, time and time zone. Leave everything by default and again "Next." The installer will apply the settings and reboot again. Well, that's all, we have successfully switched from 32-bit Windows 7 to 64-bit.
