Computer cleaning and general repair of the cooling system.
Golovna
Fans in the power supply unit periodically go out of order or begin to work harder or earlier, which affects the overall productivity of the PC.
Repairing a fan costs pennies, and the trip to the mechanics takes an hour.
- A way out of this situation.
- The fan can be repaired independently, without needing to be screwed in.
Materials
To repair a PC fan you will need:

tube with oil for sewing machines;
clerical lower

Procedure 1. Get to the bottom of the breakdown
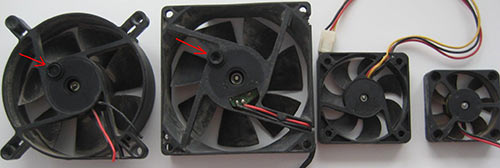
In the above photo of the fan you can see the standard fan bearing bushing.
When wrapping it, the shaft forms a very thin ball of butter. There you have your chergu trimmed with a gum bushing, which is located under the sticker. A number of fans do not wear such bushings at all, and the sticker is simply glued on top of the mask.

Problems with the fan begin when the oil ball often hangs around or around.
The traditional repair method involves disassembling the housing unit and removing the fan itself.

After this, remove the sticker, sleeve, apply a new ball of butter and then place it in the turn-off sequence in place.

Insert the head into the central hole of the fan mounting area, piercing the sticker and the rubber bushing.
If there is no leftover, then gently pull the head back, shards of oil will quickly spread out on the surface. If there is one, then remove the thirds of the oil and also remove the head. Immediately turn off the heat so that the fan evenly distributes the oil over the surface and starts working again as before. The rest of the time is often spent in difficult or similar situations. The similarity between them lay in the fact that in the field of vision, speeches gradually began to flow that were lived, often practiced, often incorrectly. The rest of the time is often spent in difficult or similar situations. In order to help them recreate and thoroughly “create”, it is imperative that we first bring them into proper sight, so that there is a lot of saw-wood, well, how can we be without anything! The axle should be taken with a pen, a brush and forward: using cologne, wipe all important parts and mechanisms.!
Even if it were nothing, things just don’t happen that easily in the world.

It takes a lot of time to tinker with
coolers
.

Yakbi not ci
coolery
You noted that the computer runs fine when turned on.
Most likely your fans are humming.
I have a computer.
It could be the cooler on the processor, the cooler on the power supply unit, or the fan on the video card.
Perhaps you have a case fan installed.
You can hear the skin from them.
In this article, we will take a look at the cleaning and oiling of the cooler in the life block.
Fortunately, almost all other computer fans have the same design and are designed the same way. You can read how to remove the processor cooler from the statistics Let's see.
Exit the computer from the network.

Unplug all cables that go to the computer.

Remember that simply unplugging the cord may not damage the case or components of the computer.
Life can come along the cord or cable that goes to the monitor.

Safety equipment - above all.

Respect!
The effect of drops of oil in the decomposition will be unambiguous, but the procedure for sorting everything out will have to be repeated in two months.
The machine oil is sparse and with intensive wrapping it easily hangs, leaks and the fan begins to hum again.
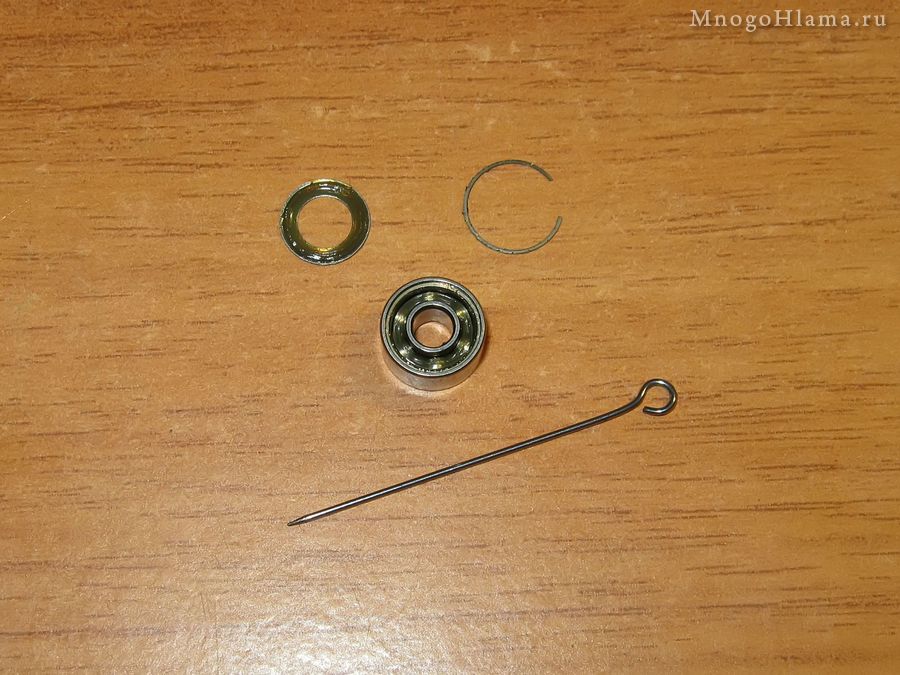
If you really want to continue to live, check the presence of thick ointment like Litol in a bottle. Due to its viscosity, it adheres more reliably to the fan axis and will serve longer. It is bad for car motor oil to rub onto the bearing. On the axis of the buried one, the impeller can be seen white retaining ring
.

We need to know this.

We pick it up with a tip, tweezers and pull it together.
Whose ring has a cut.
We take a piece of the white ring with tweezers and try to remove it.
Uvaga ! It is very often near the circle when you try to take off the whistle and fly to the far end of the room.


Having thought about taking a look at the fans, since the small fan is close to 15 years old, it soon became clear that their design is practically the same.
The differences are based on the size and shape of the body, impeller and engine plate.


Then I will describe the process of disassembling on a large fan (120mm).

For the cob, glue a sticker under which there is a humic plug.

Using a twist or a twist, we pierce it and remove the cork.


Under the plug, you can see the metal of the entire impeller, with a white, white, plastic lock washer.


If it is visible through the old oil, then wipe it with a cotton swab.


We insert a narrow screw into the cut of the locking ring and turn it 90 degrees so that the ring comes loose.


After that, twist the ring and remove it from the axis of the impeller.


During this process, the puck can easily shoot out and roll around, usually in the most important place, under a table, sofa, baseboard, etc.


After the locking ring is loosened, the humic ring is removed from the axis.


Now, without much effort, you can strengthen the impeller into the frame, thereby slightly removing the magnets that are mounted in the impeller body.


We take another humic ring from the base of the impeller axis.

So we can say that the sorting is complete.

We feed the oil with a naked spoon onto the rings and all the bells; a syringe is essential for this purpose.

In this case, the bell can be wrapped periodically with your hands, so that it is easier to penetrate the inside.


If you pour a lot of oil, you won’t notice (up to 3-5 drops) so that everything will soon find its way and will soon collect sawdust on itself and become covered with moss or spread from shovels throughout the entire system unit. Here, everything depends on the size of the fan, a large one will need more oil, and a small one will need less. Let's stop the traffic jam.
If this sticker tray is heavily filled with oil, you need to wipe it with a retailer or white spirit, as this sticker will no longer stick to the oil.
The sticker itself can be replaced with tape if the old one has become unusable.


Basically, it’s all about prevention.


We connect it, check it, then, based on the test results, install it into the computer case or the living unit.
The noise comes from the oil heating up and leaking around the bearing, lubricating it.
However, after about an hour the noise becomes constant, as soon as the oil has ended. If noise appears at the cooler, it is necessary to lubricate the bearing. If you can't build something, you'll wear it out and have to buy a new fan.
Bearing grease can be obtained using additional machine oil. Vikoristovuyuchi different views
lubricant, I chose the best color that is suitable for the bearings.
It can either be prepared independently or purchased.
If the oil is daily, you can use engine oil, a couple of drops of which you can see during the hour of checking the engine timing.
However, the oil of the ball bearings (rolling), forging does not always give
garniy result
.
This operation must be carried out carefully, without breaking or wasting the washer.
It may happen that she’s going to fly like hell, and she’s going to have to joke around.
If the washer is ruined, the cooler will not work.
These are the reasons why you won’t be able to squeeze the beetle.
Next, pull out the humic ring, then remove the beetle itself.
There is one more ring on this axis that needs to be removed.
A cooler that has been running for a long time may have erased humic rings.
The stench can be completely erased, and often.
Most often, the rings are lost due to the wear of the clothes.
It is impossible to find humic rings on the market, such spare parts are not sold.
Replacing the bearing will not cause noise if the ring is not in place.
