Technique applying gel varnish for beginners. How to make shellac at home. Step by step instructions for beginners. Video tutorials for beginners and master class design
The image of a beautiful well-groomed woman is made up of many components: hair, clothes, shoes, face. It often happens that the nails are somewhere at the end of the list - and this is wrong.
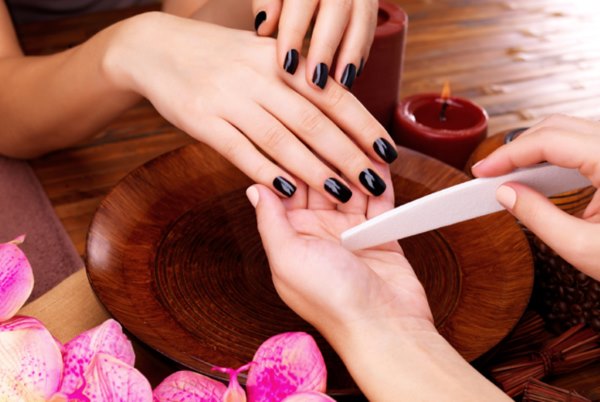
A neat manicure, sleek pens - the card of any woman. Peeling nail polish looks just awful, and there is just no time to refresh it. Today, this problem is solved quite simply: shellac has become the most popular procedure in nail care salons.
But what if there is not enough time or money for going to the salon? The way out, of course, is to make shellac at home. For beginners step by step we give instructions for this popular manicure.
A beautiful word, by the way, does not conceal anything mysterious. Shellac is a waste product (in other words, excrement) of insects of worms that feed on tree sap. This digested gummy substance is collected, dried and crushed, then the varnish mass is melted and cast into molds. The result is a great tool for manicure.
Manicure has never been a special procedure, but the use of shellac has its own distinctive features. First, the need for nails disappears; secondly, the coating is quite durable and lasts much longer; thirdly chic appearance and rich colors.
 The disadvantage of shellac is primarily its cost.
 The manicure life, however exquisite, is very short. Housework is the responsibility of any woman, very few have domestic helpers. Daily cooking, washing dishes, washing, cleaning - all this leads to the fact that nail polish quickly dims, cracks and loses its appearance.
Another thing is shellac: a symbiosis of gel and varnish (even performed at home by beginners in accordance with step-by-step instructions) held for quite a long time, and during this period it is possible to additionally strengthen the nail plate.
Advantages and disadvantages of shellac
Shellacyou guessed it has many advantages:
- Shellac manicure looks great on any nails: both long and short. At the same time, the method of painting gives a chance to grow nails to the desired length.
- Since shellac is a natural remedy, it helps to strengthen thin and breaking nails.
- Shellac keeps on nails for a long time: some women of fashion manage to keep a manicure for up to three weeks.
- To erase shellac from nails, special tools are needed, and this means that household chemicals are not afraid of him.
- Shellac gives the nails a dazzling shine that lasts an incredibly long time and does not tarnish.
- Manufacturers are closely watching the fashion and the color palette of shellac is constantly expanding. You can find not only classic tones for manicure, but also bright avant-garde colors on sale.
- Perhaps the most important advantage of shellac is that it is completely harmless. Dangerous formaldehydes are not included in its composition, therefore women who are prone to allergies and pregnant women can safely make a shellac manicure.
If for some reason the coating suddenly bothers you, then shellac can be removed at home. To do this, you need to buy special tools in the salon, liquid and film, carefully study the step-by-step instructions for beginners and independently clean the nail plates.
Everything in the world has its downside - and shellac is no exception:
- First of all, it concerns the high price of the procedure itself, and if the need for correction appears, it is also quite expensive. So, if the nails grow too fast, you will have to accept additional costs.
- The second negative factor is more significant. Shellac, according to the manufacturer, is indeed a very resistant coating. But the nails tend to expand under the influence of high temperatures, and then decrease again, taking the original size. So washing dishes in hot water or too warm a bath contributes to the deformation of the nail and cause microscopic cracks in the coating.
Through these microscopic holes under the varnish layer dirt is possible, and the dirt creates greenhouse conditions for many bacteria and microorganisms. Shellac lasts a long time, which means the bacilli have enough time to damage the nail. So the fungus is not the most dangerous disease.
To avoid the sad consequences, all dirty homework is best done with gloves.
What tools and tools will be required
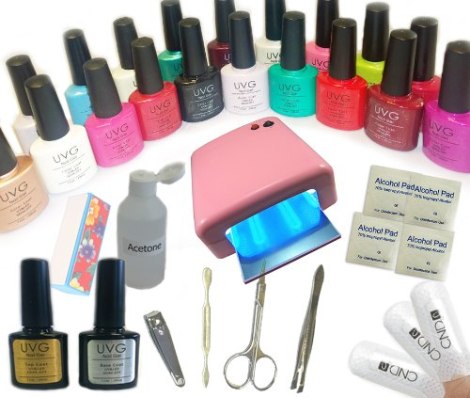
Shellac is a very complicated procedure, and it is best to do it in the cabin, with an experienced master. But "not the gods burn pots," so that with certain skills, it can be done at home by yourself. To do this, you need to know step-by-step instructions for beginners and have special tools and manicure UV lamp.
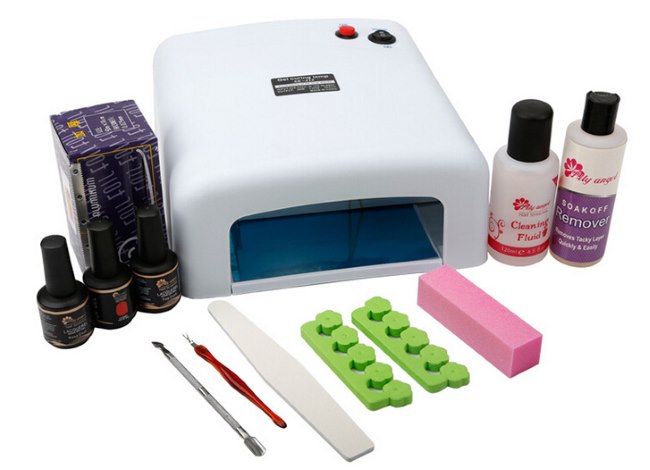 For applying shellac at home, you will need some tools and tools.
 First you need: Base coat, shellac and fixer. Professionals recommend using basic and basic coatings from the same category shellac, preferably from the same manufacturer. Otherwise, there is a risk that the desired result will not be achieved.
In addition, you must have:
- antibacterial agent;
- an orange tree spatula or stick;
- nail file;
- scissors for manicure;
- bondex, agent for improved adhesion;
- cuticle remover;
- grinding nail file.
Preparation of nails for shellac
So, having available all the necessary tools for shellac at home (for step-by-step application for beginners, read on), you can start preparing nails.
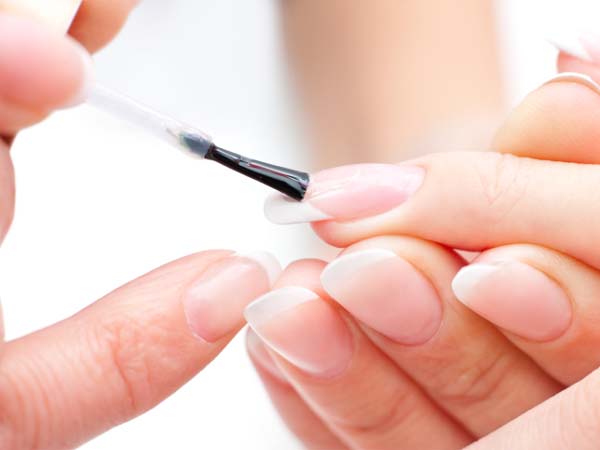
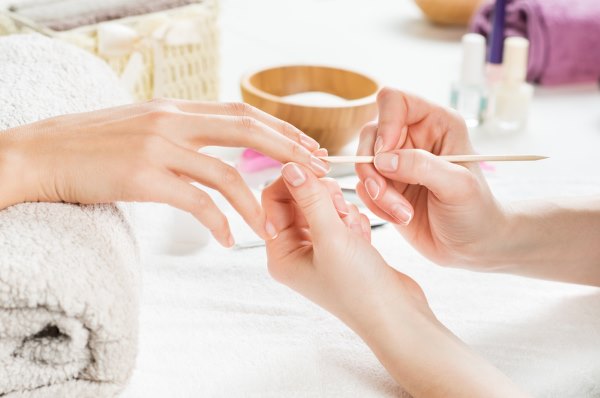 Before applying the gel polish, you need to prepare the nails, processing in particular the cuticle
 Preliminary surgery includes:
- cuticle processing and nail plate formation;
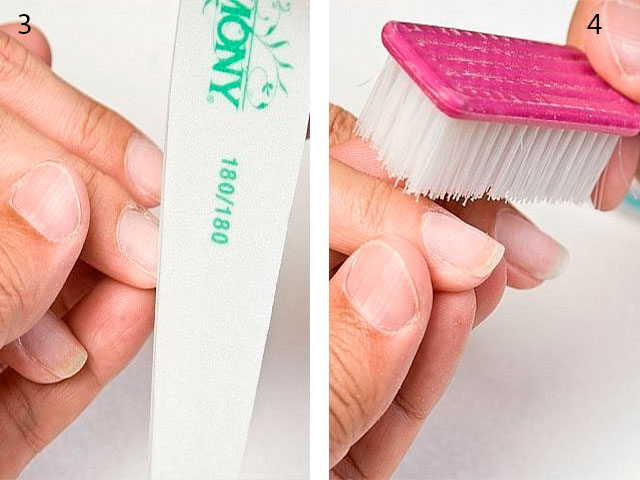
- sanding is a must-have procedure that improves the adherence of shellac directly to the nail;
- disinfection with antibacterial liquid, which additionally degreases the nail and provides a uniform coating;
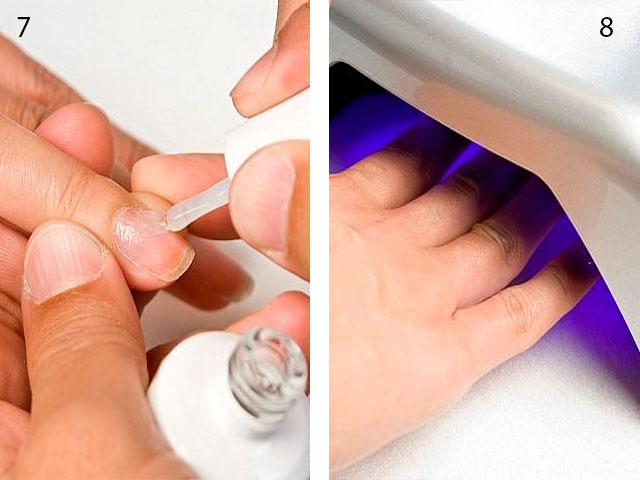
- base coat;
- warming up with an ultraviolet lamp to fix the gel for at least 25-30 seconds for each nail.
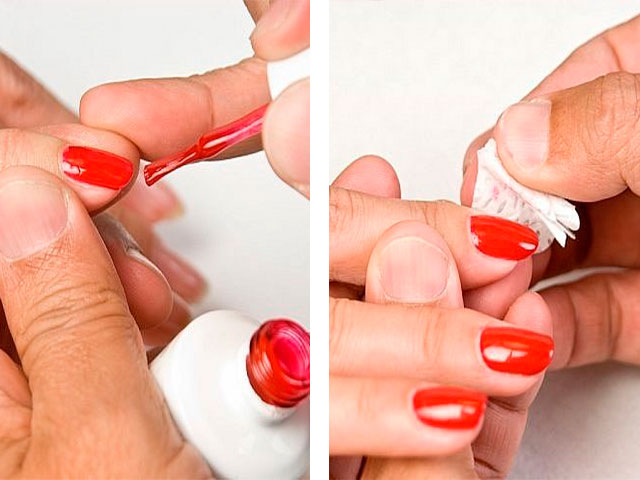
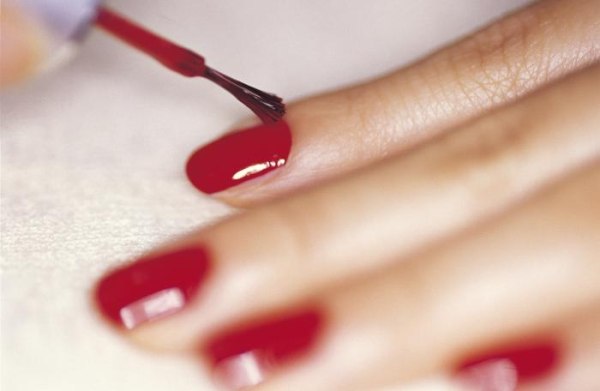
How to make shellac at home. Step-by-step instructions for beginners
Now that your nails are ready, you can proceed to the immediate applying shellac:
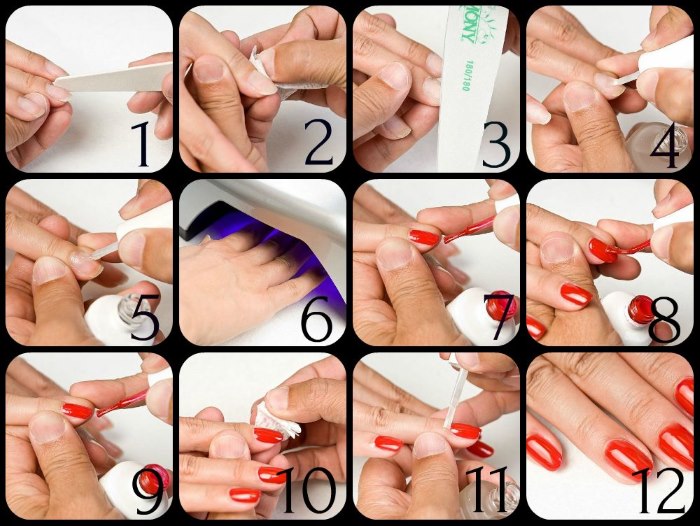
 When making shellac at home according to the step-by-step instructions for beginners on your own, you should know that it is not necessary to remove the adhesive layer after the first and base coat, as this will increase traction.
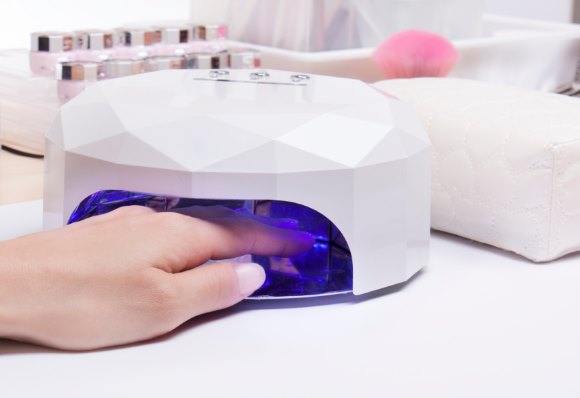 After applying each layer of shellac, nails should be dried in a UV lamp
 What will happen to the nails after applying shellac
No matter how safe the shellac procedure was for the nails, recovery measures are still needed. In the end, after all, every day they change their underwear, and the nail remains in its peculiar shell for a long time. So, if yellowish spots appeared on the surface of the nail plate or the nail was somewhat deformed, then urgent measures should be taken.
You can revive the nail in the salon wizard or take advantage home remedieswhich is generally preferable since they are inexpensive and available:
- Make lotions from heated olive oil throughout the week. Nails will receive additional nutrition and hydration, which means they will maintain a healthy appearance.
- A piece of lemon, which should daily wipe the surface of the nail, can work wonders. Essential oils and vitamin C will return shine and get rid of delamination and breakage.
- A bath with sea salt will relieve you of a possible fungal infection. The procedure is desirable to do every day, for 10-15 minutes.
 Sea salt baths are recommended for restoring the nail plate after shellac
 Secrets of applying shellac at home
By making shellac at home by yourself, following step-by-step application technology for beginners, you can save a little. So, what tools and tools can be replaced and how:
- Manicure masters are used to remove the cuticle special tools, quite expensive. But if the cuticle is not too noticeable, then in this case, you can use the orange stick to just push it away.
- The grinder completely replaces the usual polishing nail file: the end result will be the same.
- A small bottle of salon disinfector, which can cost about a thousand, is easily replaced with nail polish remover or acetone.
- The basic coating cannot be replaced, but you can find a suitable product in cosmetics stores, which, among other things, also has a healing effect.
Take into service a couple more secrets of applying shellac at home.
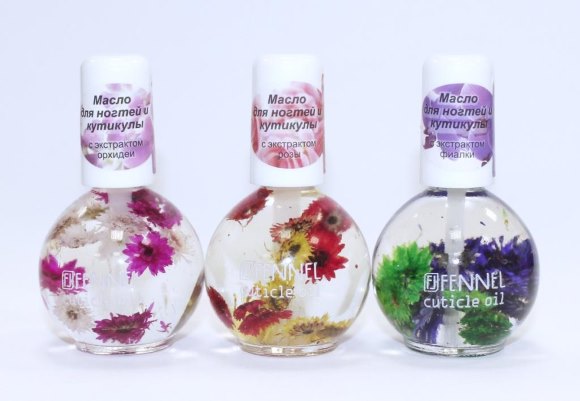 Cuticle oil should be used in the morning and evening every day.
 Useful tips from professionals:
- When purchasing an ultraviolet lamp, you should pay attention to its power, the most optimal result is achieved when using a lamp with a power of 36 watts. In this case, the coating dries quite quickly.
- Before you start a manicure, roll a coated jar in your hands. This little trick will significantly improve the properties of the varnish, which will fall evenly without much effort.
- To prevent the thickening of shellac, it should be stored at room temperature, carefully closing the bottle after each use.
- Any corrective treatment should be carried out only under the obligatory condition: the nail should be dry. No soft nail file will protect the wet nail plate from damage.
- Use cuticle oil daily: morning and evening. Only in this case will you be able to avoid the appearance of inaccurate burrs.
- Before you go to the salon for the beauty of your hands, you should treat your nails, if necessary. Shellac can only aggravate the problem of fragility and delamination of the nail plate.
- Do not use hand cream directly in front of the shellac manicure.
How to remove shellac gel
To remove the shellac manicure yourself at home (for beginners, step-by-step application is described above), need to cook:
- cotton pads or special sponges;
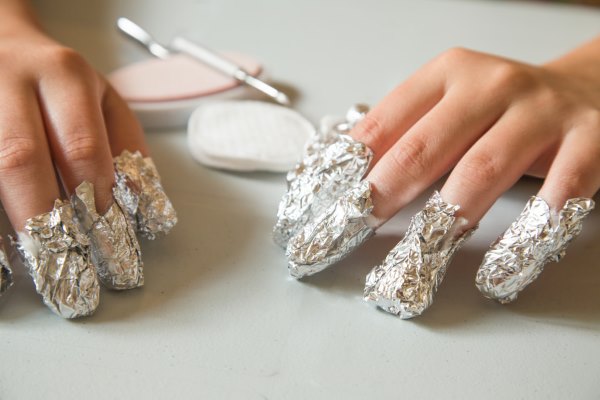
- 10 pieces of foil so that you can wrap your fingers;
- isopropyl alcohol or a special agent for dissolving shellac.
Wash hands with soap and warm water and dry thoroughly before removing shellac.
 The procedure for removing shellac
 Now you can proceed to shellac removal:
- Cut cotton pads in half.
- Moisten a piece of disc in alcohol and attach it to the nail, fix with metal foil. Try to avoid getting alcohol on the skin so as not to cause irritation. Foil is used to ensure that the alcohol does not evaporate too quickly. Wait for the result will have about 15 minutes, at this time you can gently massage the fingertips for better penetration of alcohol.
- In some cases, the shellac is removed with a film, if this does not work, then it can be removed with a conventional plastic spatula. It happens that due to inexperience the coating was applied too thick and the shellac is not removed. This means that the procedure will have to be repeated with alcohol or just to cut the shellac.
- In conclusion, the nail should be lubricated with oil for the cuticle to avoid drying out the skin and nail surface.
Shellac is a wonderful tool for manicure both in the salon and at home (you have already read the step-by-step instructions for beginners), the nails look neat, elegant and, not least, natural.
Over time, experience and due skill will come and the whole procedure will not take too much time. As a result, the hands will look very attractive, and the nails will receive additional protection.
Shellac "Cat's Eye"
Making nails "cat's eye" is very popular and looks very impressive. Using a gel polish, with the addition of a metal base and a magnet, you can get a pattern that really looks like a cat's eye.
For this design you need to cook green gel polish and special magnet. However, if there is no special, then any, the most ordinary one will do.
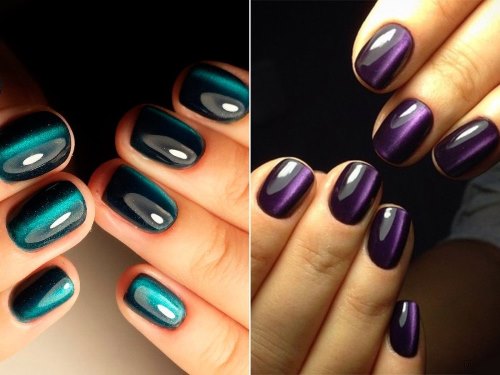 Manicure "Cat's eye" can be performed in any color
 Initially, a base coat is applied to the nails.To be dried in the ultraviolet lamp. The next layer is green, which is also dried. Magnet is not yet applied.
And now a magnetic plate is brought to the second coating: metal particles of lacquer are folded into an elegant pattern. If the magnet is brought up by an edge, a strip is formed on the nails; but if you scroll it over the surface of the nail, the image will come out intricate, like a cat's eye pattern. Now it remains only to complete the normal procedure.
It is not at all necessary to use only the green color palette: after all, the cat's eyes may be yellow or even blue.
If the cat's design fell in love, then you should buy a special magnet, with which you can get a spectacular pattern.
As you can see, shellac at home (for beginners step by step execution, see above) is quite feasible. The main thing is to follow the instructions and not be afraid to dream.
Gel polish - a special coating that keeps the manicure for several weeks. This technique has become very popular and is in great demand among the female. To date, this procedure can be done both in the salons of the master, and independently at home.
Make yourself a manicure gel varnish at home does not make any difficulties, if you comply with the technology of coverage. To do this, you will need special tools, which we will discuss below.
How to cover nails gel varnish at home (in stages)
To cover the nails yourself at home, you need to learn the technique of proper application and purchase everything you need.
What is needed for such a manicure (list)
So, in order to make the coverage of this excellent tool at home you will need the following:
- Grinder
- Degreaser or alcohol
- ultraviolet lamp
- Base Gel (base)
- Color gel varnish
- Top (fixer)
How to make up your nails correctly and beautifully (description with step by step photos)
In most cases, before applying a manicure is done (removing the cuticle and shaping the nail plate with a nail file), then proceed to the main task. Here is a step-by-step description of the technique of applying a wonderful product:
- Shift the cuticle and shape it. This should be done carefully so as not to damage the finger.
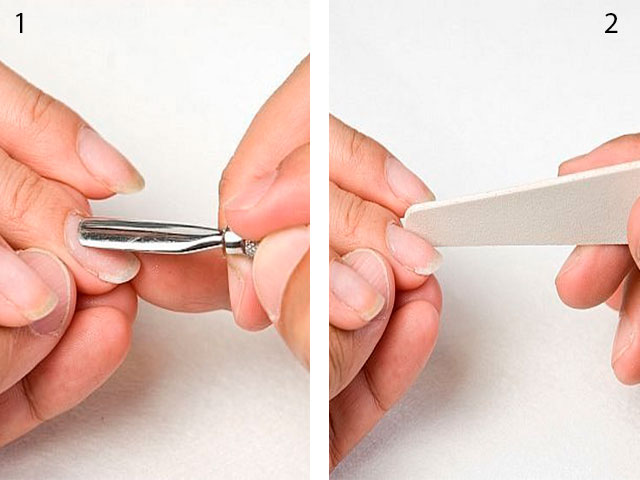
- We make easy polishing of the nail plate to remove the gloss. Brush remove all unnecessary.
- We degrease with a special liquid, apply a thin coating of the base coat, paint the end of the nail plate well and dry in the lamp for 1-2 minutes.
- Apply the color coating in 2 thin layers, each dry in the lamp for 2-3 minutes.
- The last layer (top) - fixer. Apply it should be a layer of thicker and well paint over the ends. Dry in the lamp for 2-3 minutes and remove the sticky layer with ordinary alcohol. On a note! Use lint-free wipes.
Video tutorials for beginners and master class design
For a better understanding of how to apply gel polish, without the help of a wizard, view a selection of video lessons.
How to remove gel polish from nails
This coating was designed so that it held for a long time and no external factors affected its perfect appearance. So how best to remove such coverage? It is impossible to erase it with simple acetone, so we suggest using the methods we want to offer you.
Without special liquid
Have you decided to remove the gel coat yourself, but have you purchased a special liquid for this? Nothing wrong! Here is a brief guide on how to do this in another way.
- Fill some capacity with nail polish remover with acetone.
- Cut down the shiny layer of your nail polish with a nail file.
- Apply on the skin around the nails cuticle oil or fat cream.
- Dip your fingers in liquid with acetone and hold for 7-8 minutes.
- Remove the softened layer with a wooden stick.
Home method with foil
One of the most popular and effective ways to remove your beauty from nails is foil. To do this, we need cotton pads soaked in a special product remover. We put them on the nails and wrap in foil. Set aside for 10 minutes, after which we remove with the wrapper, pressing down slightly, trying to remove the coating. Remove the remaining pieces of varnish with a wooden stick.
Video for illustrative example
Shellac is an innovative development that combines gel and varnish. Material is popular with women different ages, as it has some advantages in comparison with the usual home manicure and acrylic extensions. Shellac can also be used for pedicure, which will look perfect for a whole month.
Benefits of shellac:
- Save time and effort. Shellac lasts about 2-3 weeks. Its durability will allow to make a manicure much less often and rather quickly.
- Natural and well-groomed nails.
- The cost of coating gel varnish Shellac is less than building up with acrylic gel.
- A variety of colors. Create spectacular designs (more than 250 colors).
- Does not harm the nails, quickly allows you to grow and strengthen your nails.
- Suitable for nails of any length.
- Gel polish dries quickly, so the manicure is done very quickly.
Now let's look at the flaws of Shellac, which are not so many:
- Considerable cost of the necessary facilities and equipment, without which it is impossible to make a gel-gel coat. Of course, with constant use, it pays off very quickly and costs will be much less than a manicure in the salon.
- Removing Shellac is quite a difficult process that is best left to the master for the safety of nail damage.
Not all women can use Shellac. The reasons:
- thin and weak nails. In case of accidental bending of the nail to the floor cracks will form. The term manicure noticeably reduced.
- features of work - long stay of hands in water or daily hours-long work on the keyboard.
Not all women will cope with his independent application, you need to have such qualities as accuracy, accuracy and some skills to create a manicure.
What is needed for a manicure?
In order to apply Shellac at home, you need to thoroughly prepare yourself and purchase all the necessary means for the procedure. To do this, below is a list of what you need to buy.
Independent manicure with the use of gel varnish Shellac will cause some difficulties, so for beginners we recommend the creation of a single-color design. Having learned the skill and order of actions in creating a simple manicure, you can begin to try combinations of colors, french, use of drawings, stickers and glitters.
List of required materials:
- Manicure set.
- Sanding file.
- Degreaser or acetone.
- Ultraviolet lamp or LED-lamp.
Attention! The UV lamp should be rated at 36 watts. Exact time drying, see the instructions for the lamp. Professional LED-lamp is much more powerful, note that the drying time of varnish is significantly reduced.
- Shellac base.
- Shellac color.
- The final coating (finish-Shellac).
- Sponges or napkins.
- Means for clarification and removal of the top sticky layer.
Shellac: gel nail polish procedure at home
To succeed in creating an excellent manicure, it is necessary to thoroughly clean and prepare the nails for coloring with gel varnish Shellac. Without grinding and degreasing Shellac will fall unevenly and have to redo everything. It is necessary to put layers only in a certain order and to act accurately. It is not worth trying to apply gel polish without using a UV lamp, it is impossible to wait for it to dry before UV light.
Instructions for applying Shellac:
- Preparation of nails. It should be cut, file nails, remove the cuticle with cosmetic fluids or by trimming.
- Grinding. With the help of a soft nail file for polishing you need to perform the grinding of nail plates. You only need to remove the top shiny layer of the nail.
- Degreasing procedure. Wipe with acetone or special disinfectors.
Council Use lint-free wipes required! Vata is not suitable!
- Fingernails should be covered with thin layers of Shellac base and sealed (painted) the end of the nail. In drying for a minute.
- Cover your nails with the first thin layer of colored gel polish. Dry for about 2 minutes.
- The second thin layer of colored shellac. Dry for 2 minutes.
- Cover the nails with a finishing coat, applying it with a thicker and even layer, be sure to seal the end of the nail. Dry in the lamp for about 3 minutes.
- To remove a sticky layer by means of a napkin or sponge, moistened in acetone or solvent of a sticky layer.
- The process of applying shellac is complete.
How to erase Shellac gel polish?
The procedure for removing shellac is quite simple and safe for nails, it can be done at home. Shellac is, first of all, varnish, so it is easier to remove it than an acrylic gel coating, you do not need to cut it.
A special professional gel polish remover will help remove manicure without any hassle, but you can do without it. To do this, we take aluminum foil, cotton wool or discs, acetone, orange or wooden sticks.
Removing gel polish from nails step by step at home:
- Wash your hands well with soap.
- Cotton disc cut in half and exfoliate. Cut the foil for wrapping nails.
- Dip cotton wool in acetone and attach to the nail, wrap with foil.
Attention! Make sure that the liquid with cotton does not fall on the cuticle or the skin near the nail. This can cause allergies or burns.
- Repeat the wrapping procedure with all the nails and wait 10-15 minutes. At this time, you need to do a light massage of the nails for easier removal of gel polish.
- Next you need to remove the foil and cotton and remove the softened gel. If there is a lacquer in some places, use an orange or plastic stick to clean the surface of the nail. Grind if necessary (if there are visible small residues).
- Treat with nourishing oil to avoid brittle and fragile nails.
When buying materials and equipment for manicure using Shellac, carefully monitor the quality of products, so as not to harm the nails. Now sold ready-made kits for home use, and you can buy all the items separately.

A simple procedure for applying gel polish will allow you to show the beauty and tidiness of your hands, give time to grow your nails and strengthen them. Shellac does not extend the nails as an acrylic gel, but simply simplifies the manicure process, making it more resistant and immune to most of the factors that make up ordinary varnish.
In order for Shellac not to exfoliate prematurely, do not neglect the careful removal of the cuticle and the degreasing of the nail. Peeling of varnish is also possible with health problems: vitamin deficiency, medication, hormonal disorders.
It is necessary to store Shellac in a dark place, tightly closed. The result of the work depends on the correctness of storage and application. With the help of gel polish you can create good versions of a perfect manicure, which is able to hold out on nails for 2-3 weeks.
Gel Polish at home: video
Women's pens attract not less attention of men than other parts of the body, so it is important to take care not only of the skin, but also of the nails. Here women will be helped by a neat and stylish manicure with shellac coating, which can be done in the salon or at home, guided by step-by-step instructions for beginners.
Characteristics of shellac
Shellac is a natural product found in nature. This is a resin produced by subtropical and tropical insects used in the creation of various varnishes, in photography. The product is environmentally friendly, hypoallergenic, it does not contain formaldehyde and toluene.
Shellac - a popular manicure today
First this component, in the production of products for natural nails, began to use the company CND, which developed a unique product that performs the functions of gel and varnish.
The product quickly gained popularity among women on maternity leave, business women, travelers, all those who once had their nails repainted every two or three days.
Features of shellac
So beloved female manicure is characterized by such features:
- The ability of this coating to stay on the nail plate for 2 to 3 weeks. This figure depends on the condition of the nails themselves: the harder and stronger they are, the longer shellac lasts.
- The technique of applying the product is drying all its layers in a special lamp emitting UV rays. Typically, such a manicure is done by a professional, but you can use shellac at home, for beginners - a step-by-step guide that will help you find the right tools and instruments.
 The undeniable advantage of shellac is its durability
 Advantages and disadvantages of gel polish
This product has its positive and negative features that must be considered before applying. Among benefits of shellac worth noting the following:
- It creates a long, durable manicure, which can be erased only with the help of a professional tool, therefore, he is not afraid of various chemicals used in everyday life.
- It is harmless to nails, as it is made from resin of natural origin, it does not contain substances harmful to the nail plate (formaldehyde and toluene). Therefore, this coating is suitable for pregnant or allergic women.
- It protects the nails from splitting, cracking, allows you to make the nail plate stronger, grow it.
- A diverse color palette (more than 100 shades) allows you to create a manicure for any occasion, combine different colors, make beautiful, unusual drawings. Such a manicure will always be unique, can only be limited by the imagination of a woman.
- Shellac is easy to clean at home with a special agent or film. For beginners, there is a step by step instruction that allows you to remove the coating without harm to the nails.
 One of the disadvantages of shellac is its high price.
 Despite the presence of a large number of advantages, gel polish has its drawbacksamong which it is necessary to name the following:
- Shellac creates a suitable environment for the development of bacteria leading to nail diseases. This is due to the fact that due to the change in temperature, the nail plate is subjected to various deformations, leading to a violation of the integrity of the coating. Through the cracks formed can penetrate water, dirt, creating good conditions for the development of microbes.
- Covering nails with shellac in the salon is a rather expensive procedure, and correction of the grown nail will be expensive. Applying gel varnish at home reduces the cost of the process, but requires skill in covering the nails with one hand, in addition, there is a need to purchase special equipment.
- Shellac is not a remedy, so it cannot completely solve the problem of weak and thin nails, moreover, it keeps on such a nail plate badly enough, it can begin to peel off after a few days.
You can not use the product for women suffering from nail fungus, fingers
What tools and instruments are needed
To create shellac at home it is recommended to purchase all the same tools and materials used in the cabin. None of the components can be replaced, it will allow beginners to create a beautiful manicure step by step. The list includes the following means and materials:
 Set for shellac at home
 - rigid nail file (220–240 grit), manicure forceps, scapula, orange stick, bafik;
- cuticle remover;
- brush for brushing dust from nails;
- degreaser;
- lamp with UV rays (36 watts);
- shellac - base, tone, top;
- the napkins which are not leaving villus;
- means for removing the sticky layer.
By choosing materials and tools, it is recommended to give preference to the most well-known and proven firms.so that the result only pleased, did not become a disappointment.
Preparation of nails for applying shellac
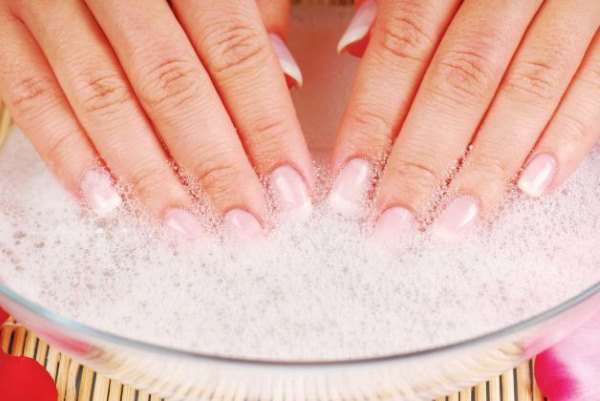
To cover well lay on the nails, you must first prepare them. note that gel polish manicure consists of the usual and specific procedures:
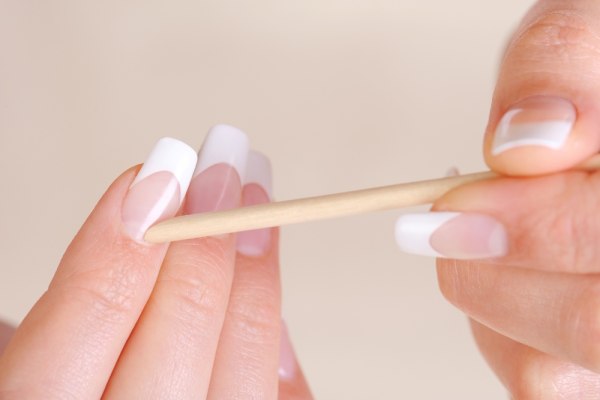 If the cuticle has not grown much, you can simply push back the orange of the baton
 - Cuticle processing: carried out in various ways, depending on how much it has grown. Before its removal, it is necessary to make a bath that will soften the cuticle and make it easy to clean. If she has not grown much, it is enough to push her orange stick. For a more overgrown cuticle, it is better to use a special oil or nail forceps.
- Processing of nails: it is necessary to give an equal shape to the nails, process them with a buff for better grip with the coating. Clean hands from dust with a brush.
Processing the nail plate with a degreaser is a very important step in preparing for a manicure.
Especially well to clean the sides of the nails with a degreaser.
After applying this tool to the nails can not be touched, otherwise the gel polish is badly bonded to the base. Degreaser can be replaced with alcohol wipes, but it is believed that they can affect the quality of the coating is not for the better.
Shellac at home: step-by-step instructions for beginners
Beautiful manicure can be done not only in the salon. Easy to apply shellac at home. For beginners, a step-by-step guide will help you learn how to apply one color of gel polish, when this skill is fixed, you can try other designs.
The following instruction will help to master the technique of applying shellac:
- Apply a base coat that protects the nail plate. To make the layer not too thick, you need to know the rules for applying the base (this rule also applies to applying other coatings): first, the edges of the nail are painted, then only the middle, the final touch is to seal the tip of the nail, so the layers will hold better. Drying the nails in a UV or LED lamp, the time in the first should be one minute, in the second 12 seconds.
 After treatment of the cuticle, the base coat is applied on the nails.
 - The main coating is applied according to the same rule as the base coat, however, it is not necessary to paint over the tips. The shellac layer should be as thin as possible. Advice from professionals: before applying the product, it is recommended to roll the bottle several times in the palms for better distribution of the pigment.
- Drying the color layer in the lamp, drying time 1-2 minutes. If during drying the gel varnish is swollen, then the whole process must be started from the beginning, with degreasing.
- The application of the second layer of the base, which will allow you to create a brighter and more saturated color, if you need a translucent effect, you can skip this item. The second coat should be slightly thicker than the first.
- Drying with UV light for 2 minutes.
- The finishing or top means is put with the thickest layer. The last layer is dried in the same way as the previous one - 2 minutes.
- Removing the formed sticky layer with a lint-free napkin and a professional tool, you can use alcohol, but it can deprive the shellac of its gloss and shine.
It is important to understand that such a step-by-step instruction for applying shellac at home is quite simple, but for beginners it can be quite difficult. You should not worry if it does not work out right away, with time the skill will definitely come.
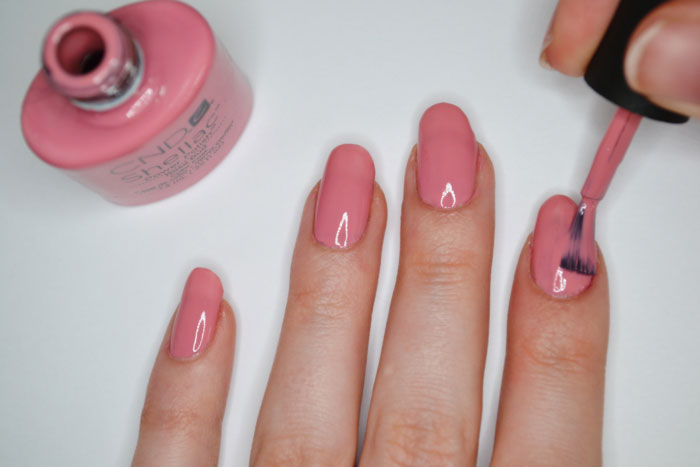
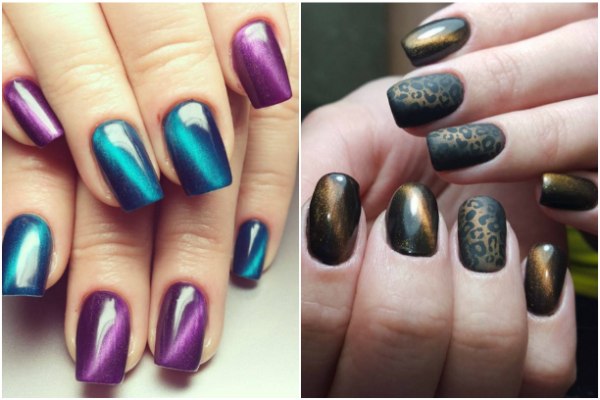 Manicure "Cat's Eye" - a popular trend in nail design today
 How to make a fashionable shellac "Cat's eye"
This season's popular manicure is “Cat's Eye”, which got its name because of its similarity to the stone of the same name. These nails look very nice and noble. You can create a cat's eye manicure at home, because the secret is in a special magnet.
For this design, you will need the same tools as with conventional gel polish, the difference will be in shellac itself - you need to buy a special magnetic tool in the set with which the magnet comes.
The process of creating a fashion manicure consists of the following steps:
- Preparation of the nail plate and cuticle.
- Nail treatment with a degreaser.
- Drawing the basic leveling covering, drying it in a lamp.
- Covering one nail with a colored layer of shellac, drying it in the lamp.
- Applying a second color layer on the same nail plate.
- Creating a design with the help of a magnet, for this purpose it is brought to the painted surface so as not to touch it (about 3 mm from the nail). It is recommended to hold the magnet for 5–10 seconds, during this period the necessary pattern is created. Drying the nail in the lamp.
- Drawing a finishing covering, drying.
- Removal of the formed sticky layer.
This technology handles all other nails. To make the manicure sparkle even more, you can additionally decorate it with rhinestones.
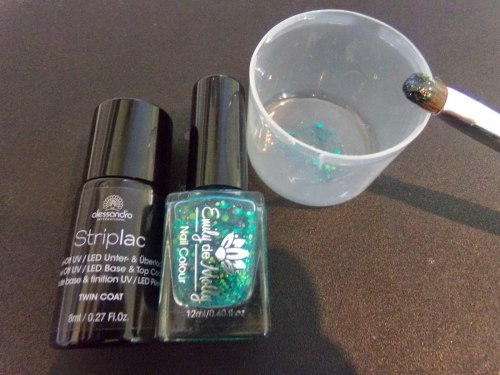 To make the sequined shellac uniform, pre-mix the gel polish with the sequins
 Secrets of using shellac at home
Make nails beautiful is not so easy, if you use shellac at home. For beginners, step-by-step instructions may not be enough, for the reason that they do not know some of the secrets that are available to professionals. To get the desired result, experts recommend the following:
- For even and even distribution of the sparkles on the nails, it is necessary to mix them with a small amount of gel polish, mix everything well and only then apply the sequins with a second layer on the nail plate.
- For the best result, it is recommended to apply the shellac with a thin layer, while it is not necessary to paint over the cuticle, otherwise the look of the manicure will be inaccurate.
- To create a French manicure, you should not use a stencil, because after drying it can not be removed, and if removed from a wet coating, the border will spread.
- When using shellac as a build-up, there is no need to completely cut off the nail plate, just polishing it a little.
Rules for removing gel polish from nails
The use of shellac at home implies not only correct application, but also requires knowledge of how to remove gel polish. It does not help the usual nail polish remover, you need to use professional tools, in addition, it is important to know the procedure itself, which consists of certain step-by-step recommendations for beginners.
To remove gel polish, you need to prepare five disks of cotton wool, cut into two parts, ten squares of foil, the size of which should be able to wrap a finger, a special tool, orange sticks and bafik.
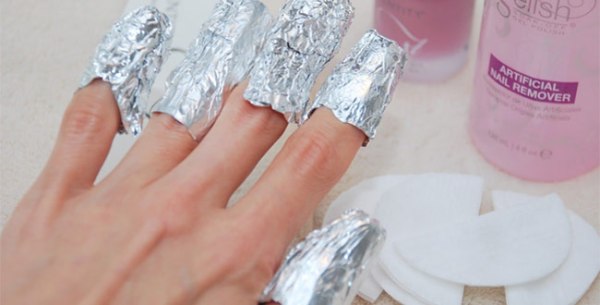 To remove shellac at home, you need a foil
 The procedure for removing shellac includes the following steps:
- Discs should be wetted with a gel-polish remover attached to the nail plates.
- Wrap each nail with a disc with foil, leave for 5-7 minutes.
- Remove everything from your fingers, remove leftovers from the orange stick.
- If the shellac is poorly removed, it is recommended to hold the soaked cotton wool a little more or rub it slightly.
- Treat the nails with a buff to permanently remove the gel polish.
- Make a relaxing bath, rub any care product for hands and nails.
solvents and their analogues cannot be used to remove shellac
Thus, you can independently make shellac at home. For beginners, the step by step guide will help comprehend the intricacies of this process, learn the secrets of professionals, create a beautiful and original manicure on their nails.
Beauty to you and your nails.
Step-by-step video on how to make shellac at home:
Useful video about shellac at home:
Video, which reveals the causes of shellac instability:
