Japanese crochet. Rugs of rings. Japanese knitting. Crocheted rugs
Japanese crochet very original and interesting. Japanese craftswomen are such inventors! And things made by the technology of Japanese crochet extraordinarily beautiful.
Good day!
Today I want to talk about new ideas of Japanese knitted rugs, namely, crocheted round rugs with an interesting unusual mix of parts - from rings.
What do I like this mat - the fact that it is possible to use remnants of different yarn for it, it is only desirable to choose matching colors. The hook number is equivalent to the thickness of the yarn.
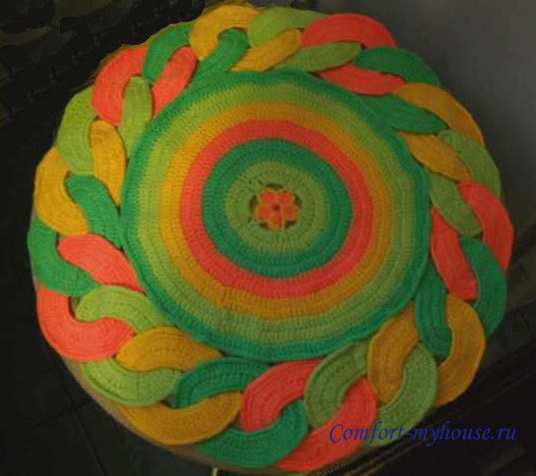
Cheerful rug from rings
Cheerful bright rug
The photo below is linked by Elena R. Elena knitted a rug with crochets.
I suggest for knitting rug scheme from Japanese magazines.

Round part of the rug knit with columns with two naquids (C2H). First, we collect a chain of 6VP, close it into a ringlet and tie it to the C2H family (at the beginning of a 3VP row for lifting).
2nd row: 5 unfinished C2H stitched together (or lush columns), 3VP between them. (I think that the number of VP may be less depending on the thickness of the yarn).
3rd and 4th rows: two columns of 4 unfinished C2H, tied together, under the EAP of the previous row.
5th row: knit a chain of VP, attaching it with semi-columns to the previous row.
Each row can be tied with different color yarns, and one can also be made, and the rings around the rug's circle can be colored.
Rings You can knit any size. For the first ringlet, we assemble a chain from the VP, connect the first and last loops with a semi-column (the length of the chain depends on the required diameter of the ringlet), we tie up the C2H ringlet.
We knit the second ring as follows: type a chain from the VP, pull it under the first ring and connect the first and last loops with a half-column, as shown in the diagram. Thus, both little rings are connected to each other. We tie the second ring C2H.
Again, we pick up the chain of VP, stretch it through the second ringlet, connect it in a circle, tie C2H and so on. The last ring is connected to the penultimate and first.


You can knit, connecting, all rings, and then sew them to the central circle of the rug. But a better product will turn out, if the rings in the knitting process are immediately gradually (knitting each) attached to the central circle.
Well, nice round mat ready!
Japanese crochet surprises with its simplicity and the resulting chic products.
Original Japanese rug
Another very beautiful original round japanese rug made according to the technology described above from the ringlets.

I think that such a rug need to knit from very thick yarn hook number 6-8, otherwise the desired effect will not work.
Top of the rug made of 9 rings of different colors, connected as described above (the diameter of the ring will determine the diameter of the rug: i.e. the diameter of the rug is twice the diameter of the ring) It is possible for the sample to link one ring and determine the size of the rug.
For the ringlet you need to dial a chain of VP of the required length, tie up with b / n posts.
2nd row: two unfinished double crochets tied together.
3rd row: also two unfinished double crochets, knitted together, with one air loop between them.
4th row: b / n columns
When all the rings are connected, you need to tie up the entire upper part of the rug with single crochet columns.


Bottom of the rug we knit according to the scheme with columns with two naquids, and in the last row to obtain a wavy edge, columns with two naquids, columns with one quilt, columns without a nakida and in the reverse order.
The basis for the rug can be sewn from a dense fabric - tapestry, burlap.
To the bottom of the rug sew the top and wonderful ready!
I will surely knit myself such a bedside rug, or even three, but in the meantime I began to knit another, well, oh-oh-ry beautiful rug according to Japanese technology. When I finish work, I will tell you necessarily.
The described technology japanese crochet Weaving the little rings can be used for other not only round, but also square and rectangular products such as, for example, in the photo below, and you can even knit a very beautiful napkin made of little rings.

As you can see, knitting Japanese rugs is not at all difficult. The main thing, it seems to me, in them is to choose the right color combination of yarn. Then they will not look coarse, they will be stylish and modern and they will be able to remarkably update and decorate your interior.
P.S. I still found the time and knitted such a rug of rings.
Used 4-fold wool blend yarn and hook No. 8.
The consumption of yarn is 200 grams of beige and mustard and 250 grams of brown.
For knitting rings gained 50 air loops.
The finished rug turned out to be 80 cm in diameter.
The base I made from a piece of tapestry.


How to knit Japanese square rug. Master class: text guide with step by step photos.
Used a wool blend of cream, blue and black colors, hook number 2.
Knitting begins with rings. All you need to tie four rings.
For the first round, she gained 90 air loops of cream-colored yarn and locked them into a ring. The number of loops picked up experimentally: so that the diameter of the ring was two times less than the required width of the rug.
Tied the ring with four rows of single crochet columns under the back wall of the loop. Another row I knitted yarn black.
The next ring should be connected to the first, and the third to the second. To do this, a chain of air loops is brought under the first circle, and then connected.

Pay attention to how to correctly connect the last fourth circle with the third and first (see diagram). I first made a mistake in this place, because of which further knitting went wrong. I also advise you, tying three circles together, to lay out the product on a flat surface, for example, on a stool, and continue to knit, trying not to disturb this “construction”, otherwise it is very difficult to straighten the interlaced and entangled circles.


Ready and assembled in the ring rings turned the seamy side up. I like this picture better and correspond to the original photo on a rug from a Japanese magazine.
Now we start knitting inside each circle.
I laid out the four-circle blank on a foam mat and pinned it to it. When at the first knitting attempt I did not do it, the rug was distorted, the circles turned into ovals, and it became clear only when I got to knitting the middle of the last lap.
Knitting rug had to start again.
So, to knit the middle part inside the circle, we attach a thread of blue color to the first circle on the left side, type 3 air loops and attach it to the other circle on the right side with a semi-column. Pull the thread through the next loop of the circle.
Now we knit four columns with two naquids from the right to the left in the first row, add a semi-column to the left circle, stretch it through the next loop of the circle. Perhaps it would be more interesting to look like a rug, the middle part of which is to tie a pattern of popcorn.


We knit a chain of 5 VP, attach it to the right circle, stretch the thread through the next loop and knit in the second row two 4C2H times:
A hook is inserted between a pair of columns of the previous row and pulling the thread, grabbing a chain of air loops. Thus, in the process of all knitting the chains from the VP will be inside the posts. We attach the thread to the left circle, stretch it through the next loop.
Chain of 9 VP. A longer chain is also possible. It should be such that evenly, without tension, lay above the columns of the previous row. Knit three groups of 4С2Н (grabbing the chain).
A chain of 15 VP, five groups of 4С2Н. Places to enter the hook when knitting each group determined according to the scheme.
We attach a thread of cream color, knit a chain of 21VP and seven groups of 4С2Н. In the middle part of the loop, you need to pull it longer than at the edges, so that the arc from the posts is parallel to the arc of the upper part of the circle.


We attach the thread of black color, knit a chain of 30VP and 10 groups of 4С2Н.
At the same time, we connect the columns with the upper part of the circle: we knit two columns with 2 nakida, we insert a hook into the loop of the upper part of the circle, stretch the thread through it, continue to knit the next two columns with two nakida.
Similarly, knit the middle of the remaining circles.

The rug can be squared, tied with black yarn with single crochet columns, with a single crochet, and with two and three crochets in the corners and between the circles.
Tie the last row "rachim step."
You can crochet larger floor mats from thicker yarns or knit a simple square base and sew it to the top.
You can apply different ideas and approaches to knitting a rug.
Japanese crochet very original and interesting. Japanese craftswomen are such inventors! And things made by the technology of Japanese crochet extraordinarily beautiful.
Today I want to talk about new ideas of Japanese knitted rugs, namely, crocheted round rugs with an interesting unusual mix of parts - from rings.
What do I like this mat - the fact that it is possible to use remnants of different yarn for it, it is only desirable to choose matching colors. The hook number is equivalent to the thickness of the yarn.
Japanese crochet. Floor mats
Cheerful rug from rings
Cheerful bright rug
The photo below is linked by Elena R., a member of the knitting group. Elena knitted a rug with single crochets.
I suggest for knitting rug scheme from Japanese magazines.
Round part of the rug knit with columns with two naquids (C2H). First, we collect a chain of 6VP, close it into a ringlet and tie it to the C2H family (at the beginning of a 3VP row for lifting).
2nd row: 5 unfinished C2H stitched together (or lush columns), 3VP between them. (I think that the number of VP may be less depending on the thickness of the yarn).
3rd and 4th rows: two columns of 4 unfinished C2H, tied together, under the EAP of the previous row.
5th row: knit a chain of VP, attaching it with semi-columns to the previous row.
Each row can be tied with different color yarns, and one can also be made, and the rings around the rug's circle can be colored.
Rings You can knit any size. For the first ringlet, we assemble a chain from the VP, connect the first and last loops with a semi-column (the length of the chain depends on the required diameter of the ringlet), we tie up the C2H ringlet.
We knit the second ring as follows: type a chain from the VP, pull it under the first ring and connect the first and last loops with a half-column, as shown in the diagram. Thus, both little rings are connected to each other. We tie the second ring C2H.
Again, we pick up the chain of VP, stretch it through the second ringlet, connect it in a circle, tie C2H and so on. The last ring is connected to the penultimate and first.
You can knit, connecting, all rings, and then sew them to the central circle of the rug. But a better product will turn out, if the rings in the knitting process are immediately gradually (knitting each) attached to the central circle.
Well, nice round mat ready!
Japanese crochet surprises with its simplicity and the resulting chic products.
Original Japanese rug
Another very beautiful original round japanese rug made according to the technology described above from the ringlets.
I think that such a rug need to knit from very thick yarn hook number 6-8, otherwise the desired effect will not work.
Top of the rug made of 9 rings of different colors, connected as described above (the diameter of the ring will determine the diameter of the rug: i.e. the diameter of the rug is twice the diameter of the ring) It is possible for the sample to link one ring and determine the size of the rug.
For the ringlet you need to dial a chain of VP of the required length, tie up with b / n posts.
2nd row: two unfinished double crochets tied together.
3rd row: also two unfinished double crochets, knitted together, with one air loop between them.
4th row: b / n columns
When all the rings are connected, you need to tie up the entire upper part of the rug with single crochet columns.
Bottom of the rug we knit according to the scheme with columns with two naquids, and in the last row to obtain a wavy edge, columns with two naquids, columns with one quilt, columns without a nakida and in the reverse order.
The basis for the rug can be sewn from a dense fabric - tapestry, burlap.
To the bottom of the rug sew the top and wonderful ready!
The described technology japanese crochet Weaving the little rings can be used for other not only round, but also square and rectangular products such as, for example, in the photo below, and you can even knit a very beautiful napkin made of little rings.
As you can see, knitting Japanese rugs is not at all difficult. The main thing, it seems to me, in them is to choose the right color combination of yarn. Then they will not look coarse, they will be stylish and modern and they will be able to remarkably update and decorate your interior.
P.S. I still found the time and knitted such a rug of rings.
Used 4-fold wool blend yarn and hook No. 8.
The consumption of yarn is 200 grams of beige and mustard and 250 grams of brown.
For knitting rings gained 50 air loops.
The finished rug turned out to be 80 cm in diameter.
The base I made from a piece of tapestry.
Very original and interesting. Japanese craftswomen are such inventors! And things made by the technology of Japanese crochet extraordinarily beautiful.
Good day!
Today I want to talk about the new ideas crocheted rugs, namely about knitting round rugs with an interesting unusual mix of parts - from rings.
What do I like this mat - the fact that it is possible to use remnants of different yarn for it, it is only desirable to choose matching colors. The hook number is equivalent to the thickness of the yarn.
Cheerful rug from rings
Cheerful bright rug The photo below is linked by Elena Rebrova, a member of the knitting group. Elena knitted a rug with single crochets.
I suggest for knitting rug scheme from Japanese magazines.
Round part of the rug knit with columns with two naquids (C2H). First, we collect a chain of 6VP, close it into a ringlet and tie it to the C2H family (at the beginning of a 3VP row for lifting).
2nd row: 5 unfinished C2H stitched together (or lush columns), 3VP between them. (I think that the number of VP may be less depending on the thickness of the yarn).
3rd and 4th rows: two columns of 4 unfinished C2H, tied together, under the EAP of the previous row.
5th row: knit a chain of VP, attaching it with semi-columns to the previous row.
Each row can be tied with different color yarns, and one can also be made, and the rings around the rug's circle can be colored.
Rings You can knit any size. For the first ringlet, we assemble a chain from the VP, connect the first and last loops with a semi-column (the length of the chain depends on the required diameter of the ringlet), we tie up the C2H ringlet.
We knit the second ring as follows: type a chain from the VP, pull it under the first ring and connect the first and last loops with a half-column, as shown in the diagram. Thus, both little rings are connected to each other. We tie the second ring C2H.
Again, we pick up the chain of VP, stretch it through the second ringlet, connect it in a circle, tie C2H and so on. The last ring is connected to the penultimate and first.
You can knit, connecting, all rings, and then sew them to the central circle of the rug. But a better product will turn out, if the rings in the knitting process are immediately gradually (knitting each) attached to the central circle.
Well, nice round mat ready!
surprise with their simplicity and the resulting luxurious products.
Japanese crocheted rug
Another very beautiful original japanese rug made by the above technology of the rings.
I think that such a rug need to knit from very thick yarn hook number 6-8, otherwise the desired effect will not work.
Top of the rug made of 9 rings of different colors, connected as described above (the diameter of the ring will determine the diameter of the rug: i.e. the diameter of the rug is twice the diameter of the ring) It is possible for the sample to link one ring and determine the size of the rug.
For the ringlet you need to dial a chain of VP of the required length, tie up with columns without a nakida.
2nd row: two unfinished double crochets tied together.
3rd row: also two unfinished double crochets, knitted together, with one air loop between them.
4th row: b / n columns
When all the rings are connected, you need to tie up the entire upper part of the rug with single crochet columns.
Bottom of the rug we knit according to the scheme with columns with two naquids, and in the last row to obtain a wavy edge, columns with two naquids, columns with one quilt, columns without a nakida and in the reverse order.
The basis for the rug can be sewn from a dense fabric - tapestry, burlap.
To the bottom of the rug sew the top and wonderful japanese rug ready!
Described knitting technology japanese crocheted rugs by interweaving the rings, you can use it for other not only round, but also square and rectangular products, such as in the photo below, and you can even knit a very beautiful napkin made of ringlets.
As you can see, knitting is not difficult at all. The main thing, it seems to me, in them is to choose the right color combination of yarn. Then they will not look coarse, they will be stylish and modern and they will be able to remarkably update and decorate your interior.
P.S. I still found the time and knitted such a rug of rings.
Used 4-fold wool blend yarn and hook No. 8.
The consumption of yarn is 200 grams of beige and mustard and 250 grams of brown.
For knitting rings gained 50 air loops.
The finished rug turned out to be 80 cm in diameter.
The base I made from a piece of tapestry.
Knitting rug turned out to be not so simple. In the Japanese journal, from which I took this scheme, there was no explanation. I had to dissolve my product several times and, having broken my head, start all over again.
And now, finally, my original mat ready and now I can already tell you how it to tie.
I took the wool, cream, blue and black yarn, hook number 2. You can use leftover yarn.
At first I typed 90 airy loops of cream colored yarn and locked them in a ring. The number of loops picked up experimentally: so that the diameter of the ring was two times less than the required width of the rug.
Bound a circle four rows of purl without crochet (we introduce the hook under the back wall of the loop).
Another row I knitted yarn black.
The next circle should be connected to the first, and the third to the second. For this chain of air loops sum up under the first circleand then we connect. I told about such knitting in the article Round Japanese rugs.
All you need to connect four circles. note on how to correctly connect the last fourth circle with the third and first (see diagram). I first made a mistake in this place, because of which further knitting went wrong. I also advise you, tying three circles together, to lay out the product on a flat surface, for example, on a stool, and continue to knit, trying not to disturb this “construction”, otherwise it is very difficult to straighten the interlaced and entangled circles.
Connected four laps i turned the wrong side up. I like this picture better and correspond to the original photo on a rug from a Japanese magazine.
Now proceed to knitting inside each circle .
I laid out the four-circle blank on a foam mat and pinned it to it. When at the first knitting attempt I did not do it, the rug was distorted, the circles turned into ovals, and it became clear only when I got to knitting the middle of the last lap. I had to start all over again.
- So, for knitting the middle part inside the circle, we attach a thread of blue color to the first circle from the left side, we collect 3 air loops and we connect to another circle on the right side with a semi-column. Pull the thread through the next loop of the circle.
Now we knit four columns with two naquids from the right to the left in the first row, add a semi-column to the left circle, stretch the circle through the next loop.
- We knit a chain of 5 VP, attach it to the right circle, stretch the thread through the next loop and knit in the second row two 4C2H times:
A hook is inserted between a pair of columns of the previous row and pulling the thread, grabbing a chain of air loops. Thus, in the process of all knitting the chains from the VP will be inside the posts. We attach the thread to the left circle, stretch it through the next loop. - Chain of 9 VP. A longer chain is also possible. It should be such that evenly, without tension, lay above the columns of the previous row. Knit three groups of 4С2Н (grabbing the chain).
- A chain of 15 VP, five groups of 4С2Н. Places to enter the hook when knitting each group determined according to the scheme.
- We attach a thread of cream color, knit a chain of 21VP and seven groups of 4С2Н. In the middle part of the loop, you need to pull it longer than at the edges, so that the arc from the posts is parallel to the arc of the upper part of the circle.
- We attach the thread of black color, knit a chain of 30VP and 10 groups of 4С2Н.
At the same time, we connect the columns with the upper part of the circle: we knit two columns with 2 nakida, we insert a hook into the loop of the upper part of the circle, stretch the thread through it, continue to knit the next two columns with two nakida.
Similarly, knit the middle of the remaining circles.
In this way, knitting rug completed! And the rug turned out nice, and most importantly - original.
I want to note that black color very beautifully frames and emphasizes each element of the rug. I noticed this in a photo of a round Japanese rug. And before that, I thought that black was dark. It will be necessary to read the material about the black color, what psychologists and designers say about this.
Our rug can be given square shape, wrapped in black yarn with single crochet columns, with one nakida and, with two and three nakida in the corners and in the intervals between the circles. (Like knitting squares with hearts).
If the last row to tie we pitch I think it will be especially beautiful!
Such knitted rugs can decorate chairs or stools and make your kitchen or veranda cozy.
Can be crocheted floor mats larger size of thicker yarn or knit a simple square base and sew to the top.
What do I like this mat - the fact that it is possible to use remnants of different yarn for it, it is only desirable to choose matching colors. The hook number is equivalent to the thickness of the yarn.
Cheerful bright rug The photo below is linked by Elena R., a member of the knitting group. Elena knitted a rug with single crochets.
I suggest for knitting rug scheme from Japanese magazines.
Round part of the rug knit with columns with two naquids (C2H). First, we collect a chain of 6VP, close it into a ringlet and tie it to the C2H family (at the beginning of a 3VP row for lifting).
2nd row: 5 unfinished C2H stitched together (or lush columns), 3VP between them. (I think that the number of VP may be less depending on the thickness of the yarn).
3rd and 4th rows: two columns of 4 unfinished C2H, tied together, under the EAP of the previous row.
5th row: knit a chain of VP, attaching it with semi-columns to the previous row.
Each row can be tied with different color yarns, and one can also be made, and the rings around the rug's circle can be colored.
Rings You can knit any size. For the first ringlet, we assemble a chain from the VP, connect the first and last loops with a semi-column (the length of the chain depends on the required diameter of the ringlet), we tie up the C2H ringlet.
We knit the second ring as follows: type a chain from the VP, pull it under the first ring and connect the first and last loops with a half-column, as shown in the diagram. Thus, both little rings are connected to each other. We tie the second ring C2H.
Again, we pick up the chain of VP, stretch it through the second ringlet, connect it in a circle, tie C2H and so on. The last ring is connected to the penultimate and first.
You can knit, connecting, all rings, and then sew them to the central circle of the rug. But a better product will turn out, if the rings in the knitting process are immediately gradually (knitting each) attached to the central circle.
Well, nice round mat ready!
Another very beautiful original round japanese rug made by the same technology.
I think that such a rug need to knit from very thick yarn hook number 6, otherwise it will not work the desired effect.
Top of the rug made of 9 rings of different colors, connected as described above (the diameter of the ring will determine the diameter of the rug: i.e. the diameter of the rug is twice the diameter of the ring) It is possible for the sample to link one ring and determine the size of the rug.
For the ringlet you need to dial a chain of VP of the required length, tie up with b / n posts.
2nd and 3rd rows: two unfinished double crochets tied together.
4th row: b / n columns
