Fishing Bay loyalty. Fishing Bay: Tactical Overview
This map is a good combination of open space and rough terrain. The narrow winding streets of the port city, located on the flank, will help to unexpectedly gain an advantage. Gentle hills with numerous bushes will make extensive use of ambush tactics. The map was added in update 0.6.7. Name in the battle record file: fishing_bay.
Tactics
The game location is conventionally divided into three zones: the alley (Zelenka), the village (center) and the city (port). Alley is an open area on the west of the map. Differential relief makes it unsuitable for heavy tanks. Slow technique will be detected at a great distance and shot before it can come close. Therefore, the classic route of a heavy tank runs through the city, located near the water in the east. Urban buildings provide reliable shelter and the ability to get to the enemy base without falling under artillery fire. In the center of the map on a hill is a village. The buildings here are also very strong and withstand ACS projectiles. However, the position itself is very vulnerable to flank fire.
Light tanks (LT)
Light tanks can break into the enemy base in any of the possible directions. Classic example is the light from the village in the center. An alternative tactic is the "passive light" on the alley.
Medium tanks (ST)
Medium tanks are distributed on the map, depending on the preferences of the players. This is usually an alley and a village, but if the player is more accustomed to urban combat, he can send his tank to the city. At the first stage of the battle, the STs are engaged in the interception of light tanks and occupy key positions. Then they fight in the middle and long distances. At the end of the battle, the surviving ST mobilized to break through the emerging gaps in the enemy defenses.
Heavy tanks (TT)
Heavy tanks traditionally collide in the city. Individual cars can go to the alley.
Anti-Tank Self-Propelled Artillery Units (PT SAU)
PT SAU protect approaches to the base. Mostly they concentrate on the hill and near the church on both sides of the lowland on the alley. In case of successful advance of the Allies, the tank destroyer can move to the center. From there, in their sector of fire is most of the map.
Self-propelled artillery mounts (SAU)
ACS are usually located on a hill or outside the city, on the very edge of the map. Large slow ACSs have a very high probability of being detected in the first seconds of combat, so it is important to leave the open zone at the base as soon as possible.
Standard fight Legend
Information:
- Card Type: Summer;
- Dimensions: 1,000 × 1,000 m;
- Battle Levels: 4 - 11;
- Battle Mode: Standard fight.
- Record mode: Fishing_bay.
Description:
Map of Fisherman's Bay represents open space and rugged terrain. The winding streets of the city port, which is located on the flank, allow you to gain an advantage in battle. Gentle hills with dense vegetation allow the use of ambush tactics. Therefore, the game location is suitable for any type of technology.
Tactics in standard combat:
The game location can be divided into three zones: the alley (Zelenka), the village (center) and the city (port). The alley is an open area located on the west of the map. The differences in the terrain do not allow an effective route to be laid for heavy tanks, since a slow, large vehicle will be discovered at a great distance and destroyed before it can get closer. Therefore, heavy tanks are sent to the city, which is located on the eastern part of the map near the water. City buildings allow you to hide from enemy fire and provide an opportunity to reach the enemy base. In the center of the map on a hill is a village. The buildings are able to withstand artillery shots, but this position is very vulnerable from the flanks.
|
Light tanks (LT):Light tanks can reach the enemy base in any possible direction. Most often at the beginning of the battle LT are sent to the detection of the enemy in the village in the center. From this zone, you can detect opponents that are distributed along the flanks. The second is capable of “passive light” from the alley, but such detection is extremely ineffective for battle. Therefore, the light tank is to get to the height of the enemy, so that the allied tanks could destroy the enemy according to your intelligence. |
|
Medium tanks (ST):Medium tanks are mainly divided into two areas: the avenue and the city. Usually choose the alley, but if the usual urban battles, you can go there. Their first task is to destroy light tanks and occupy key positions. Next comes the battle at medium and long distances. At the end of the battle, the STs find gaps in the enemy's defenses and make a breakthrough. |
|
Heavy tanks (TT):Heavy tanks are sent to the city, where protracted battles take place near the bay. Some heavy tanks are sent to the alley, but this is very dangerous, since there is a great chance of being destroyed by artillery. |
|
Anti-Tank Self-Propelled Artillery Units (PT-SAU):Anti-tank self-propelled guns mainly protect the approaches to the base. Basically, they occupy positions at the beginning of the alley, from which you can control half of the map, and if the allies lose the city there may not be allowed to capture the base. You can also go to support heavy tanks in the city and take a position near the church or around the corner of the building. Dangerous but effective is the occupation of the center of the map, where it is possible to sweep both flank. |
|
Self-propelled artillery installations (SAU):Artillery often takes positions on the edge of the map. Large-sized self-propelled guns have a great chance of being detected at the beginning of the battle, therefore they need to leave the open area as quickly as possible. |


Screenshots Gallery:


Video guide:
Greetings to you, dear lovers of tank battles of the world World Of Tanks! Today you will be introduced to our portal. site with card Fishing bay. We will try to consider this location from all sides and explain to you how to play here.
General information.
Map wot Fishing Bay in every sense of the standard: the size of a square kilometer, the levels of battles 4 - 11, the type of card - summer. The relief of the map is also very complex and includes absolutely all types of terrain that are found in our game - this is both urban development, and strong elevation differences, and a body of water, and forest tracts. Fishing Bay is in the game with patch 0.6.7.

Picture 1. Minimap.
On Fisherman's Bay in the classics of the genre is two main areas through which it is possible to develop an attack, as well as one auxiliary for supporting allies, highlighting, base defense and so on.
Consider the key elements of the map that you need to know to skillfully use the minimap and take the right actions in battle.

Picture 2. Legend.
- "Zelenka" or the left flank. The first direction to attack, as well as the most important position for def. This direction is for fast and maneuverable tanks, which are able to get here at the beginning of a battle and take comfortable positions. Among the multitude of random players, it is mistakenly believed that only a team of the top base can attack on Zelenka, but in fact this is not the case. The fact is that in this direction there are equally comfortable positions for both teams - these are big stones, and the way to them is approximately equivalent. The stones indicated by the number 1 are the positions that the bottom base team needs to take (however, as a rule, the bottom team ignores this direction and prefers to stand in the def of behind the green stuff), the stones indicated by the number 2 are the positions for the top base team (and This is the command that will never leave this direction empty and always tucked under the stones). The main clash here should occur between the stones and those tanks that will survive here will subsequently have a strong influence on the outcome of the battle. From these stones it is very easy to develop an attack, and most likely the team that has seized these critical positions will eventually push the green light. It is worth noting that the team of the lower base, after pressing under their stones, clean the direction much easier. In addition, you should know that behind the "Zelenka" surely there are several PT-ACS, which are a stronghold of the base's defense, since from these positions it is very convenient to defend the approaches to the base. And this means that pushing the city, but not capturing the “brilliant green” your team will have less chances. Incidentally, earlier (a couple of years ago) they played quite correctly on this map - both teams went to Zelenka and fought there, and the situation when the lower team leaves attempts to attack this direction began to occur only recently and it is extremely wrong!
- District top base. Immediately located team respawns. The terrain is extremely difficult, hilly. There are several shelter stones, as well as bushes. Houses on the right and left are excellent positions for def. It is extremely difficult to attack from the side of the city, since your path will pass a little upwards and defenders of the base will shoot you even on the approaches.
- Center card. This is an auxiliary area that can only be used as a support. By and large, this is a city building located in the middle of the map, but it is impossible to use it in any attacking actions, since this part of the map is slightly higher relative to the rest of the map, and therefore you will definitely fall into the chamber from all sides. But the center also opens up very useful features: highlighting opponents (especially important at the beginning of the battlefield, to show the enemy’s way to the allies), shooting through almost the entire map (but it’s worth being careful not to return fire), and also an extremely important function of the center Fishing Bay wot - defense! The fact is that opponents attacking your base will certainly fall in the crossfire if your allies are located simultaneously in the center of the map and behind one of the flanks. It’s quite a difficult direction, you should always be alert and be able to look at the minimap, and therefore if you don’t have enough knowledge in our game, then you should go to fight on one of the flanks. The most important thing that you should know about this direction is that there is no place for tanks that do not have decent camouflage, and therefore only light or medium tanks will do.
- District bottom base. Virtually no different from the opposite base. The only significant difference affecting the gameplay is more difficult to defend here.
- City or right flank. Extremely difficult direction due to the lack of options to travel through it. There is only one road on which you can push in the city. The rest of the city, as elsewhere, is characterized by large houses located close to each other. Here is the best shelter from artillery and long-range lumbago on the map, which means it is ideal for heavy and armored tanks.
And now we will look at how to play the Fisherman's Bay map.
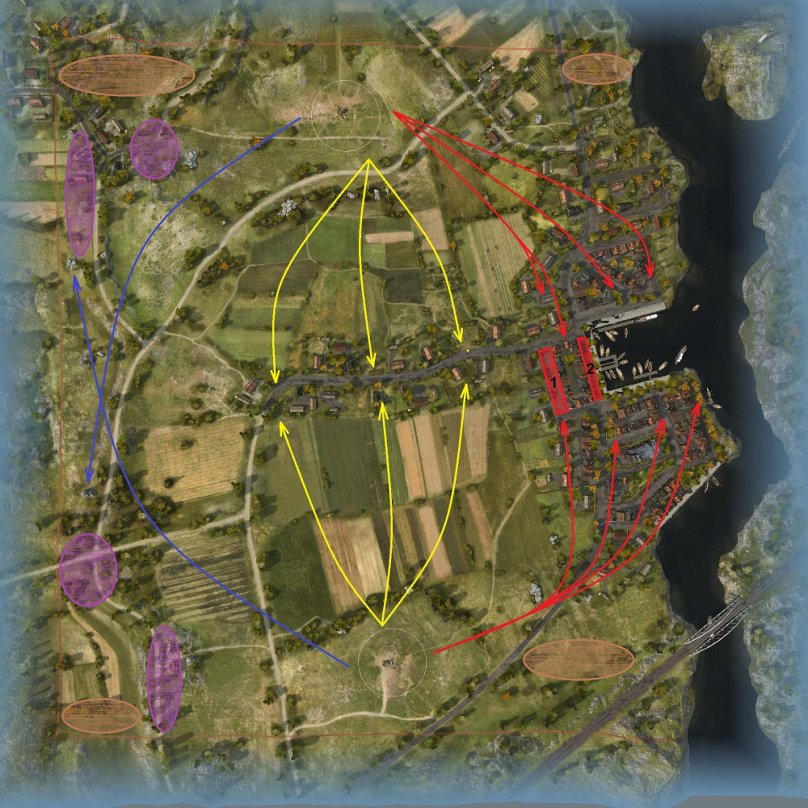
Picture 3. Directions and positions.
Above the image shows the main tactic on the map Fishing Bay wot. And I will try to explain to you now. So, on this map, as I said, there are two main directions and you need to occupy both of them (at least so that there are defenders), and there is one auxiliary direction - the center (you will never develop an attack through the center, do not ask for it, here you can only help and support).
- For artillery There are several successful, comfortable and, most importantly, hidden positions. They are indicated by brown areas. You should bear in mind that it is necessary to choose a position, relying on which Allied forces went to one flank or another. If medium tanks did not go to medium tanks or heavy tanks did not go to the city, then you should not take the corresponding positions. Be sure to keep in mind the position of forces on the minimap and leave on time from the abandoned flank.
- For PT-ACS Fisherman's Bay also has very successful and comfortable positions, which are highlighted in purple. From these positions, Zelenka is perfectly shot through, the center of the map, and also a great breakthrough from the city. However, you should not “take root” here. Support the team, follow the Allied forces, come to the rescue in time where it is needed.
- The first direction to attack is "Zelenka" It is shown in blue. It will feel comfortable here medium tanks. This is a very difficult direction. Usually, one or two tanks from the upper base go to a vigorous breakthrough, with the support of the PT-ACS behind, and the lower base team in full force take up the PT-SAU positions. This is fundamentally not the right tactic, which, as a rule, ends the same way: the top team gradually pushes through all the “brilliant green”, destroying enemies and gaining an advantage. In order to successfully fight in this direction on Rybatsky Bay, it is also necessary for the lower base team to go to Zelenka, pushing under a stone and destroying enemies. Play should be from the stone, highlighting the enemies. Only such a tactic can bring success. However, you should not hurry if you are not playing in a platoon or could not motivate random allies to support you, because you will surely die alone here. It is worth going, at least, together, with the support of the allies behind. Passing to the stone must be very fast and the shortest path. After one of the teams captures Zelenka, the other team will lose comfortable positions and the most important direction. This is a very important component of tactics.
- The second direction to attack is the city. shown in the picture above in red. The city here is different from the urban areas on the other maps in that it has two wide sections with many streets and driveways for each of the teams, but they are connected only by one road (number 2). This road can be safely called the “death road”, because the attempt of careless travel here will turn badly for you. This means that before traveling on this road, you need to carefully reduce opponents in another part of the city. Without this, even experienced platoon players can face trouble here. In addition to this road, in fact, there is one more (highlighted by the number 1), but it is even more dangerous to use it, since it is open for shooting from the center or the city, and for artillery fire.
- Medium and light tanks can choose the center of the map. Light tanks from the center (closer to the city) shine through enemies moving to the city, and medium tanks from here can manage to throw awkward heavyweights into the boards. After that, by and large, in the center of the map, battles take place only between those who came here. However, the team of the lower base here has a few comfortable lumbago around the city. Dear friends, I remind you that this is just an auxiliary line and it is worth going here only if there are enough allied forces on the flanks.
In custody.
At first glance, the wot's bay is quite balanced and should be interesting and cheerful, but in reality it turns out differently, it is flourishing, and vigorous breakthroughs, as a rule, end in failure. This is due to the fact that at this location there are not only comfortable conditions for a breakthrough, but even more comfortable conditions for defense. The city on the Fisherman's Bay is not convenient for a breakthrough, since it has only one more or less safe road to get through and even drive through the city, you will again come up against base defenders who will shoot you from different sides. So we will not call this card good.
Dear readers of our site, on this we finish the guide on the map Fishing Bay wot and say goodbye to you see you soon.
I’ll start the guide on the Fisherman’s Bay map from that, in every sense of the word, the standard location. Sign up to you and size in square kilometer, and is used at all levels, starting with 4. Seasonality - summer. The relief on the Fisherman's Bay gathered in itself all types of terrain: city, heights, forest and water. The game was introduced with patch 0.6.7.
Fisherman's Bay - the main combat zones.
The simplicity of the card is manifested here. As usual, there are two important on the board, convenient for attack and one direction of support. I propose to dwell on these locations in more detail. Having mastered them, it will be easier to navigate on similar rafters of other maps.
Main combat zone on the map
- The first direction is Zelenka. This is the main attack vector and one of the main places for def. Suitable for LT and ST that have developed speed and maneuverability, allowing at the beginning of the battle to get here to score the best position. Many tankers believe that it is convenient to attack on Zyolka only if your team is at the top base. But this is not true. Zelenka at Fisherman's Bay includes comfortable positions for both teams. In the figure, these positions are indicated by the number 1 - these are stones, for which it is convenient to attack and keep the defense of both teams. As you can see, the path to them is equivalent. The stones at number 1 are places for the team starting from the bottom base. A 2, respectively, for a team that starts from the top base. The central battle must begin between these stones and those tanks that will emerge victorious from battle, will break through and drag the entire outcome of the battle.
In addition, it is convenient to develop an attack from this position on Fisherman’s Bay. So most likely those who seize the stones will break through Zelenka. And here the odds in the direction of the lower base team are already visible, because they will be a little cure for breaking through Zelenka. In addition to everything, it is necessary to remember that behind Zelenki most likely there is a couple of PT-ACS, which will guard the base there and de-direction. In an ideal strategic situation, the team that broke through the city but provtykalshaya Zelenka tends to drain. Although now everyone plays exactly on the city direction, scoring on Zelenka from the word "in general". This, of course, is not correct and is more like avoiding failures, but you cannot push it against the will of the people. - The second area we will consider is the Upper Base Area. Here are the respawn points. The location is quite complicated: hilly terrain with difficult intersections. There are a couple of stones that can be used as shelters and bushes for masking and light. If you decide to defit - choose the position behind the houses to the left and right of the respawn points. The PT-SAU behind these stones will greatly complicate the enemy’s attack from the city: it will be easier for them to shoot a crawling up tank.
- The third, auxiliary, direction is the center of the map. Best suited for fire support. As a point for the start of the attack, this strip of urban development is not suitable. An attempt to break from a central height to either side will be stopped by enemy fire. It is impossible to pass unnoticed here. On the other hand, the light of this place can be used on your hand - shine the positions of the opponents there and keep the defense. In short, it is a good place for light and medium tanks. It is recommended to play in the center to experienced tankers who can keep a minimap and enemy vehicles in sight in sight. In addition, if your crew has not mastered the disguise - there will be little sense from you.
- The fourth direction is the area of the lower base. Identical to the place of respawn the top team. Of the main nuances - it will be more difficult to keep the defense here. Therefore, if you zaesporunilis below - rush !!
- Fifth direction. City. You can also call it the right flank. One of the most difficult areas, although protected from the arts. In the City, you can push through only one road, tanking between narrow passages and high houses. Best of all here will feel strands.
Fishing Bay: tactical positions
For a competent and successful game it is best to play a platoon. Coordination is one of the fundamental elements of victory. But in the solo gameplay, there is also a way to survive and bend.

Fisherman's Bay - the main directions of movement of equipment
- Let's start with good positions for artillery. On the map, I marked them brown. Keep in mind that you need to choose a position based on the location of allied vehicles on the map. Still, Tanks is a team game. To drag the fight alone, without support will be extremely difficult. I tell you, as an experienced tanker: it is better to leave the abandoned flank, than to tank that alone.
- How to play PT-ACS on Fisherman's Bay map. The most convenient positions are shown on the map in purple. They offer a chic chamber on the little green, and you can even work in the support of the def if the city is broken. But it's not worth standing here for a long time. Watch out for the allies, move behind them, providing fire support.
- To attack a better direction than the green is not found. In the picture it is shown in blue. The best thing here will be tanked STshkam. Hand on heart, this is a difficult direction. Usually a pair of tanks with ACS support go to the upper base. At this time, the team of the lower base often stands in positions for the PT-ACS full composition. When you begin to analyze such fights, it becomes clear that this is a failure tactic for the lower base: slowly, the top team will push the green. In order to prevent such an outcome, the team of the lower base must tank from the stone, pushing under it and highlighting the enemy allies. One here is better not to defit - you will surely be merged. So swing the skill of convincing allies.
- The next direction suitable for the attack is the city. In the picture above it is shown in red. Unlike urban buildings on other maps, this area of Fisherman’s Bay includes two wide sections with a bunch of streets and driveways connected to the “road of death.” Negligence, forcing you to drive here, will turn into crits and travel to the hangar. The section of the city, indicated by the number 1, is an even crazier place for a position. It should be avoided because you will be open to shelling from the center and the city. Not to mention the openness to artillery.
To summarize: CT and LT on Fisherman’s Bay should play in the center. LTs can also highlight the enemy team from the central buildings, and CTs can be thrown over them.

At first glance, it seems that the Fisherman’s Bay should be epic meilovo on the map, but in practice everything turns out differently. Often it is def on both sides and clumsy drain rush a couple of brave souls. To use the city as a main platform for a breakthrough is a particularly stupid idea. After a bloody battle in the city you will meet the defense, covering from all sides. In general, a good game requires skill. Tank the sides!
