How to register in email. How to create email on Yandex
Hello, friends! E-mail is a free analogue of regular mail on the Internet, created for instant exchange and storage of information, organizing the distribution of advertising materials, with the possibility of sending limited files between users.
Before registering, if you understand that the terms “mail”, “box”, “delivery”, “letter”, “envelope” are similar both on the Internet and in ordinary life, the process itself becomes more understandable.
Correct writing in the Russian language is not installed.
Common text use email, and when specifying contacts E-mail:
What does an email address look like?
Let us analyze in detail the fictional email:
Where palap is the username
@ - "to" (translation of the 2nd value of the English preposition at) indicates the location,
gmail.com - domain name (the name of the service where the registered mailbox is located).
The scheme of work in pictures
Consider an example without the use of complex terminology.
User having a mailbox on a Yandex service with an address [email protected] writes a letter to the mail service user with the address [email protected]
He presses the “send” button, after a few seconds a new letter is displayed in the recipient's “inbox”. If a failure occurs, the sender will receive a notification. The analogy with regular mail is obvious.
The technical process of sending a letter is shown in the figure below.

3 popular time tested sites
Yandex.ru
Mail.ru
Google
Register a new mailbox in yandex.ru
Suitable for the Russian-speaking population, is access to various services of the company Yandex.
Step number 1. We fill personal data
Go to the site yandex.ru and click "Start a box."

Fill out the forms:
- surname;
- login;
- password;
- re-enter the password;
- choose one of the proposed control questions;
- indicate the answer to the security question;

- indicate the number mobile phone;
- we enter characters of kapcha - protection against spam;
- get acquainted with the terms of the "User Agreement".

Step number 2. Mailbox is registered
Click the "Register" button. 
Mailbox created. Congratulations! Customize appearance, signature and more will be able to own.
Related videos:
Mailbox registration in mail.ru
Priority to the Russian-speaking population, provides access to various services of the company Mail.ru
Step number 1. Data input

Fill in the form carefully:
- surname;
- date of Birth;
- choose a country, region, locality;
- indicate your gender;
- write down the desired email address;
- password;
- repeat the password;
- specify the mobile phone number to recover the password.

Step number 2. Registration is over
Click the button "Register". 
Offer to integrate your account with other postal services skip. Creation completed.
Related videos
Email Registration at gmal.com
One of the most reputable foreign mail resources with great functionality from Google.
Step number 1. Filling out forms
Clicking on the button "Create an account" proceed to creating an account in Gmail.com

Must be filled:
- surname;
- username will be an email address;
- password;
- confirm the password;
- fill in the date of birth;
- specify the floor;
- mobile phone;
- a spare address to restore account access;

- we pass the test by filling in the data captcha;
- choose a country of location;
- read terms of use and privacy policy.
Step number 2. Completion of registration
F1 - calls the “help” of Windows or the help window of the active program. In Microsoft Word, the keyboard shortcut Shift + F1 shows text formatting; F2 - renames the selected object on the desktop or in the explorer window; F3- opens the search window for a file or folder on the desktop and in the explorer. The Shift + F3 key combination is often used to search in the opposite direction; F4 - opens the drop-down list, for example, the list of the address line in the 'My Computer' window or in the explorer. Alt + F4 shortcuts in Windows are used to close applications, and Ctrl + F4– to close part of a document or program (for example, tabs) ; F5- refreshes the active window of an open web page, desktop, explorer, etc. In Microsoft PowerPoint, the F5 starts the slide show first, and the Shift + F5 key combination from the current slide; F6 switches between the screen elements in the window or on the desktop. In Explorer and Internet Explorer - move between the main F7 - checks spelling (in Word, Excel); F8 - selects the loading mode when the operating system loads. In the Word editor it turns on the expanded text selection. Selection of a fragment from the initial to the final position of the cursor occurs without holding down the Shift key. pressing the F8 key selects the word closest to the cursor. The third sentence containing it. Fourth paragraph. Fifth document. You can remove the last selection by pressing Shift + F8. You can disable the mode with the Esc key; F9-- updates selected fields in some programs; F10-activates the full menu, and the key combination Shift + F10 activates the context menu; F11 - switches the window to full screen mode and back, for example, in Internet Explorer; F12- go to the selection of the file saving parameters (File -\u003e Save As). In a standard PC / AT keyboard, an alphanumeric block consists of 47 keys and includes keys for entering letters, numbers, punctuation, arithmetic, and special characters. The result of the action of these keys depends on the register (lower - upper) in which these keys are pressed. Shift, Ctrl, Caps Lock, Alt and AltGr (right Alt) control keys are also called modifier keys, as they are intended to change the actions of other keys. Shift (reads “Shift”) - an upper-case key (non-fixed switching). It is used simultaneously with other keys, for example with the keys of an alphanumeric block for a set of capital letters and upper case letters. In addition, the Shift key is used as a modifier in quick keyboard shortcuts and when you click the mouse. For example, to open a link in a browser in a separate window, you need to click on the link with the mouse button while holding down the Shift key. Ctrl (read "control") - used in combination with other keys, for example: Ctrl + A- in Windows selects all the text in the window; Ctrl + B- in MS Word Editor switches the font to "bold-normal"; Ctrl + S- in programs with WinAPI copies text to the clipboard, and in console programs it completes the command; Ctrl + F- in many programs calls the search dialog; Ctrl + I- in MS Word editor switches the font to “italic-normal”; Ctrl + N- in programs with a multi-window interface opens a new empty window; Ctrl + O- in many programs invokes the dialog to open an existing file; Ctrl + P- in many programs sends the text to print or call the print dialog; Ctrl + Q- in some programs exit from it; Ctrl + R- in browsers updates the contents of the window; Ctrl + S- in many programs saves the current file or calls the save dialog; Ctrl + T- in browsers opens a new tab; Ctrl + U- in MS Word editor toggles text underlines; Ctrl + V- in programs with WinAPI inserts the contents of the clipboard; Ctrl + W- in some programs closes the current window; Ctrl + Z- in many programs cancels the last action; Ctrl + F5- in browsers updates the content; Ctrl + Home- in programs with a text field makes the transition to the beginning of the edited document; Ctrl + End- in programs with a text field makes the transition to the end of the edited document; Ctrl + - in Total Commander makes the transition to the root directory of the disk. Alt (read "Alt") - used in conjunction with other keys, modifying their action. For example: Alt + F4- in all programs closes them; Alt + F7- in some programs calls the search dialog; Alt + F10- in some file managers causes a directory tree; Alt + Tab- in Windows makes the transition to the next running window; Alt + letter- in some programs calls menu commands or opens menu columns. In addition, Alt + Shift or Ctrl + Shift keyboard shortcuts are usually used to switch the keyboard layout. Capslock (read Kapslok) - switch to upper case mode (fixed switch). Pressing the key again cancels this mode. Used when typing in CAPITAL letters. The Esc key (read Escape), used to cancel the current operation or last change, minimize the application, go to the previous menu or screen or deselect, is located in the left corner of the keyboard next to the function key block. In the Windows operating system, the keyboard shortcut Ctrl + Shift + Esc calls Task Manager. Tab (reads "Tab") - in text editors inserts a tab character and works with indents, and in graphic interfaces it moves the focus between elements. For example, moving between the desktop, the Start button, the Quick Launch panel, the taskbar, and the system tray. The action of the AppsKey key is equivalent to a right-click and brings up a context menu for the selected object. Enter line key - Enter to enter a newline when typing, select a menu item, submit a command or confirm an action, and so on. Backspace (reads "Backspace") - in text editing mode deletes the character to the left of the cursor, and outside the typing area - returns to the previous screen of the program or web page in the browser. Delete (reads "Divides") - deletes the selected object, selected text fragment or the character to the right of the input cursor. The Insert key (reads "Insert") is used to switch between insert modes (the text is moved apart) and replacements (new characters replace the existing text) when editing text. The keyboard shortcut Ctrl + Insert replaces the command "copy", and Shift + Insert- "paste". In the Total Commander and FAR Manager file managers, the key is used to select a file or folder. PrtScn (print screen) (read "Print Screen") - takes a screenshot and puts it on the clipboard. In combination with the Alt key, a snapshot of the current active window is copied to the buffer. The ScrLk (Scroll Lock) service key (reads “Scroll Lock”) blocks scrolling and when it is activated, the contents of the entire screen are shifted with the cursor keys, which is very convenient when editing large tables, for example, in Excel. Pause / Break (read "Pause" or "Break") - suspends the computer. In modern operating systemsoh this key is only relevant while the computer is booting. The up, down, right and left arrows refer to the arrow keys and allow you to move through the menu items; shift the input cursor in the corresponding direction by one position. In combination with the Ctrl key, the arrows move a greater distance. For example, in the Microsoft Word editor, Ctrl + ← moves the cursor a word to the left. With the Shift key, a block of text is highlighted. The Home and End keys move the cursor to the beginning and end of the current line of a document or file list. What hotkeys are useful to know. The keyboard shortcut Ctrl + Shift + Esc is irreplaceable when the computer hangs, it calls the Task Manager, with which you can complete the process, remove the task or shut down the computer. The Alt + Tab keys allow you to switch between open windows. A panel with all open applications appears in the center of the screen, and when selecting the active window, press the Tab key several times without releasing the Alt key. The Alt + Space (space) combination opens the system menu of the window, with which you can restore, move, maximize, minimize and close the window without using the mouse. Alt + Shift or Ctrl + Shift - switch keyboard layout. With Win + D, you can minimize all windows and display the desktop, and the Win + M keys minimize all windows, except for dialog windows. Win + E opens the My Computer folder. Win + F - opens a window to search for a file or folder.
Many search engines and Internet services offer to create a free mailbox, each of which provides its own unique advantages, but not everyone can compare with the email from Yandex.
Yandex mail provides the user with unlimited storage space for letters, various protection systems against viruses and malware, as well as intelligent protection from spam and allows access to mail from almost all devices connected to the Internet.
Create mailbox
Nowadays even a novice can get a mailbox. Now a lot of Internet services offer to create an email for free, and to create it, the user must come up with a unique email address and a complex password. The most popular mail services are Yandex, Google, Microsoft and mail.ru.
Each of these email services provides access via a web interface in any browser, as well as email clients. As you know, all of the above companies have search services, as well as provide access to their other services. Therefore, by registering a free mailbox, you can access all other services of these companies.
How to create email on Yandex
The first step to register mail in Yandex will be to create a login and password. Creating a login should be taken responsibly, as it should be simple and easy to read. After registration, the login can no longer be changed, and it will be permanently attached to your email address. For example, if your login is written “login”, then your email address will look like this “ [email protected]”.
Creating a password should also be taken very seriously, otherwise the mailbox can be hacked by fraudsters.
In order to avoid such a situation, you should invent complicated passwords and not worry about breaking mail, to create which you should take into account its length of at least 15 characters and consist of upper and lower case letters, numbers and contain various special characters.
Difficult passwords are quite difficult to remember, therefore special programs have been developed for their storage, where one of them is “KeePass Password Safe”. In addition to storing passwords, the program provides for their generator, which allows you to quickly create a difficult password.

Registration 1 step
After you have come up with a login and password, you should proceed to the creation of an electronic mailbox.
- To do this, you should go to the web address https://mail.yandex.ru and click on the “Create a mailbox” button, after which you will be taken to the mail registration page.

- On the registration page, you must enter your first and last name, as well as your previously created login and password. Also pay attention to the item “Security Question” and the data that you filled in it, you need to remember, they can be useful if you forget your password. After all the entered information you need to click the "Register" button.
Registration 2 step
After registration, you will be taken to the main web interface of your mailbox, where your account will be further configured in the “Quick Mail Setup” window and in it you will be able to configure your mailbox step by step.
- The first step is to set up tags that allow you to group your contacts with colored tags.

- The second step allows you to connect to your mailbox other accounts. This is done so that you can receive letters, for example, from mail.ru in your Yandex mailbox.

- The third step will allow you to specify additional information about yourself, as well as allow you to select a domain zone and upload a photo.

- The fourth step is the final one, which informs you that the initial mail setup is complete. By clicking the done button “Done”, you will be able to fully use the mail via the web interface.

Mail setup
Going to the mail setup, you will see the following items:
- information about the sender;
- collecting mail from other mailboxes;
- folders and tags;
- mail processing rules;
- security;
- mail programs;
other parameters.
You can safely skip the first three points, since they were set up at the initial stage in the “Quick Mail Setup” window. The item “Mail processing rules” will allow you to set up a black and white contact list.
For example, if you receive a lot of spam from certain addresses, then you can put them on the “Black list” and their letters will never fall into your mailbox. The white list serves to ensure that all emails sent by your colleagues and friends do not fall into the spam folder.
Item “Security” will give you the opportunity to replace the old password with a new one. In addition, you can specify additional email addresses and your phone to restore access in case of hacking the box. The attendance log allows you to track which IP addresses you entered in the mail.
Item “Mailing Programs” allows you to configure the protocol through which your program will collect mail. Yandex Mail can use the POP protocol and more modern IMAP, which is installed by default.
Item “Other parameters” configures the webmail interface and editing, as well as sending emails.
Video: create mail
Collecting letters on the computer through The Bat
If you use mail for regular correspondence with friends and relatives or for registering with any service, then a browser will be enough for this purpose. But when you use a mailbox in a large company and process hundreds of letters every day, then an email client installed on a PC will become an indispensable assistant for you, where The Bat!
Among its competitors, it stands out for increased security, speed, support for all Windows operating systems. Thanks to these qualities, the program is increasingly being used in a corporate environment where safety and speed of work are at the forefront.
The Bat! - is an An independent product that can customize work not only with email services, email service providers, but also with Microsoft Exchange servers, which is extremely important in a business environment. The program covers an unlimited number of email-boxes, processing and storing letters of a huge scale with the provided means of automatic sorting and filtering messages.
In addition, the use of the IMAP4, POP3 and SMTP protocols provides secure communication with mail servers and supports cryptographic SSL and TLS protocols of various versions for interacting with the client all mail services that use encryption of network traffic.
Installation and Setup
To install the program on a PC, download the client by going to the download page. After downloading the client, start and click the “Next” button.

After that, accept the terms of the license agreement and click “Next”.

Then you will be given the opportunity to choose the installation “Complete” or “Custom”, and with the full installation all the components of the program are installed, and with the custom installation only those that you specify and click the “Next” button.

After selecting the components, a window will appear that informs you that the program is ready for installation. Click "Install" and wait for the end.

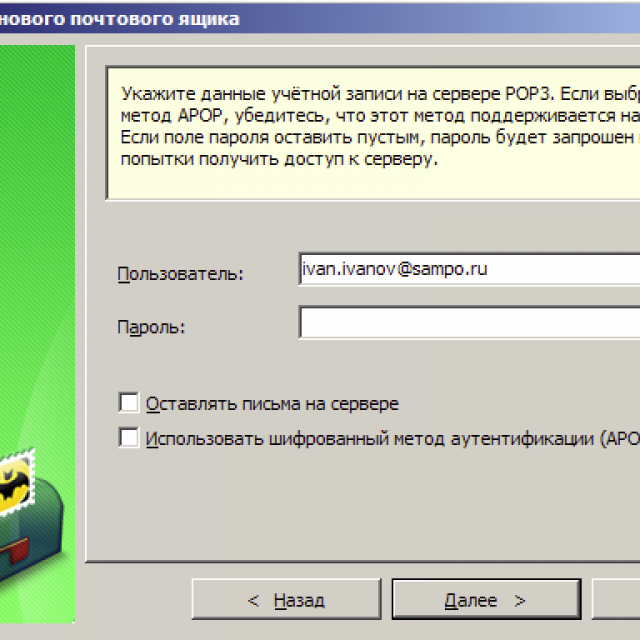
After installation, run the program. A new mailbox creation window will appear.

Enter your mailbox information in it and click the “OK” button. After that, you will be taken to the main menu of the program and will be able to fully use email on your computer.

Work in the program
To a user who is used to working with mail in the web interface, The Bat may seem like a rather complicated program, but this is not so, because creating and accepting letters in it is as easy as in mail from a browser. To create a new message, you just need to go to the “Letter” tab and click the “Create” button. Then a new window will open in which you can edit your letter.

Unlike webmail, letter editing in The Bat is quite advanced. You will be able to format text, check text for spelling, and also encrypt letters using S / MIME, PGP and OpenPGP.
It is as easy to receive incoming emails as sending, for this it is enough to open the program and go to the inbox. The program also has an advanced system of protection against viruses and various spyware. The Bat can scan both image files and executables for viruses. And if you received a letter with a malicious file, the client will necessarily issue a warning.
If you use The Bat at work and to your PC, other employees have access, then you can protect it by using a password to access your personal mailbox. To do this, go to the “Box” tab and click the “Password to access the box” button
One of the advantages of such a program is the use of an offline address book. It provides additional security, since many formats have been subjected to various attacks in which data is stolen. Also, the book is compatible with many modern formats, which allows you to store in it not only the mail data.
Through the use of plug-ins that provide additional mail protection that can be created by developers, The Bat has gained additional popularity in a corporate environment.
Summarizing, we can say that an email inbox is an indispensable assistant that helps people communicate both at home and at work. As can be seen from the article, even the most novice user is able to create e-mail. The use of e-mail in our time remains very relevant, since this type of transmission is one of the main ones in the world of the Internet.
The number of Internet users is constantly growing, so the question of how to create e-mail does not lose its relevance. Today it’s hard to imagine your life without email. This is a convenient way to exchange messages and documents both in your personal life and at work.
To start exchanging emails, you first need to create your inbox. Today there are many free mail services.
Most popular in Russia:
- mail.ru mail;
- Yandex Mail;
- Google gmail
Which of them you register your mail does not matter. Letters can be sent to any addresses, completely regardless of the recipient used by the postal services.
How to register email on mail?
For this you need to perform a series of sequential operations.
- On the main page of the Mail.ru service, follow the link “Registration in the mail”.
- In the registration form you will need to enter your first and last name (they will be displayed when sending letters, the recipient will see the first and last name in front of your email address in the sender's column).
- In the proposed lists, select your date, month and year of birth.
- Choose your city from the list or select your option.
- Think of your username or a unique name for the box. If the name you have invented is already used, the system will warn you about this and offer free logins (based on the date of birth, name and surname you specified). Service Mail.ru offers to create an email on one of the domains: list.ru, inbox.ru, bk.ru or mail.ru.
- Next, you need to come up with a secure password that can protect your box from unauthorized access. To avoid errors during the initial input, the password must be repeated.
- The next step is to bind the mail to the mobile phone. This will allow, if necessary, to recover the password from the box and increase the security of the mail. An SMS message with a verification code will be sent to the phone indicated in the special field. If you wish, you can specify a different password recovery method. This can be done through a security question or other mailing address (if you do not want to bind the phone).
- It remains to press the "Register" button. If you did everything correctly, you will automatically be taken to your inbox.
In the future, to log into your mailbox, you will only need to specify a login and password.
The presence of the mailbox on Mail.ru opens access to a wide range of projects and services, for example, to the popular social network Odnoklassniki.
To provide constant access to your mailbox, you can install on your phone a special mobile application from the Mail.ru project, which corresponds to the operating system.
Registration in Yandex Mail
Before you create mail on Yandex, you need to register your account.

If not, then you need to perform the following steps:
- On the account registration page, enter your first and last name.
- Create your own unique login (it will be used in mail and other Yandex resources), or choose the one you like from the ones offered by the system. Please note that you cannot change your login after registration.
- Create a secure password. To increase its reliability, it is desirable to simultaneously use lowercase and uppercase letters, numbers and punctuation marks.
- Enter your phone number. This is necessary to restore access to mail when a password is lost and to receive notifications. The number can be used as an additional login. You can also refuse to transfer the number or specify it later.
- Enter the characters from the image that serve as protection against automatic registration, then click the "Register" button.
After the registration is completed, you will be presented with a box consisting of the specified login, @ icon and yandex.ru domain.
Yandex allows you to create a special address for those who would not like to indicate their real box when registering in online stores, forums and other resources.
Due to the indication of an additional word before the login, it is possible to make so that all the letters that will come to this box will automatically go to spam. Such a box will look like a special word + [email protected].
Google Mail Registration
How to create a Google email?
Registering with the Gmail.com mail service provides access to Google services — the Google+, YouTube network.
Do not do without mail Gmail and owners of phones on Android. It allows them to download and install apps from the Play Store.
Before you create your Gmail account, you need to register an account. In the Gmail.com menu, select "Create an account", after which you will be taken to the page with the registration form. It is required to specify the name and surname, date of birth, country of residence and gender, and also come up with a login (if he is busy, you will have to change it).
Read the terms of service and click the "Next" button.
After that, you will be prompted to enter a mobile phone number or additional mail to restore access to the box.
Upon successful registration, you will see a window asking you to log in to your account.
It remains only to make the necessary settings, add contacts and you can use the mail.
Yandex is not only a search engine, but also a service that offers to easily create a mailbox. Registration will take 5 - 10 minutes, and you can use it for a long time and successfully.
After registering, you will receive a postal address (e-mail), which is necessary for correspondence with friends, colleagues, subscriptions, creating a page in the social. network.
Mailbox features on Yandex
Each mailer has its own features.
Consider the main features of Yandex:
- receiving, sending letters and files;
- information about the sender, is in the letter;
- unlimited volume;
- interesting and non-standard interface topics;
- availability of Yandex.Disk with a capacity of 10 GB;
- quick access to files and links attached to the letter;
- view attached files directly in the mail interface;
- create a box for the domain.
With this service you can set up a convenient workplace for correspondence. And also share files of large size.
The creators thought about those who use mail for personal correspondence, and about those who need this service on duty (organizations, domain owners).
Video: create an email inbox
Stages of creation
The basis of this service is not particularly different from others. Therefore, to create an e-mail address on Yandex is not difficult, both for a beginner and for the owner of another mailbox.
First of all, you need to go to the official website of Yandex. In the upper right corner click "Start the box". In the window that appears, fill in the fields: Name and Surname. If you do not want to distribute your name on the network, you can enter the invented one.
Unique login
Login is your middle name. You will specify it at the entrance to your box. Also login will be the beginning of your e-mail.
Important! Enter a login that is not ashamed to send to friends or colleagues.
That is why your electronic name should be unique, readable and easy to remember.

Login must consist only of Latin characters, you can numbers. A hint will appear to the left of the box, what your name might look like. For example, it could be your mobile number.

To the right of the field one of two things will be written: the name is taken or free.

If busy - you can add more numbers to the name or letters. Or try to enter another.

If free go to the next stage.
Usually the system offers you free options. They are based on your first and last name, plus additional numbers.
If you find it difficult to come up with a name, simply select any of the options you like. Click on it, and it will automatically fall into the input field.
Important! Remember your chosen login, you will use it to login.
Login password
To protect and enter the mail you will need a password. It should be easy to remember, and, at the same time, difficult to guess.
Important! For reliability, it is better to use different registers, languages, numbers and symbols.
In the input field, dots will appear instead of characters. It protects your data from prying eyes.

Under the field, you will see the level of protection:
- plain;
- average;
- reliable.
A simple option needs to be improved, at least to medium.

It is very easy to create a complex password by entering your favorite phrase in the English layout. The original will look like a set of letters and symbols.
Then repeat the entered password in the appropriate field.
If you still forget and lose your password, there is a way to confirm that you are the owner of the e-mail. About him below.
Question to restore access
The control question is necessary so that you can easily resume forgotten password. The phone number is entered for the same purpose.
Important! Do not invent brilliant questions. After all, the answer to it should always be in your head.
Standardly choose the mother's maiden name, because it is unchanged and unforgettable.
In the appropriate fields you need to enter the question and the answer to it. The system will remember it, and when you request to renew your password, it will ask you the answer to your secret question.

If none of the suggested options suits you, select “Ask your own question”. Write it, and give the answer below.
If you enter a phone number, then with similar actions, you will receive an SMS with a code. You will overwrite the code in the appropriate field and go into your box.
Completion
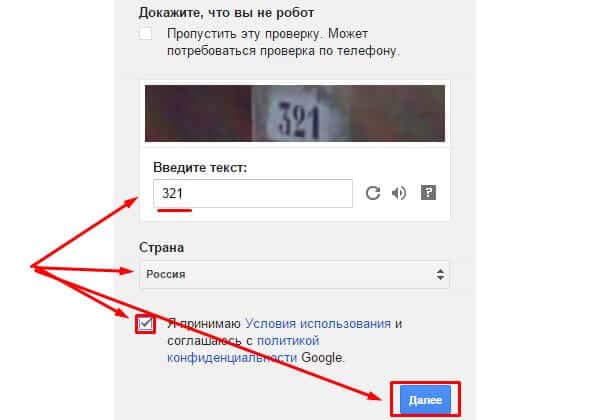
The next field is “Enter characters” or “Enter captcha”, below is a picture in which the characters are written, so they need to be entered in the bottom field.

To complete the registration you need:
- put a tick on consent with the rules of Yandex;
- click on the Register button.
All mailbox created.
Now you are on the page with your letters. There is already one incoming letter from Yandex. It can be opened by clicking on the inbox, and in the window that appears, click on the letter itself.
How to get e-mail on Yandex under a different name
Internet users, mail is needed for different purposes. It is very convenient to have, for example, a separate address for subscribing. Then the important letters will not be lost among the newsletter.
First you need to get out of your mail:

Click on the "Register" button and fill in all fields of the registration form. Only now enter another login, it should also be free.
The password can be entered the same, it is more convenient. But repeating passwords makes your security vulnerable. Therefore, the box for receiving letters with personal information, it is better to lock it up. However, it should not be used anywhere else.
The control question can be left the same as on the first box.
If you entered a phone number, then when creating a new address, you need to specify a new one. You must have access to this number, since it will receive SMS, with a confirmation code.
Similarly, we complete the creation.
We use mail
Now you need to figure out how to work with e-mail. Immediately after registration, you will be taken to the messaging control panel.

On the left there is a menu:
- incoming - here come and collect received letters. In order to open a letter, you just need to hover over it, and click the left mouse button. Unread - are bold. When you open a letter - it will not be highlighted;
- sent - the name speaks for itself. All messages you create and sent to the recipient are stored here;
- deleted - a message from any folder can be deleted, after which it will go to this folder;
- spam - all advertising correspondence gets here;
Important! Spam can get the message you need, so it is better to periodically check this folder and delete unnecessary.
- drafts - if you have written the text, and were distracted, you can save it, not send it. You can find a saved message in the Drafts folder;

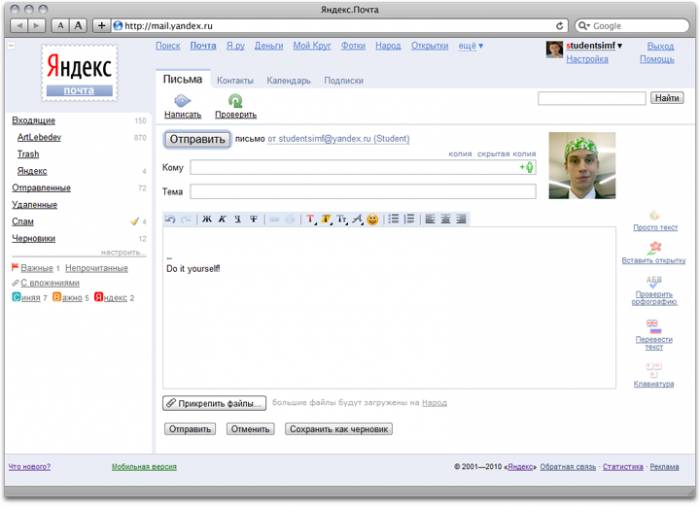
In order to create a message you need:
- go to the post office;
- select the “Letters” tab - “Write”;
- in the “to” field enter the email address of the recipient;
- in the “Subject” field - the name of the message (optional);
- in a large white field - the text of the message;
- click "Send".
All message sent. You can also attach a card or file.
You can delete a letter in two ways:
- open the letter and press the “Delete” button at the top;
- open the folder where the letter is unnecessary, put a check mark next to it. At the top, click "Delete."

There is a horizontal menu at the top:
- letters;
- disk;
- contacts.
Each of these items has its own sub-items. Work with letters is described above. Large files are stored on the disk; and in contacts you can create your address book with the addresses of your scribes.
Be sure to leave the box at the end of the work. So no one can read your correspondence.

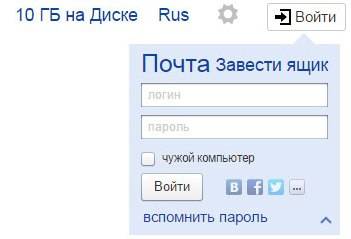
To re-enter the mail you need:
- go to the main page;
- enter your username and password;
- click "Login".
Create mail for your domain
If you are a domain owner, you can create a box with an address of the form “[email protected]”, where name is any word. For one domain, the service allows you to create up to thousands of mailboxes.
Plus, you can connect the organization's domain. From it you can create mail for your employees.
Algorithm of creation:
- go to the domain connection page;
- fill in the appropriate fields;
- click "Connect".
The system will take you to a page with your domains.
To get started, you should:
- confirm that this is your domain;
- send domain to service management.
Creating a mailbox is simple and quick. On Yandex ru intuitive interface. Therefore, it is enough to read all the tips and fill in the appropriate fields.
The possibilities of this service are pretty wide. It would seem that the creators thought out everything to the last detail, if only the users were comfortable.
