How to set up Wifi connection on any Linux desktop. Installing a Wi-Fi adapter in Ubuntu How to set up Wi-Fi in Linux
Perhaps you have already decided to “transplant” all your home devices to the drone-free Internet. As it is, not all foods can be kept closed before being adjusted. Tim has decided to switch to the free and cost-free Ubuntu operating system. Any other OS does not offer the same freedom of customization and resource management as Linux. There is a lot of fuss about both distributions. When running Ubuntu, setting up Wi-Fi is of utmost importance. It’s also rare that the OS allows users to run half of their capabilities without access to the Internet.
Today, there are even more extensions to the Wi-Fi option, if a wire is connected to the modem to the router. And the router broadcasts a drone-free signal wherever needed. And when you buy a new laptop, you are sure to arrange everything according to the “plug and forget” principle. When it comes to Ubuntu, not all devices can provide the required wireless functionality. So, how to set up Wi-Fi, why doesn’t it work “out of the box”?
Perhaps you have already tried Wi-Fi, but nothing worked. For some unknown reason, the computer does not know the available connections, and the signal is invariably zero. It’s even worse when the dartless line adapter is not indicated. Well, having a new computer set up is a great rarity, so installing all the necessary options is your task. We will look at installing drivers on a Broadcom device. It’s good to have a wider stench. Let us explain in detail how to set up Wi-Fi in Ubuntu.

"$sudolspci | grep Network".

"$lspci -nn -d 14e4:".
- After this, you need to check the cards supported by the driver and follow the command data. If there is no functionality, you will need to select a different driver.
- It is also necessary to know about the firmware that will be required for normal driver operation. This can be found in the driver documentation.
IMPORTANT. On the website https://wireless.wiki.kernel.org/en/users/drivers you will find the drivers themselves, descriptions, firmware, as well as detailed instructions for use.
- Before you launch the required driver, you need to disable the launch of certain hardware modules to avoid conflicts in the robot:
"$ sudo modprobe -r module name." Here the name is written without any signs, across a clearing.
- To avoid being re-attracted to something you've clicked on, do it like this:
"$vi /etc/modprobe.d/blacklist-bcm.conf
blacklist module name
blacklist module name
blacklist module name"
- Launch the driver using the following command:
"$ sudo modprobebrcmsmac".
We looked at the first stage of how to set up Wi-Fi on Ubuntu. Next, let’s try to practically connect to the drone-free network, vikorist terminal.
Connection setup
Of course, you can change the graphical interface to configure Wi-Fi settings in Ubuntu Server. However, mistakes are often made if this method does not work. In addition, the vikoryst console, you receive informative data about the steps that you can use. The principles of customization are not the same for all Linux distributions, so you can remove the necessary steps in any OS based on Li.0nix. For example, we use WPA connection. The implementation of WEP is currently not feasible, since the level of security for such a connection is extremely weak.

"$ sudo iwlist scan".
This will ask the console to allow you to increase the available measures and its characteristics. Find ESSID. Він means the name assigned to the measure, and will be used to work with it.

"$ wpa_passphrase (measurement name)> wpa.conf".
The name of the measure is completed with a space without other characters.
- Enter a password to access the game in the console. The configuration file will be automatically saved.
Now, for using Wi-Fi in Ubuntu, you can completely use the graphical interface.
Access point creation
And now we’ll look at how to create a Wi-Fi access point in Ubuntu. Apparently, the access point is called an “extension” of the already existing dart-less line, or a base for the creation of a completely new line. Setting up Wi-Fi Ubuntu Server for such a role is best done using the graphical interface.
- We first need to connect the computer to all connections before making any connections.
- Connect the computer to the drone network for which an access point will be created. The panel must be able to see that the computer has a wired connection.
- Click the right mouse button to select the network connections menu. Click “Edit connection”. After this, please add a new connection.
- Select from the Wi-Fi list and click the Create button.
- Start adjusting your new connection. For this purpose, enter all the exact parameters that may be needed. Tse:
- Hotspot mode.
- Name of the connection
- Data encryption mode. Bazhano vibrati WPA2 chi WPA.
- Save installation details. After setting up Wi-Fi, you must turn it on. Select “Connect to the accepted limit”. Once you find a measure on the list that was recently created, then create a connection with it.
- Now you can quickly access the access point as you please!
On completion
We began to practice a bunch of brown tricks. We learned in detail how to set up Wi-Fi on Ubuntu, and also diagnosed network faults. If you are deprived of food, and if the problems are not resolved, you can again turn to comments, lose your thoughts, or ask for something from the guides of our site. Have fun!
I am reading to you my beloved! Today we will talk about Ubuntu WiFi problems. The best way to connect a computer to any operating system is through a wire. If you don’t want to lose the cable again, an even simpler way to connect is through Wi-Fi.
Here, Linux OS users may have problems, since not all Ubuntu distributions have built-in Wi-Fi module drivers. Obviously, the developers of the system are making a special effort not to entice you to be a moron. If you read the series, you will probably blame everything on the difficulties with setting up WiFi. But there is nothing terrible and at the same time we believe this is an unfortunate and unacceptable problem.
How to install drivers
And so we first need to find out which transmission model stands in the middle. By the way, it would be good to know about the name of the company that produced the program. For whom we open the console, we carefully enter the command:
$sudo lspci | grep Network
Now we know the name of the hardware transmission model. I lost the driver for Linux. Let's go to the side.

Now it’s even more important to marvel at another person – the virobnik. There may be a number of options here, like mine. Therefore, after this, the remaining step is known - the type of connection will be indicated there. So, since I choose the internal module for connections to PCI, I choose this option. So you can look at the types of supported standards - “a/b/g/n”, to see what you need.

We open the driver that you prefer as the best option. Now you can find the name of your module model in the table. And so, for greater clarity, let’s reconcile, PCI-ID is the first step. You can find out PCI-ID using the following command:

Now it is important to note the other principle - if there is a driver, then you will write Yes, if there is no driver, then No. If you realize that there is not enough wood of this type, then we turn back and see a different package.

If you already know the required driver, you will need to download it. Let’s press the message to the very beginning after I write “For example”. You may need to install a driver, as it is already said that it is built into the system itself.
You will also need to install the firmware. Therefore, you need to look at the “Firmware installation” section. There you can upload files and firmware that you need to copy and download. For the skin driver there may be some nuances, so just read this point carefully.
In my case, I need to grab the package and copy it into a container. Next you will need to display the modules in order:
$ sudo modprobe -r wl
$ sudo modprobe -r b43
$ sudo modprobe -r b43-legaxy
Modules are also added to the NS so that the system does not oversize them.
$ vi /etc/modprobe.d/blacklist-bcm.conf
blacklist b43
blacklist b43-legacy
blacklist wl
Now you need to run the module, for which there is a simple command in the console:
$ sudo modprobe brcmsmac
Everyone now has radio wi-fi that is to blame for disturbing you. I’ll tell you straight away that I installed it on my device, installing drivers follows the same principle, but there may be some differences. Firmware is especially important - for it you need to read the instructions for your model.
How to connect WiFi in Ubuntu

Connections are now approximately the same as for Windows or other operating systems. At the very top you should see a small badge, as indicated by a trikutnik. Just click on it, select the required measure and enter the password. Now the Internet is available on your computer.

There are times when such an icon simply does not appear or you need to earn it through the command row. To connect to WiFi, open the console. And so everything will need to be done by hand, so let’s get started.
- We scan the entire nearest expanse:

- The ESSID row will be named according to the username for connection. The following is written:
$ wpa_passphrase_ESSID > wpa.conf

- I hope you have already realized that instead of another word you need to enter the name of your measure. Next, enter the connection key.

- Now to connect you need to enter the command as shown in the image. After "-D" you need to enter the name of the driver. After "-i" is the name of the interface that you are using. The last “-s” is the name of the file that we created earlier.
- We have connected to the router, but now we need to select the edge address and register the DNS. We open a new window, rather than close the old one and write:
$ sudo dhclient -r
$ sudo dhclient -i wlp3s0b1


Now you know how to quickly set up WiFi and launch it, the connection can already be established. You can try surfing any site to be sure. On Linux, everything is much more complicated, but after all the steps described in the statistics, everything can work stably.
Nowadays, the ability to connect a laptop to the Internet is becoming increasingly popular. The most advanced option is to connect connections to the router, and then it distributes Wifi to the entire unit. Wifi technology is supported by most modern laptops, and it’s handy - you can take it with you without fear of breaking the cord, and it’s even easy to move it to another room.
But there is one problem: not all Wi-Fi devices are supported out of the box. So, there are some Linux laptops that do not require Wifi setup in Ubuntu: once everything is installed, you can connect as long as possible or create access points. Ale tse not so often. This article will look at setting up Wifi in Ubuntu. We will take the remaining version of the Ubuntu 16.04 distribution with the Linux 4.4 kernel. Here the core plays the most important role, since it itself is responsible for supporting mastery. I'll admit that you don't get Wifi Ubuntu out of the box, so if you're going to connect to the limit, burn out lower.
If you tried to connect to the Wifi network, and it didn’t work, even though the password is correct, or your password is not recognized by the Wifi network card presence system, it becomes clear that Wifi Ubuntu does not work out of the box and will need to Danish adjustment. There are plenty of Wi-Fi adapters and wireless adapters. This statistic is less clear to us than Broadcom, so it’s impossible to cover everything. First, I’ll try to explain so that you can get it, let me know that you have a different Ubuntu Wifi adapter.
First of all, let's marvel at what kind of generator you have for moderate payment, for which you can read:
sudo lspci | grep Network
The most popular ones are Broadcom, Atheros, Intel, Realtek. For which application we will look at Broadcom. For each of these devices, a number of open drivers have been implemented that you can install. Well, after all, it won’t suit you, you’ll need to select a driver for your card. For this, open the site https://wireless.wiki.kernel.org/en/users/drivers. This is the official site for Linux kernel drivers. On this page there is a table with the use of Wi-Fi drivers that are in the kernel.

For our Broadcom adapter there are several drivers, apparently only those for those in the remaining column - PCI; Our adapter is connected via the Qiu bus. Tse b43, b43-legasy and brcmfmac and brcmcmac.

Next, select the closest driver: looking at the cfg80211, AP, IBSS, mesh, monitor, PHY modes speakers. Support for the sap80211 protocol, support for the access point mode, support for IBSS, Mesh, support for the listening mode (for packet overload) and support for the expansion of the b/g/n/a protocol.
For us, the best driver with the same parameters is b43. Let’s discover it and see what our map supports:

As you may call it, the PCI ID of the card is entered here to accurately determine the validity. For Broadcom you can look it up with the command:
lspci -nn -d 14e4:

We know our BCM4313 card and in the Supported column it says No – it’s bad, but it’s not supported by the driver. There are almost no such PCI IDs here. But setting up Wifi in Ubuntu is not finished yet. Let's turn back and notice a different driver. The available brcmsmac driver does not support Mesh and IBSS, and we do not need it.
It is obvious, surprising and most important that our card is in the first row:

We have now found the required driver and know what modes it supports. In a similar way, you can select a driver for another adapter.
Please note that before starting the driver, you may need to install the firmware. There is no need to install the Ubuntu Wifi driver, as long as it is built into the kernel. Information about the firmware can be found below on the page:
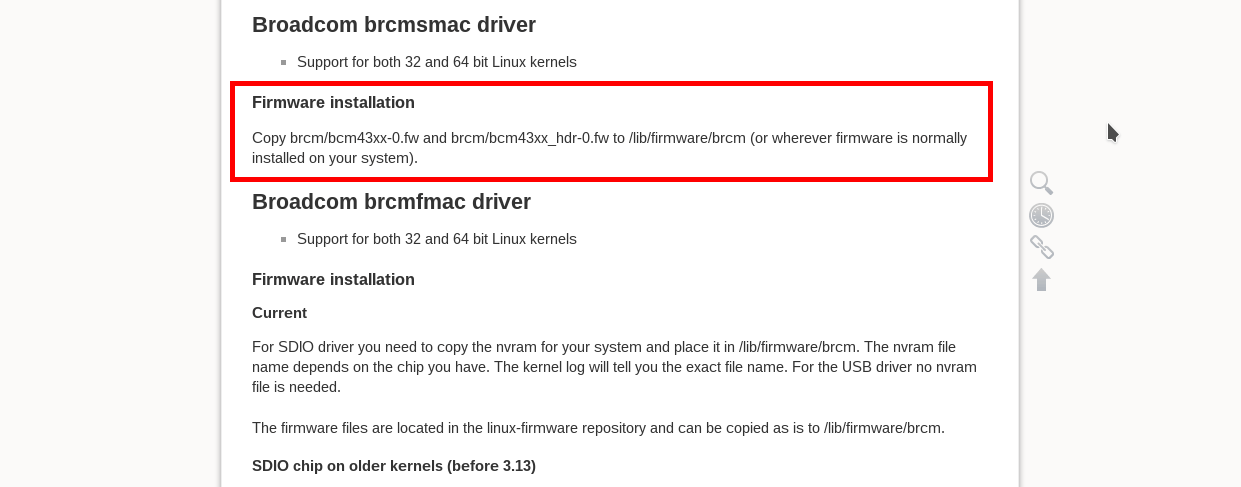
For our application, you need to download and copy the files brcm/bcm43xx-0.fw and brcm/bcm43xx_hdr-0.fw to a separate folder. The axis of the smell is these files, on the tree tab, which are downloaded and copied to the folder specified in the instructions:

sudo cp bcm43* /lib/firmware/brcm/
As you know, all the little things are complicated, but in reality there are all these descriptions, and everything is sent, you need to really marvel. Now I can no longer install the Ubuntu Wifi driver, for which I just need a kernel module. Before doing this, you need to add to the black list all other modules that the kernel can automatically encrypt:
Vivantage modules:
sudo modprobe -r wl
$ sudo modprobe -r b43
$ sudo modprobe -r b43-legaxy
Let's add them to the black list:
vi /etc/modprobe.d/blacklist-bcm.conf
blacklist b43
blacklist b43-legacy
blacklist wl
Now we launch our vibration driver:
sudo modprobe brcmsmac
Axis and everything is now working Wifi. Now you know how to install the Wifi driver in Ubuntu, how to find it, how to select the required version for your card. Although we looked at the method for Broadcom, other adapters need to be handled in a similar manner. We block the selected driver, blocking all other available ones. And don't forget to install the firmware. Please note that if Ubuntu does not require Wifi, you can download it.
Connecting to Wifi in Ubuntu
Once the installation of the Ubuntu Wifi driver is completed, connecting is not at all difficult, but much easier, compared to what you have already gone through. Now the following icon appears on the panel:

If Wifi Ubuntu does not work, it is missing. More precisely, it is, but it looks different. Click on this icon and select the required measure from the list. Forgot to enter password:
 That's it, connecting Wifi to Ubuntu is not that difficult, and you can access the Internet.

Connecting to Wifi in Ubuntu via terminal
Sometimes situations are lost if the graphical interface does not work. You may also need the Internet. Next we will look at how to connect Wifi Ubuntu through the terminal. As you know, to exchange data, the Wifi network uses encryption, such as WEB, WPA and WPA2. We will not consider WEP, because it is much simpler, and its encryption is not secure - it can be obtained for a small amount of money.
I'm looking forward to WPA. Setting up Wifi in Ubuntu through the terminal consists of several stages:
- Scan the border and find out accessible points
- Connect to the point for help wpa_supplicant
- Find an IP address via DHCP
- Adjust DNS servers so that websites open correctly
In the graphical interface, everything is automatically generated, but as long as we have chosen this path, we will need to do it manually.
We scan the measure using an additional special utility:
sudo iwlist scan

One dimension was identified with ESSID H30_CE550. Okay, now we are going to follow this point to connect Wifi Ubuntu. Follow the team:
wpa_passphrase H30_CE550 > wpa.conf 
After entering the password and pressing Enter, the utility will create a configuration file for the connection. The file could be created manually, or it would be easier.
For the connection itself we will use the utility wpa_supplicant. Let's take a look at the syntax:
$ wpa_supplicant -D driver -i interface -c file_connection
Drivers that are specified by the option -D just two: the old wext and the new Wifi driver Ubuntu nl80211. Do not confuse drivers with device drivers. This is a universal search between these drivers and the system. Try another one first, but if it doesn’t work, it’s the same as the first one. You can look at the interface from the main utility iwlist scan, My connection is wlp3s0b1, but for everything you will have wlan0. And the name of the file is the same file that we carefully created. Launchable:
sudo wpa_supplicant -Dnl80211 -iwlp3s0b1 -cwpa.conf

Done, another stage of connecting Wifi to Ubuntu is completed: we are in the process. It is no longer possible to select the IP address and DNS in order to fully function. Close this terminal and open a new one. Once again you can start wpa_supplicant with option -B Otherwise we would have lost control over her. If the setup of Wifi Ubuntu 16.04 went wrong, we had to poke around and kill the process, and before that, we wouldn’t have any programs visible.
To rip off IP behind the DHCP protocol, use a quick utility dhclient. We now know all available DHCP servers in the range:
sudo dhclient -r

Then we simply supply the address for our interface:
sudo dhclient -i wlp3s0b1

It takes a few seconds to obtain an IP address. After this, the consecration ifconfig, we can reconnect, so we already have IP:
sudo ifconfig wlp3s0b1

And also check the measure for help ping:

Ready. Connecting to Wifi in Ubuntu via the terminal is completed. If you decide to test this while NetworkManager is running, uncheck the Wifi control box in the applet so that the program does not affect it.
Once your interface is programmatically blocked, you can unblock it with the command:
sudo rfkill unblock wlan
Now you can connect Wifi to Ubuntu via the console. Everything is working properly. When you are connected again, you do not need to create the configuration file again; you can write a small script so that the connection is configured automatically.
Since you are the master of any mobile device under Linux OS, then you will first have to think about task number one - setting up a connection with a drone-free Wifi access point. For installation of standard tools for Linux desktops, you can find reliable and handy tools from the local authorities. For example, Wifi Radar, Network Manager and a lot of other class programs. Of course, it is important that you choose between Gnome and KDE, which offer a lot of functionality and choice.
What if you have a different and rarer console - E17, Fluxbox, ION? In this case, you should use the classic method of adjustment - the command row.
Let's take a look at two types of setup for connecting with a dartless access point:
- graphic add-on Wicd (for butt);
- Console utilities.
Enter
Please note that you have a dartless device (adapter) that runs Linux. If you immediately discovered that your device does not work, you can renew it, as one of the options for newbies, install the remaining version of the Ubuntu distribution and install proprietary drivers for your wireless card. The configuration is the simplest and most effective, even if you try to use the adapter through the ndiswrapper driver.
It is also transmitted that you have two parameters for connecting to a droneless point: SSID and identification key. Without them (especially without the other, the first fragments can be easily identified) you will not be able to establish a connection.
Wicd
Graphic supplement written in Python. Gnuchka is a handy vikoristan program that offers great functionality. Wicd is easy to install and easy to use. Just a few clues are enough to get to know the program. You should also note that Wicd, in addition to the graphical interface, also has a console version of “Wiconline”, which does not sacrifice functionality.
Command line
Let's marvel at how to set up wifi connections through the command row. To be honest, this method is universal, since it uses utilities that are standard for all Linux distributions. Moreover, all programs with a graphical interface (GUI) are based on these same utilities. Figuratively speaking, since we “know” the GUI of any graphical program, then under it we have most modest and inconspicuous console workers: ifconfig, wireless-tools, wpa_supplicant, ping, nmap and many others.
For the visualization of our plant, the following utilities are needed:
- - ifconfig : I will completely support the operation of any interconnect adapter of your computer (whether wired or wireless interface);
- - iwlist: displays a list of drone-free daughters available for connection (those within range);
- - iwconfig : utility for configuration and configuration of dartless edge devices (adapters);
- - dhclient (or other subscriptions): automatically assigns a drone-free point to the IP address of the dhcp server;
- - wpa_supplicant: a utility for setting up encryption of communications.
Before starting to set up Wi-Fi connections, it would be logical to check the availability of all these utilities on the system (although all of them are included in the standard set of Linux distributions). Let's all get to the bottom of what stinks with us, having issued very awkward commands (marvelous man which):
- - which ifconfig
- - Yaki iwlist
- - which iwconfig
- - Like dhclient
- - which wpa_supplicant
As soon as you get rid of these commands, you will see how the file system will smell. If you don’t get into rapt, you’ll have to set up a daily routine. The easiest and most recommended is the package manager of the Linux distribution you use. As an alternative, you can install the installation from the output jacks, otherwise such a way provides sufficient evidence from the customer.
Let's look at the example of connecting to a Wi-Fi point using WEP encryption
1 . The first thing we need to create is to see what kind of hem adapters we have on our computer:
# ifconfig -a
The names and report descriptions of all edge interfaces as identified by the ifconfig utility will be displayed. If no problems were found, then the reason lies in only one thing - there are no drivers for it and support for this interface is not included in the Linux kernel.
2. We launch the dartless hemline adapter:
# ifconfig wlan0 up
here :
- wlan0 – standard in most Linux systems with a wifi card;
- up - option for each ifconfig command to run the device.
3. Now we need to scan the broadcast for ourselves to identify available hot-spots:
# iwlist wlan0 scan
here :
Wlan0 – name of the droneless adapter;
- scan - the iwlist command is launched as a scan.
The result of the iwlist robot will be a detailed result, so at this stage we need only one row: ESSID: "Some_Name". The ESSID value ("Some_Name") is the name of the access point for the drone-free range. Now we know which specific Wi-Fi point we are connecting to.
4 . You can select your connection:
# iwconfig wlan0 essid Some_Name key Wireless_Key
here :
Wlan0 – edge adapter on which the connection is established;
- essid - specify the name of the access point to which you are connecting;
- key - specifies the encryption key that is used by this data transmission access point.
Respect:
The iwconfig command is used for the data encryption key in the hexadecimal format HEX. If you want to specify the key in plain text (ASCII), you need to use the s option.
For example, like this:
# iwconfig wlan0 essid Some_Name key s:Wireless_Key
The connection is installed.
5 . The remaining time is determined from the dhcp server of the wifi point to the IP address:
# dhclient wlan0
Of course, the most important deadlines will soon become boring. You can simplify the connection installation process by writing a connection script that includes all these commands in one place:
#! /bin/bash ifconfig wlan0 up iwconfig wlan0 essid Button one_name: Wireless_Key sleep 10 dhclient wlan0
We save this file under any name (for example, wireless_up) and the following command:
# chmod u+x wireless_up
Move wireless_up to /usr/local/bin to make it globally visible to the entire system.
Now all you have to do is type in the command line:
#wireless_up
The first connection will be installed.
A simpler way to look at it - connecting to a WPA-encrypted access point
Communication with such encryption is supported only by the wpa_supplicant utility, which is what we need. Also, again, we assume that we know the key (password) for encrypting this access point.
1 . A password is generated based on this key using the additional utility wpa_passphrase, which is included in the wpa_supplicant package. On the right, the password that we will continue to vikorize may look like a sixteenth number:
# wpa_passphrase ssid password
The utility generates the psk line, which we insert into the wpa_supplicant.conf configuration file:
# sudo nano -w /etc/wpa_supplicant.conf Network=( ssid=SSID psk=PSK )
For now, the configuration file will be processed. Perhaps you will need to add one more row to the header of your file:
Ctrl_interface=DIR=/var/run/wpa_supplicant GROUP=wheel
assigning the necessary access rights.
2. "Lifted" wlan0 interface:
# ifconfig wlan0 up
3. It is indicated which point we want to connect to:
# iwconfig wlan0 essid ssid
4 . We launch the wpa_supplicant utility to install the connection:
# wpa_supplicant -B -Dwext -i wlan0 -c /etc/wpa_supplicant.conf
here :
-B – run the wpa_supplicant command in the background;
-Dwext - using the wpa_supplicant utility to select the wext driver for the wlan0 interface;
-i - sets the middle interface to be configured (wlan0 in our option);
-с – specify the path to the configuration file wpa_supplicant.conf.
5 . We check that the connection is installed:
# iwconfig wlan0
The output shows various reporting information based on the specified wlan0 interface.
6. Derived from the local IP address:
# dhclient wlan0
7. Let’s simplify the process by creating an entry in /etc/network/interfaces:
auto wlan0 iface wlan0 inet dhcp pre-up wpa_supplicant -Bw -Dwext -i wlan0 -c /etc/wpa_supplicant.conf post-down killall -q wpa_supplicant
Visnovok
Depending on the Linux distribution, there are a number of ways to set up Wi-Fi connections. Indeed, such diversity of communication can be practically adjusted in any Linux system.
Golovne, so that the drone-less adapter itself is supported in Linux on a par with drivers. Already, it will be the top rank of the distributors of operating systems.
How to turn on wifi on a laptop? This type of advice is often asked by newbies who are just learning how to use a computer. Its power supply is entirely shorter, since it is not always the case that wifi on the laptop will automatically connect to the limit.
Before that, you will need to manually select a measure and then enter a password. In this article I will learn about the basic concepts that simply indicate the supply of power. So, how do you connect wifi to a laptop in Linux and Windows?
First, you need to reconnect first so that your wifi router is working and setting up. Possibly necessary. It’s not like that, because you only bought it and didn’t try to set it up, but your settings are messed up, you need to set up your wifi router yourself.
Once you understand the essence and learn how to do it yourself, you will not need to constantly call the master and pay him a pittance when there are problems. And setting up a router is very simple, as you understand the essence. There are a lot of models of wifi routers, but the principles are the same. I’ll show you on my wifi router, and you just design your own box with an antenna.
To set up your router, you need to connect it to your laptop via a cable:
After you connect the wifi router to your laptop, you will need to open your browser and enter the following address in the address bar: 192.168.1.0 The addresses in some fields may be different and you will also need to read the instructions for the router .
After entering the address, you will be asked to enter your account name and password. Call it like this: admin and admin. If everything is correct, then you will connect to your router and see something like this:
After which you need to work on the step, as shown in the picture and signed with numbers:
1. Select the tab in the menu called Wireless or Wifi.
2. Enter in English letters the name that your access point is called. From this very name, you will then differentiate your wifi from someone else’s.
3. Select the encryption type, you can set it as shown in the photo.
4. I guess the new password using a letter and numbers to . Everything is now set up, your wifi router is set up and ready for work.
Now we are deprived of only setting up wifi on laptop.
How to turn on wifi on a laptop in Linux?
As much as I've been grappling with Linux, I'll start over again. First of all, what should you check, and what is connected to the wifi laptop? On the right, most laptop models have a mechanical wifi connection.
And the axis of the deeds doesn’t know who to say, what. If there is such a button or a signal, there will be a light that signals when wifi is turned on.
It is acceptable that everything is working out for you. Then you just need to find the dartless lines icon and click on the new one with the left mouse button. You will see a list of available dartless lines. This is what the axis looks like to me:
We know our network, click on it with a bear, enter the password and connect it to the Internet. It's simple, as you say. But what about Windows?
How to turn on wifi on a laptop in Windows?
It’s all about this analogy. At the right corner of the panel you can find a connection label to the edge. We know our drone-free network there, click on it, press the connect button and enter the password. From here you can connect to the Internet.
Well, since you still haven’t fully understood how to connect Wi-Fi on a laptop, then you’ll marvel at this video instruction, or rather learn it once, or read it at least a hundred times.
We are dedicated to everyone who takes the time to set up Wi-Fi on Ubuntu after Windows 7 ;)
P.S. I hope I can help someone ;)
Yes, there are such tricks. For me it was like this: I go into Linux - the sound works, I restart it in Windows - it’s gone. I vim and vim - asked. Miracles, so far not understood, behind what principle everything is expected, as on an equal basis with bios, perhaps.
