D link dir 300 set password
If you want to avoid frayed cables, avoid being tied to your computer/laptop for one month, and easily move all your computer equipment, you need to set up a Wi-Fi router. A series of articles about setting up various routers will help you set up a drone-free Wi-Fi network at home without much effort.
Here I will describe setting up Wi-Fi on the Dlink Dir-300 NRU B5 router. First, it is necessary to work until the rest. Then you need to adjust the measurement on your computer/laptop on automatically retrieves the IP address from the DNS server.
After which you connect via the Dlink web interface (this applies to cases where you closed the web interface after updating the firmware). Entered before the browser (bazhano vikorystuvati Internet Explorer or else Mozilla Firefox) 192.168.0.1 login admin, password admin (for details).
The following is sent to the web interface of the Dlink Dir-300 NRU. Pressing the button “Wi-Fi Master for setting up a dartless range”.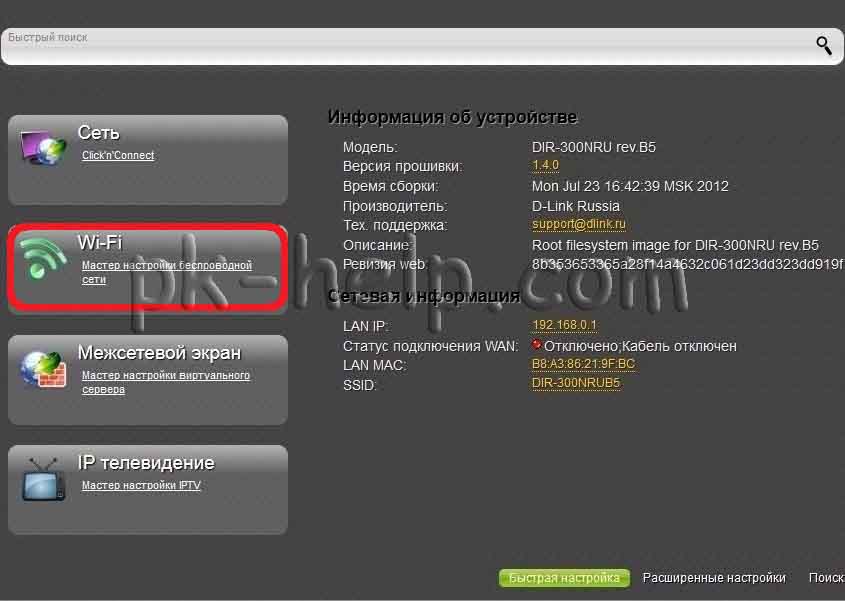 You must check the box next to the first setup window. "Take it away dartless connection»,
I think things have become clearer :). The MBSSID parameter (allows one access point to serve up to four wireless networks with different connections) and BSSID (this is the physical address of the access point (MAC address) for the wireless network.). In household minds, these functions are rarely used, and the very beginning of the stench is contaminated, so they are depleted. Onslaught "Dali".
You must check the box next to the first setup window. "Take it away dartless connection»,
I think things have become clearer :). The MBSSID parameter (allows one access point to serve up to four wireless networks with different connections) and BSSID (this is the physical address of the access point (MAC address) for the wireless network.). In household minds, these functions are rarely used, and the very beginning of the stench is contaminated, so they are depleted. Onslaught "Dali".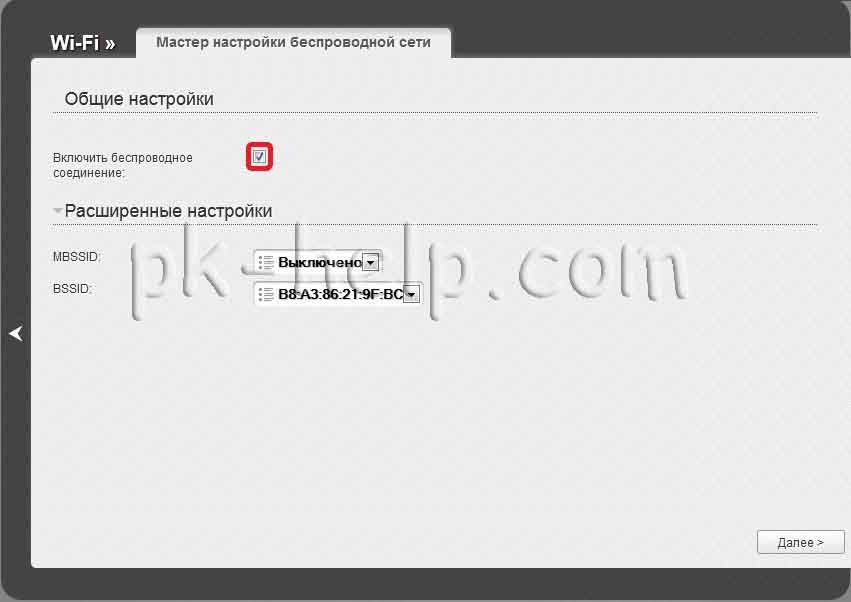 For the upcoming holiday, in a row “Private access point” We do not put a check mark, in the SSID row we write the name of the drone-free line, we select the edge, the channel is set to auto or it is indicated as valid, which means the valid channel is described in the article How to select/change a drone-free channel on a router/router
. Dartless mode selectable «
802.11 B/G/N mixed»
, for this purpose Various devices could connect to Wi-Fi, as a result “Maximum number of clients” Deleting 0 means that the maximum number of devices can connect to the Dlink Dir-300 NRU, if you specify, for example, the number 5, then the maximum number of devices that can connect to the drone-free network will be no more than 5 .
For the upcoming holiday, in a row “Private access point” We do not put a check mark, in the SSID row we write the name of the drone-free line, we select the edge, the channel is set to auto or it is indicated as valid, which means the valid channel is described in the article How to select/change a drone-free channel on a router/router
. Dartless mode selectable «
802.11 B/G/N mixed»
, for this purpose Various devices could connect to Wi-Fi, as a result “Maximum number of clients” Deleting 0 means that the maximum number of devices can connect to the Dlink Dir-300 NRU, if you specify, for example, the number 5, then the maximum number of devices that can connect to the drone-free network will be no more than 5 . 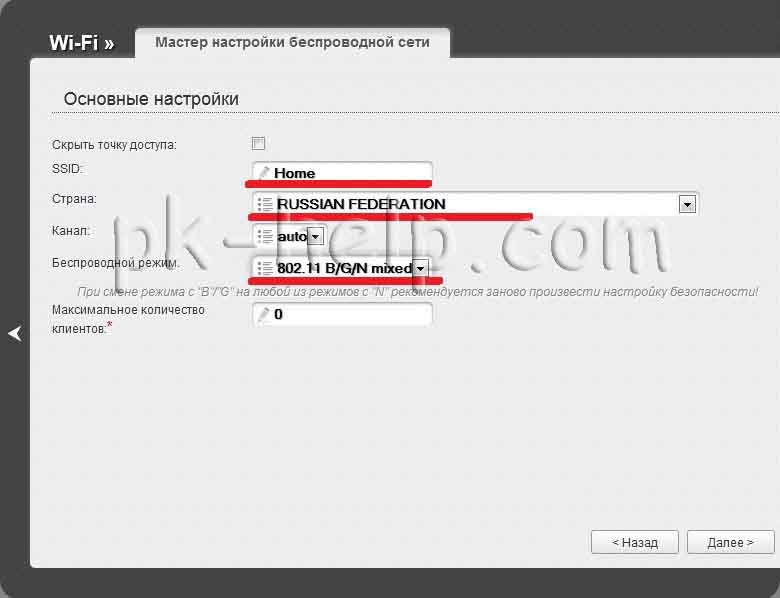 In order for all devices, both new and old, to be able to connect without problems Wi-Fi boundaries, selecting moderate authentication "WPA-PSK/WPA2-PSK mixed".
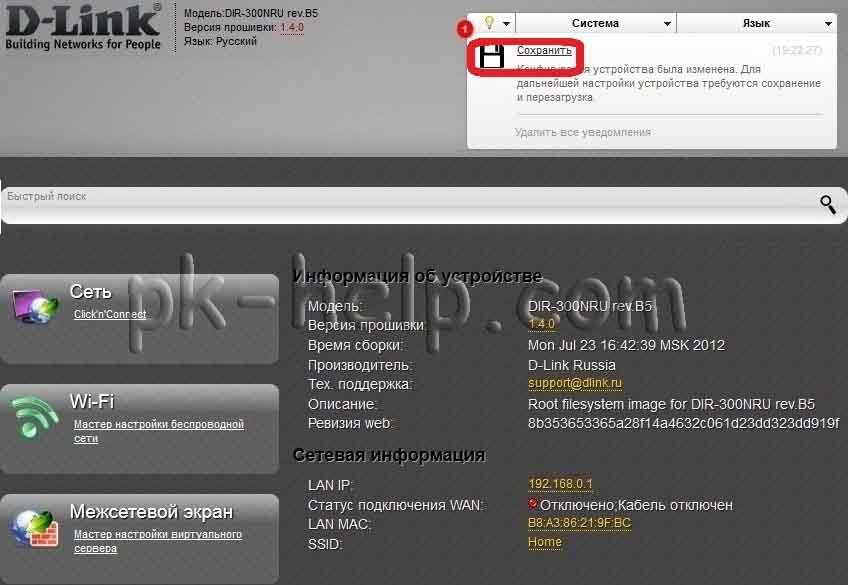
In the PSK encryption key row, enter a password that will need to be entered in order to connect to a Wi-Fi network (I recommend using a folding password, at least 8 characters with letters, numbers and special characters). All other settings involve encryption, and I recommend that they be removed. 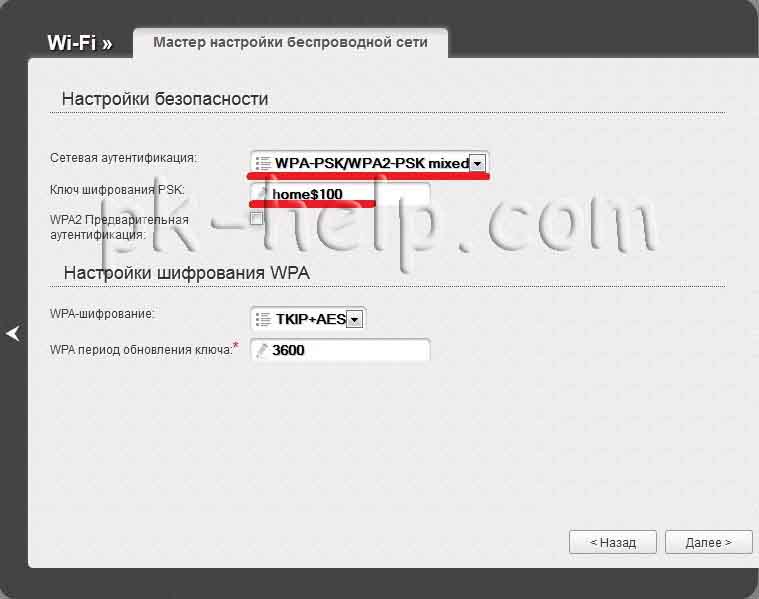 In the coming days, we are amazed at all the adjustments we have ordered, as everything is indicated correctly and under pressure "Save it" Otherwise we are under pressure "Back" it can be corrected.
  Now you need to save the settings on the Dlink Dir-300 NRU, for which you press a button "Save it."
 At this point, setting up Wi-Fi on the Dlink Dir-300 NRU router can be completed by closing the browser window, connecting to the Wi-Fi device, and finding our network.
 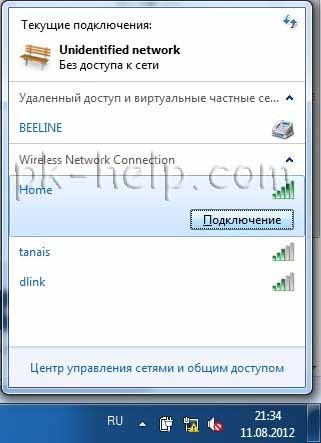 Enter the password and access the Internet wirelessly.
After configuring the router, you can start setting up local measures on
D-link DIR-300
Droneless router wifi boundaries.
Connection
To successfully work with settings and browsers through a web browser, you must have JavaScript enabled (this instruction does not include any additional details, please check until your browser is ready).
- Shut down the computer.
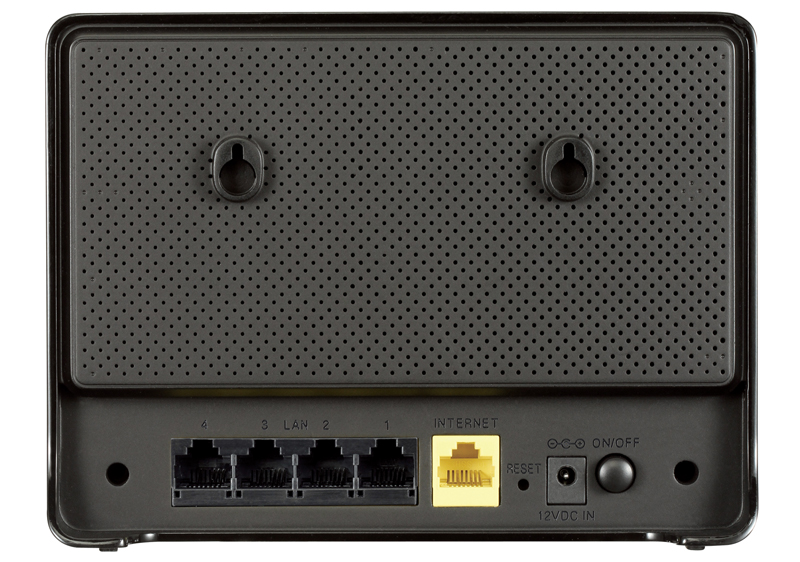
- Connect an Ethernet cable to the LAN ports on the door panel D-link router DIR-300, that is to the computer's Ethernet adapter.
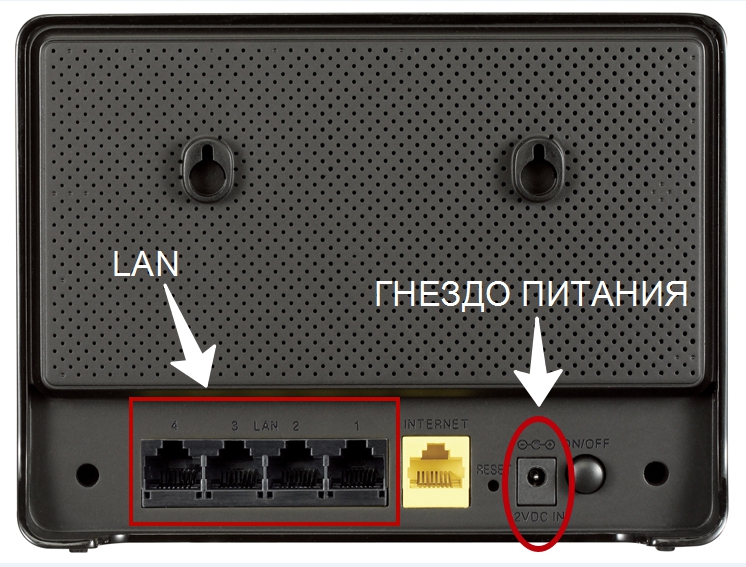
Sockets for connecting a router
- Connect the power supply unit to the power supply socket on the back of the router, and then to the outlet.
Shut down the computer.
Login to the interface
Having established your computer with the D-link DIR-300 router, you can go to the web interface, where you can configure the router. To do this, launch your browser and enter 192.168.0.1 in the address row. Then press Enter.
NOTE: If the browser shows the warning “Unable to display the page”, please re-configure your router to make sure the connections are correct.
The web interface of the D-link DIR-300 router is implemented in several languages. To select the Russian language, point to the English sign at the top of the page and in the menu that appears, click Russian.
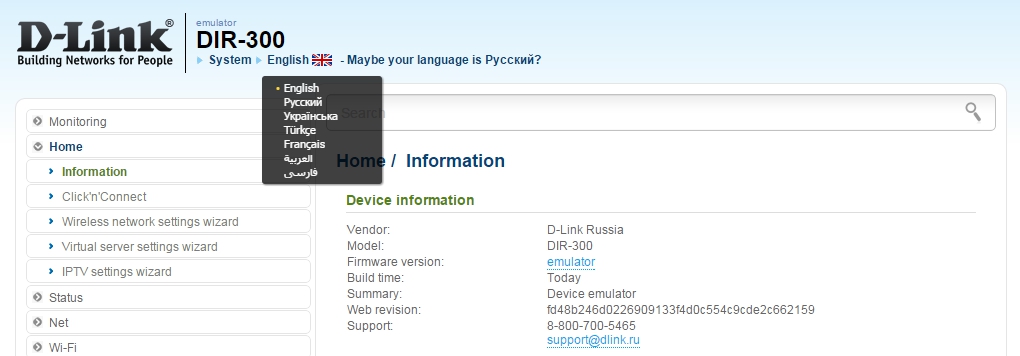
Vibir movie
- Go to page System / Administrator password
- Enter a created secret word in the Password and Confirmation fields.
You can insert a word like admin. It is allowed to write Latin letters both registers, numbers and symbols that can be written on the keyboard. For example, press and press.
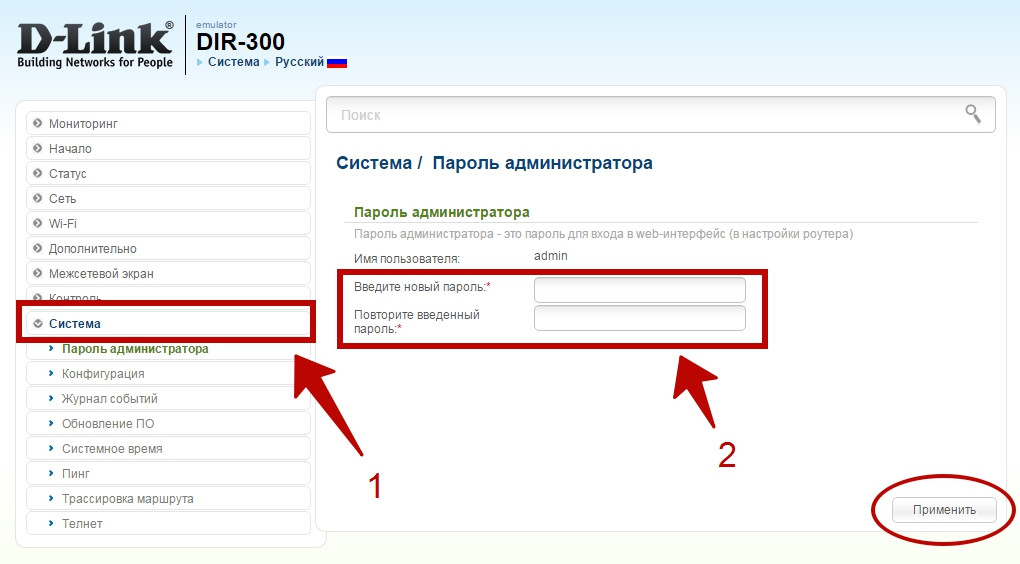
Change password
NOTE: Write down a new secret word or add numbers. Once you have lost your password, you can reset the factory settings by pressing the RESET button for 20 seconds. Remember, this procedure will overwrite all the parameters you entered.
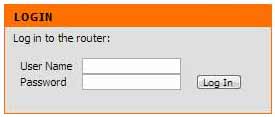
After the password has been changed, the login page to the web interface will open again. Enter your name admin and your secret word, and then Login.
Setting up the router
- To secure your Internet connection, go to the Ear menu - Click'n'Connect.
![]()
The beginning of setting up a router
- Connect the Internet access cable to the WAN port on the D-link DIR-300 router.
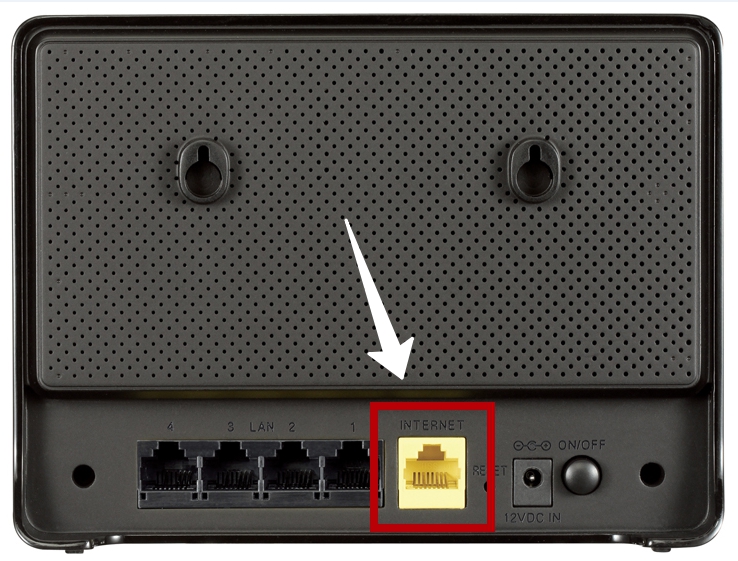
INTERNET socket
- To check the connections, look at the INTERNET indicator, it is responsible for burning. To continue, click the Next button.
- On the page with connection types, select those that your provider uses.

Different connection types
Wired WAN connection
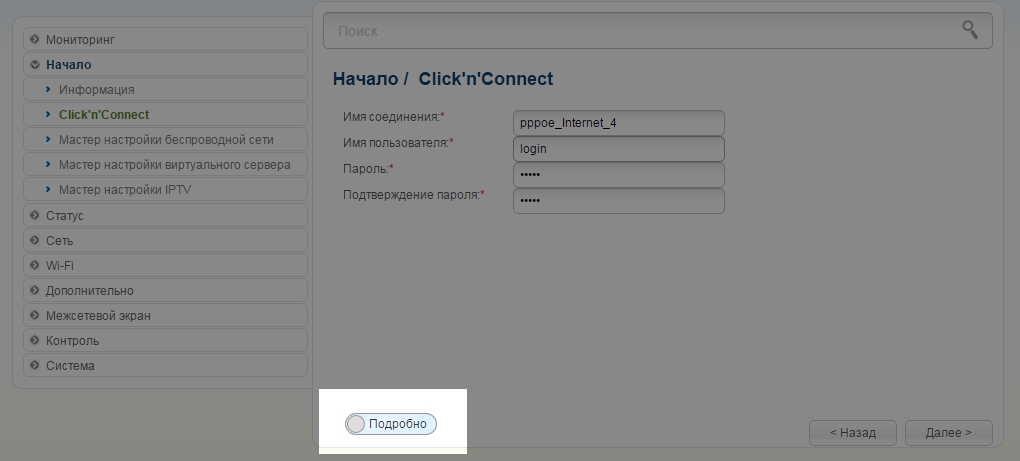
PPPoE
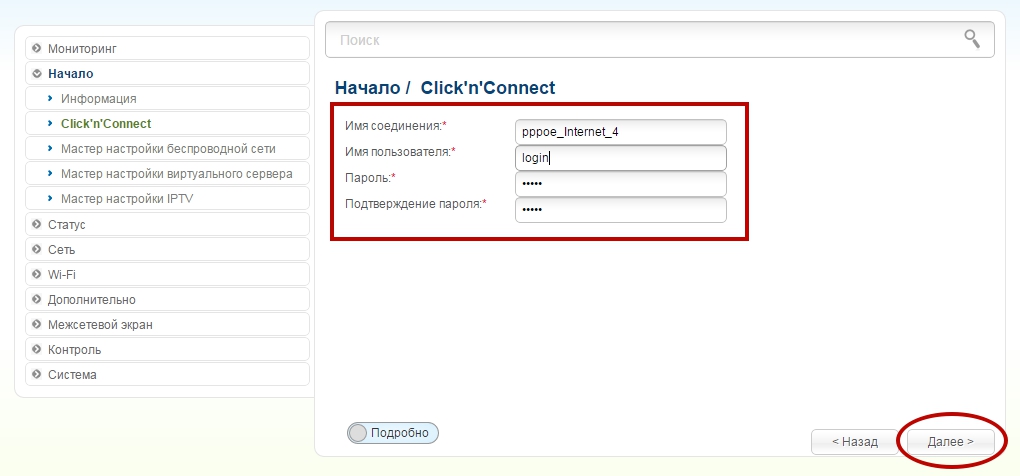
Connection type PPPoE
- In the Contact name field, enter your name.
- In the Customer Name, Password and Password Confirmation fields, enter the confirmation data provided by your Internet provider.
If you need to further configure the router, go to the expert configuration mode by clicking the Details toggle switch at the bottom of the page.
Static IP
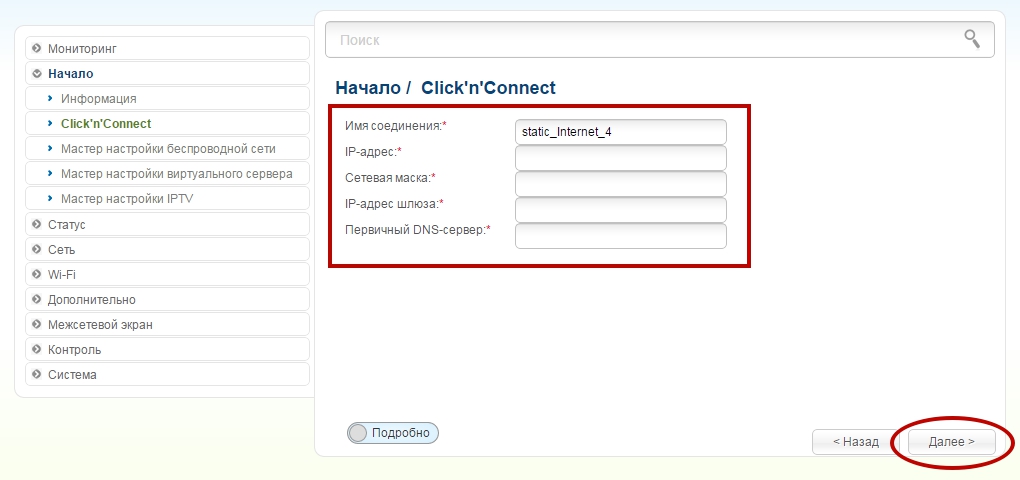
Connection type Static IP
- In the Name field, enter your name.
- Fill in the values for the IP address and settings.
- In the IP address column for the gateway, enter the address of the connection.
- At the Primary DNS server, enter your credentials.
As a rule, these parameters are sufficient.
Dynamic IP
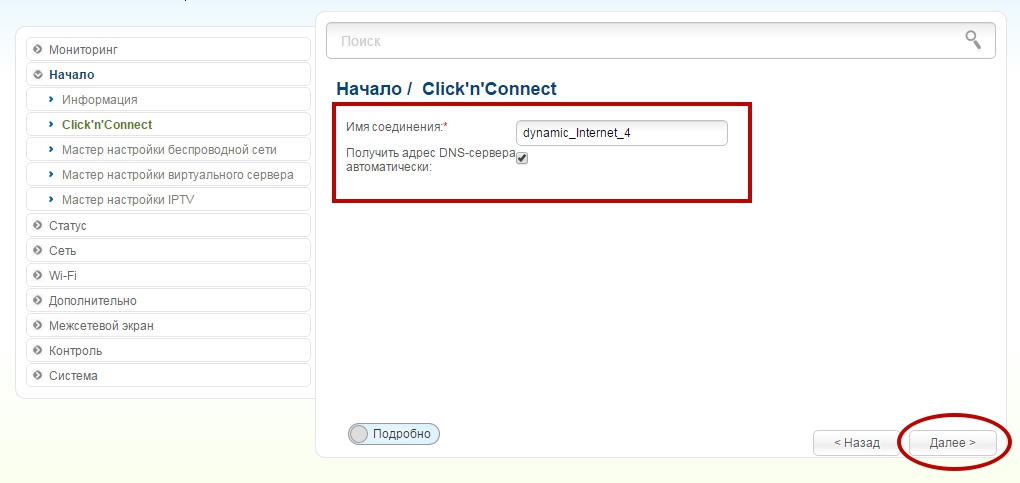
Connection type Dynamic IP
- In the Contact name field, enter a name.
- If your provider has entered the addresses of the DNS servers, select the checkbox from Select DNS server address automatically and enter the data in the Primary DNS server field manually.
As a rule, these parameters are sufficient.
If you need to additionally configure the router, switch to expert configuration mode by turning the toggle switch Details, at the bottom of the page.
Checking Internet availability
Here you can check access to Internet resources.
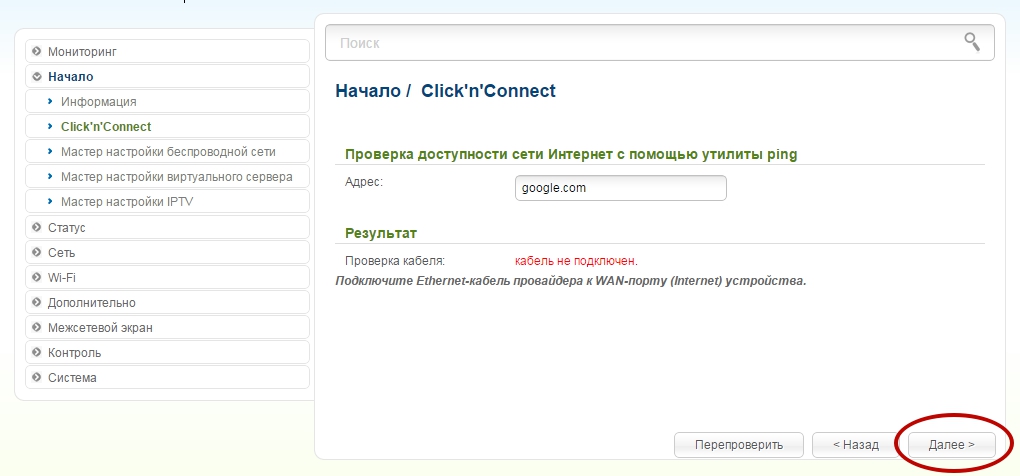
Checking Internet access
The Result section will display the result of checking the WAN connection and the causes of possible problems. To recheck, press the Recheck button again. When finished, press Dali. After this, the master's training page for drone-free communication will open.
Adjusting the dartless connection
The D-link DIR-300 router has three modes of drone-free wifi monitoring.
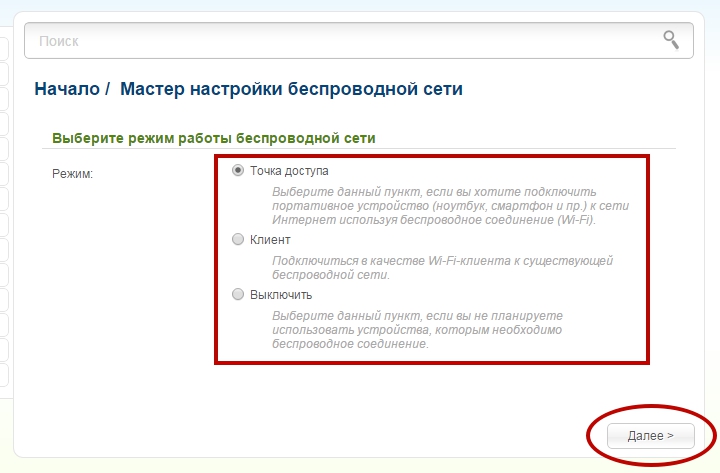
Robot router modes
- Yakshcho vi don't plan to vikorize the wifi network, put a badge on Vimknuti. Click Distance, and then click the Freeze button.
- Yakshcho vi Do you plan to use a wifi network to connect devices?, you need to set the icon to the Access Point position.
- Yakshcho vi Do you plan to connect the router to another wifi network? Then select the client item.
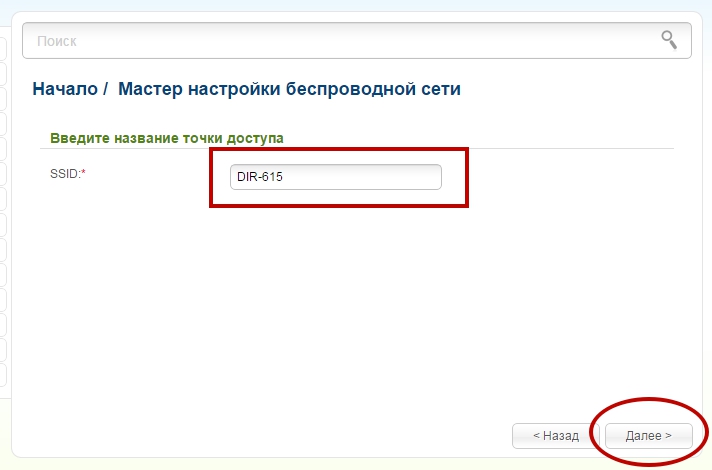
Access point mode
In the SSID field, come up with and insert your own name. To enter, you can use numbers and Latin letters.
At this time, you can change the security settings of your wifi network.
IMPORTANT: Basic settings will not provide sufficient protection for dartless local coverage. We recommend that you take care of your own.
In the "Set Security Mode" window, in the "Merezha Authentication" list, uncheck the "Secure Security" value, and in the "Security Key" field, enter a secret word or the entered letter and number - the password for accessing the wifi network that is shared with your route erom. Follow the numbers and Latin letters.
If you select Enable the network, the "Security Key" field is blocked, and you can connect to the Wi-Fi network without entering a password.
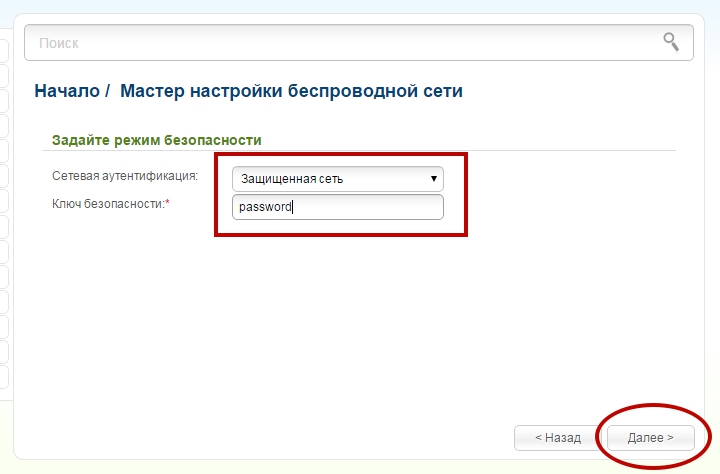
Security measures wi-fi
On the next page you can see the configuration of the D-link DIR-300 router. Verify that it is correct, and then press the Freeze button.
Setting up IPTV
The D-link DIR-300 router allows you to set up an IP TV station. For this, go to the section Master of IPTV setup.
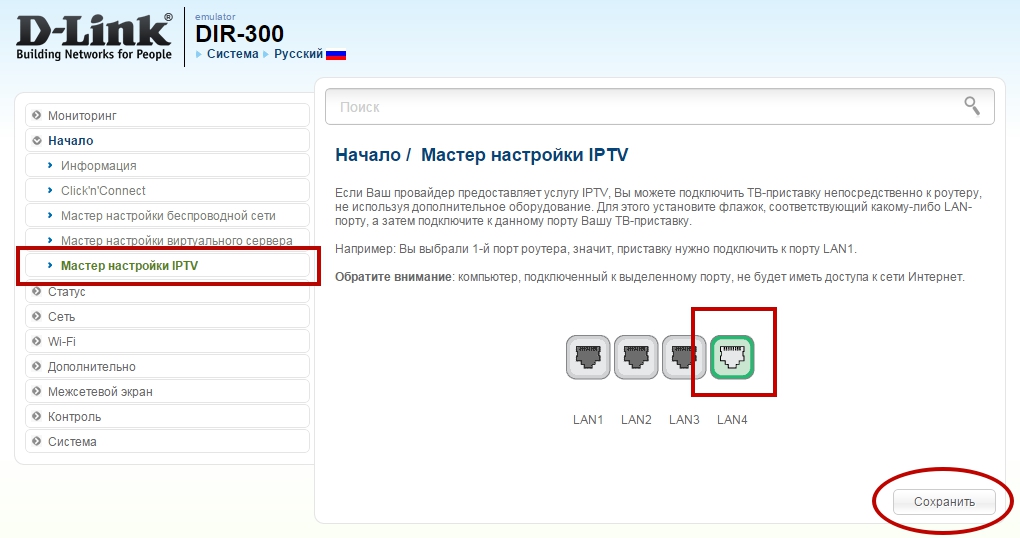
On the settings page, select the LAN port to which you want to connect the IPTV set-top box.
To organize access to the Internet and IPTV services, the provider is required to establish virtual boundaries (VLAN ID). At this time, set up access to the IPTV service, follow the instructions below.
- In the left menu, select Dodatkovo, sub-item VLAN.
- Create a group of ports using the VLAN ID values and set the type to Prozory.
- Select the port for connecting the IPTV set-top box.
![]()
- To save your settings, click Save.
The D-link DIR 300 router has two interfaces. The article describes the light theme. We encourage you to marvel at the video of how to set up the same router, but also in primary topic interface.
Many people have not one, but many personal computers lurking around their homes. To access the Internet, your home computer (laptop, phone with WiFi support) can be connected to a router.
Different models of routers are configured differently, aka:
- The router has a WAN socket - a cable is connected there, provided to you by your Internet provider,
- Dekilka (name 4) “LAN” sockets - you need to connect your home computers to them.
- How the router supports drone-free WiFi connection(in which version the kit comes with a small antenna), then you can connect the laptop or mobile phone(as they support connections using WiFi technology) without darts.
So, as a router, it is a device that will provide comprehensive access to at least a number of devices, which must be configured for safe operation at any time, because... Factory adjustments do not ensure proper safety levels and will only serve the purpose of ensuring the safety of the cob operation.
If you choose a router OBOV'YAZKOVO:
- change the access password to the router settings.
- Set WPA or WPA2 authorization and access key to the WiFi network.
- Zmіnity with the address of the local Merezhi router for 192.168.123.1, the subty-і і і і і і і і і і і і і і і і і і і і і і ІО і і і і і і і ІО ’10.0.0.0.0-10.255.255.0, 172.16.0.0-172.22.255.0, 192.188.0.
If you do not set the time limit, you will be able to connect to your router via WiFi and get access to the Internet for your account. Before that, because The router shares the channel assigned by the provider between the system, which is up to the next connection, The Internet access speed of your computers will change This is due to the fact that “guests” of your router are actively surfing the Internet.
In addition, a vikorist router with unsafe configurations violates the legislation of the Russian Federation and the great interests that are protected by law, because you provide services without a definitive license and legal representation that you are responsible for administrative and/or criminal responsibility .
Setting up the router
1. The configuration addresses on D-Link routers look like: “192.168.0.1”
This must be entered in the address bar of the browser (Mozilla/Opera/Chrome/Internet Explorer)
If everything is typed correctly, if you look at the picture, I’ll go to Qiu:
Enter password (Standard login: admin, password daily)
2. For how many addresses: 192.168.0.x are serviced by the Volkhov-Online LLC network, and their routes may interfere with the correct work of the network, which must be remembered. To do this, select LAN Setup from the left menu in the SETUP section. Then change the router address, for example to “192.168.123.1”:
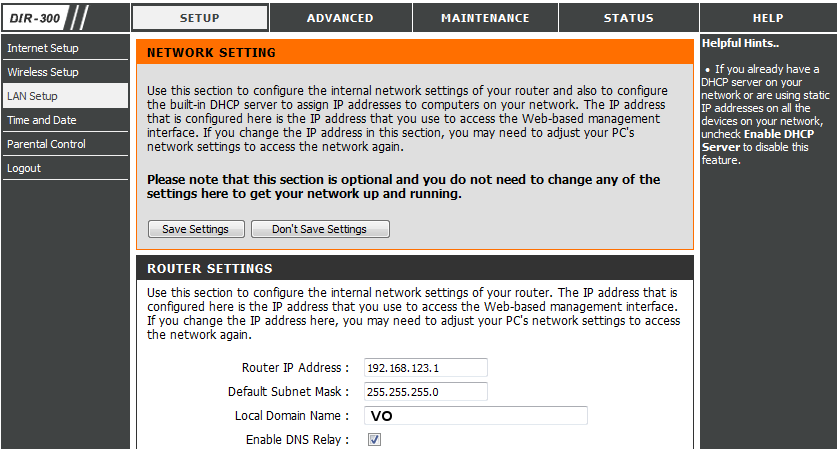
To save your changes, click the "Save Settings" button
After the router is reset, you will have to reconnect to the administration page by typing the address 192.168.123.1
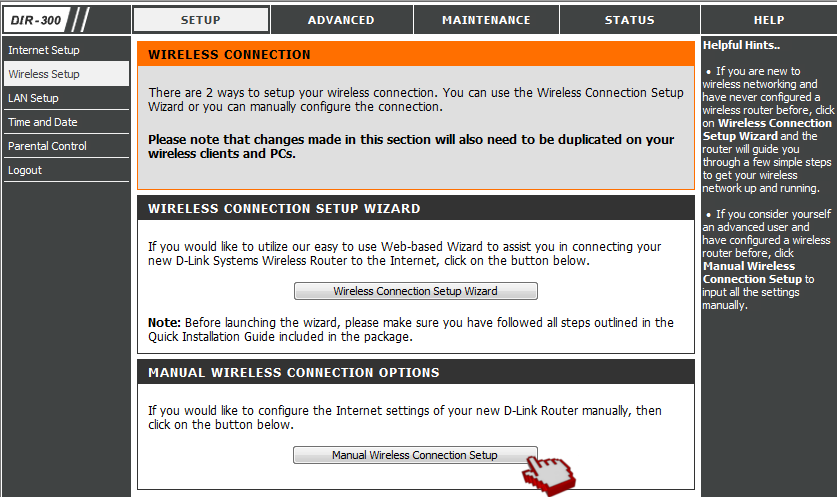
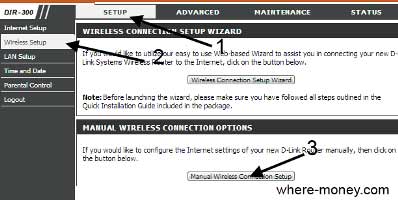
3. If your router has WiFi functionality, you OBOV'YAZKOVO it is necessary to set up the rules for access through the dartless barrier, for which go to the point "Wireless Setup"->"Manual Wireless Connection Setup":
4. In the window that appears, bring the data to the same level as the images (The next item “WIFI PROTECTED SETUP” -> “Enable” is unchecked)
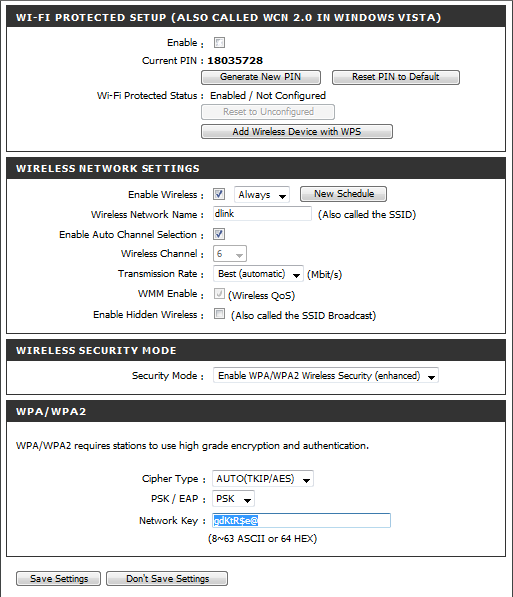
"Network Key" you can set your own, Latin characters, numbers, and special characters (!@#$%^&*)
After completing the settings, click “Save Settings”.
If you do not perform these actions, your point will be accessible to a sufficient number of people who want to use your Internet for their own purposes.
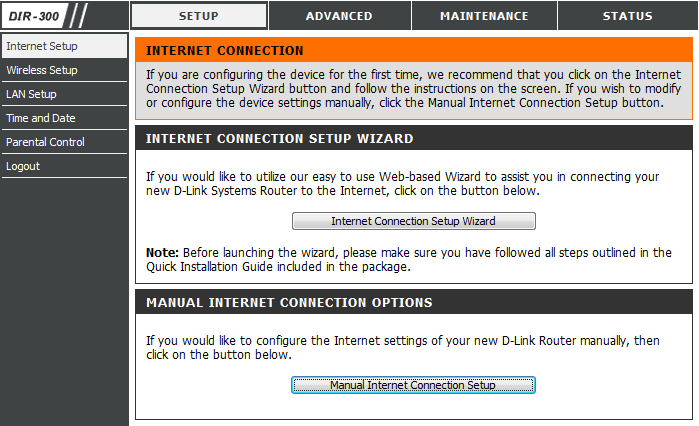
5. Setting up a connection to the Internet can be found in the section "Internet Setup" -> "Manual Internet Connection Setup"
6. Setting up Internet access:
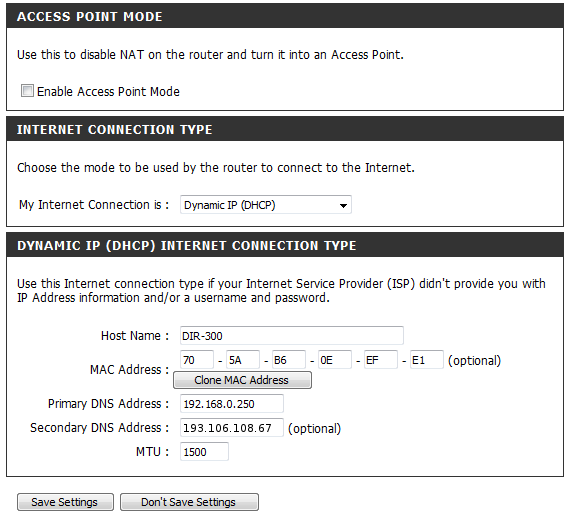
For correct operation, you must press the “Clone MAC Address” button to copy the physical address border map your PC to yourself, you must turn off address blocking on your device (It is only valid if the router setup is carried out from a PC connected to the Volkhov-Online network).
10. The only thing you need to do is change the password to access the router, for which you need to go to the MAINTENANCE->Device Administration section:
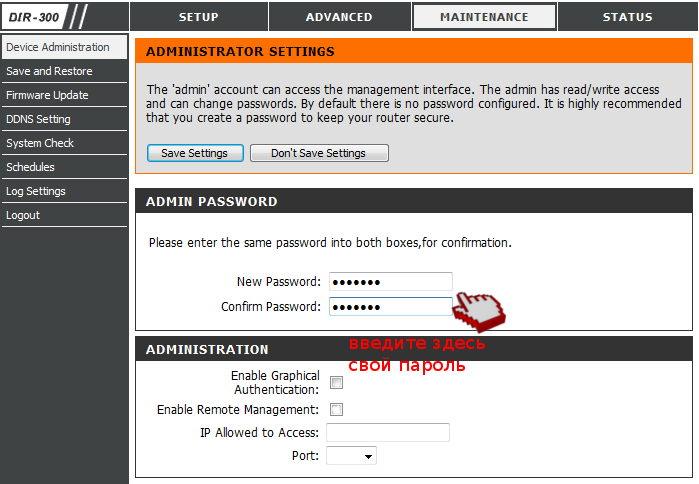
Enter a new password, confirm it and click the Save Settings button
Today's statistics language pіde about how to install, connect and configure the D-link DIR 300 router. This instruction is not related to your Internet provider, it contains secret information about the setup and capabilities of the WiFi router. Therefore, see here the instructions for getting rich DIR 300 owners.
The D-link DIR 300 router allows you to easily organize drone-free monitoring in the office or at home. Previously, you can connect to the Internet via Ethernet lines and distribute it via Wi-Fi.
If your Internet is connected via a telephone line, then read the instructions for another modem of the same provider: .
Of course, through DIR 300 you can distribute ADSL Internet, but you won’t be able to connect it directly to a telephone line. In this case, you will have to connect to a DSL modem that will be connected to a telephone line, for example, DIR 300 + DSL 2500U (without Wi-Fi). This scheme is suitable if you initially have a basic modem without WiFi and you want to organize a drone-free network. If there is a breakdown of one of the devices, then the Internet will go out without Wi-Fi connection. Therefore, better than mother, there is one device for all needs.
Once you have installed your router, the first thing we recommend is to update the firmware. There’s no point in making a fuss, it was clear from the front stat.
Setting up the Internet in the D-link DIR 300 router
To set up the Internet, on the D-link DIR 300 router, select the Setup tab from the horizontal menu, and then the Internet Setup section, then click the Manual Internet Connection Setup button.
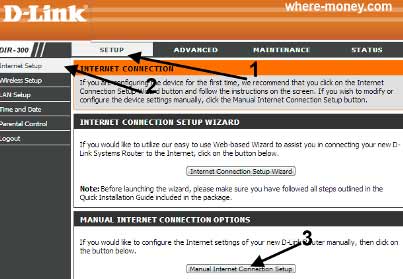
In the window, go to the Internet Connection Type section - here you select the type of Internet connection that is stored with your provider.
So, let’s take a closer look at the adjustment of connection types to the fullest extent.
Dynamic IP

- Access Point - this icon enables NAT (Network Address Translation) and requires a primary access point from the router.
- Dynamic IP – activates automatic IP address retrieval.
- Host Name is an optional authority that is sometimes required by Internet providers. The brand names indicate the name of the router model.
- MAC Address - the WAN MAC address is written down for the promos. It is not recommended to change anything that is not required by the provider.
- Clone MAC Address – here you can replace the WAN MAC address with the router’s MAC address.
- Primary DNS Addresses - enter the primary DNS server address specified in your Internet settings.
- Secondary DNS Addresses – optional, secondary DNS.
- MTU is the maximum transmission unit for optimizing the provider's network performance.
PPPoE
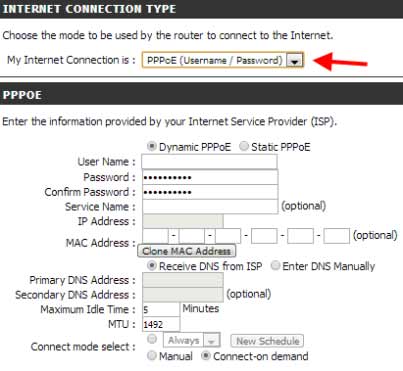
This type of connection ensures that the user has a login and password to access the network.
- The Dynamic PPPoE or Static PPPoE checkbox must be configured by your Internet provider.
- User Name – the name of the koristuvach.
- Password - password.
- Service Name – optional service name of the provider.
- IP Address - Vikorist, if Static PPPoE is selected.
- Primary/Secondary DNS Addresses - primary and secondary (optional) DNS server.
- MTU – maximum transmission unit, default value is 1492.
- Connection Mode Selec - select: always (permanently on), manual (manually), Connect-on demand (on demand).
PPTP
With this type of connection, the user will remove the login and password.
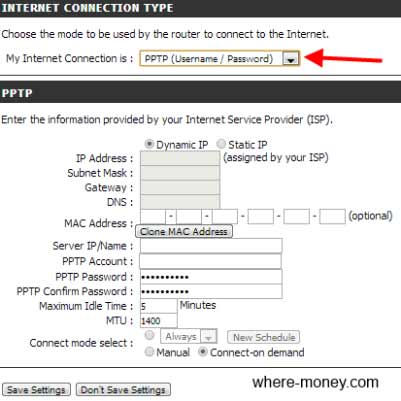
- Dynamic PPPoE or Static PPPoE - a parameter that is stored with the provider.
- IP Address — enter “IP address” for Static PPTP.
- Subnet Mask - primary and secondary DNS addresses (visored for Static PPTP).
- Gateway - IP gateway provided by your Internet provider.
- DNS—DNS server addresses.
- Server IP - "IP" of the server.
- PPTP Password - password.
- PPTP Confirm PPTP - re-enter the password.
- Maximum Idle Time – maximum hour of Internet idle time.
- MTU – maximum transmission unit, as determined by the provider.
- Connect Mode - Vibir: first, manually or whenever possible.
L2TP
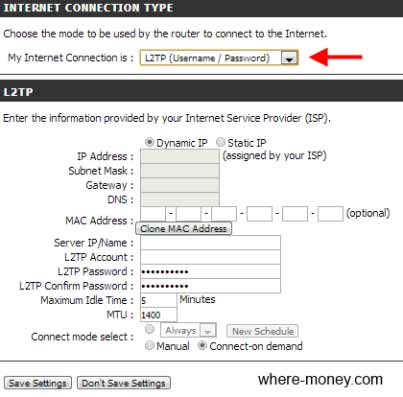
- Dynamic or Static IP – values to choose from, depending on the provider’s settings.
- IP Addresses — Enter the IP address for Static L2TP.
- Subnet Mask - primary and secondary (optional) DNS addresses for Static.
- Gateway - IP addresses for the gateway.
- DNS—ISP DNS addresses.
- Server IP - server IP.
- L2TP Account – cloud account name.
- L2TP Passwor - password.
- Maximum Idle Time – maximum hour of idle Internet connection.
- MTU - maximum transmission unit; if necessary, you can change this parameter.
- Connect Mode - Select a value.
Static IP
This type of connection is subject to vikoryst if the provider allows more information about IP WAN.
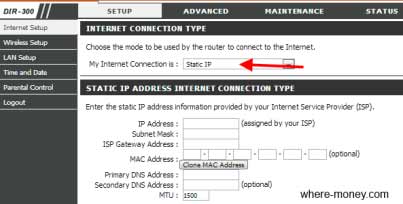
- IP Address – provided by the provider.
- Subnet Mask – mask input field.
- ISP Gateway - gateway.
- MAC Address - the WAN MAC address is preset, if necessary, change it to the one you need.
- Clone MAC Address - using the additional button, the Ethernet MAC address specified by the provider is copied and the WAN MAC is changed to the router MAC.
- Primary and Secondary DNS Address – the primary and secondary DNS server.
- MTU - the default value is 1492, otherwise it can be changed depending on the configuration of the network.
Russian PPPoE
This type of connection is often abused by Russian Internet providers.
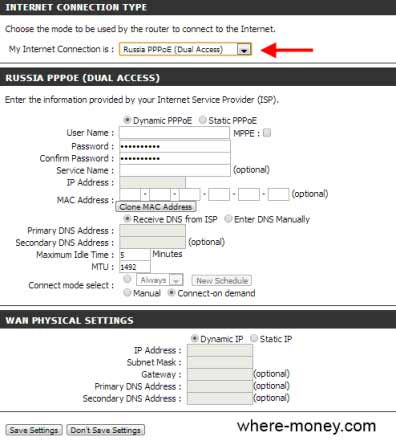
- User Name – the name of the koristuvach.
- Password - password.
- Service Name — name of the provider's service.
- IP Address - "ip" (to be specified for Static PPPoE).
- MAC – optional.
- DNS - primary and secondary DNS server.
- MTU - 1492, can be replaced with another one.
- Connection Mode Selec - Vib.
The steps below under the WAN Physical Setting indicate WAN setup. If you are using Static IP, fill in the required router configuration fields. For a dynamic IP, select Dynamic; you do not need to enter any other parameters.
Russian PPTP
Another type of connection that Russian Internet providers often use.
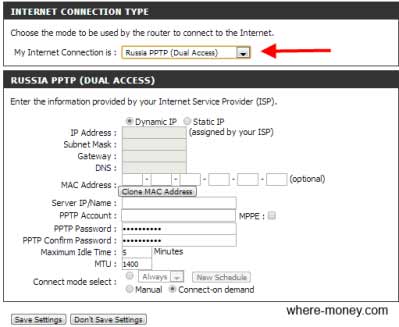
For the analogy with the guidance of higher adjustments:
- IP Address - IP addresses for Static PPTP.
- Subnet Mask - primary and secondary DNS Static PPTP.
- Gateway - IP gateway.
- DNS - information about DNS servers.
- Server IP - “IP” of the server.
- PPTP Account – cloud account name.
- PPTP Password - password.
- Maximum Idle Time – an hour of idle time.
- MTU is a standard value and can be changed.
- Connect Mode - Select a parameter.
Yak bachite, nalashtuvannya different types It's similar to each other, but it doesn't change the fact that you need to enter them carefully, otherwise you won't be able to connect to the Internet.
Now let's look at how to set up Wi-Fi on the D-link DIR 300 router.
Setting up WiFi
To select setup of drone-free monitoring in the horizontal menu, select Setup, and then the Wireless Setup section. Then click Manual Wireless Connection Setup.
You have the basic Wi-Fi setup in the D-Link DIR 300.

- Wi-Fi Protected Setup - fixed zakhistu Wi-Fi. Check the Enable box and press the Generate New PIN button (to generate a PIN) or Reset PIN to Default (to reset to the initial settings), and then go to the settings below.
- Enable — Increased dartless range.
- Wireless Network Name – the name of the drone-free network.
- Wireless Channel – setting up the DIR-300 channel.
- Transmission Rate — Select the speed of data transmission.
- WMM Enable - Select priority for traffic type.
- Enable Hidden Wireless - this function is enabled. The bezdrotovo border will not be widely visible. To connect to Wi-Fi, you need to know the SSID.
The advanced Wireless Security Mode ensures the security of drone-free surveillance. Here, you can select security modes; our option is set to WPA2 ONLY.
Below in the Cipher Type field the encryption type is indicated. For PSK/EAP, select PSK. At Network Key - Enter the password for the drone-free network.
Setting up a local LAN network
Next, the menu changes the local network configuration and sets DCHP (dynamic node configuration). To access the necessary settings, go to the Setup - LAN Setup section.
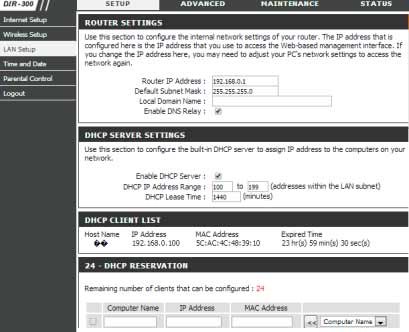
- Router IP Address—indicates that the router’s IP address has been configured. Start for DIR 300 tasks 192.168.0.1
- Default Subnet Mask - subnet mask. Starting price is 255.255.255.0
- Local Domain Name - optional, domain name.
- Enable DNS Relay - if checked, DNS information is transferred from the provider to the computer. If this parameter is not selected, the router will be used as a DNS server.
Parental Control
This function blocks access to the created list of sites.
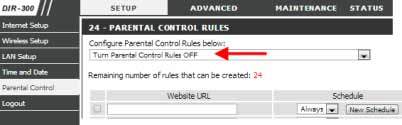
Select from the list Turn Parental Control ON (press in) or Turn Parental Control OFF (press in) Father's control.
In the Website URL field, enter the URL you want to allow or block access to. You can also put it here keywords, once they are detected on the site addresses, they will be blocked.
The Schedule parameter indicates the schedule for setting the time when Father’s control may be active.
That's all, a description of the main set up Wi-Fi D-link DIR 300 router is completed. The capabilities of the router that are lost must be removed independently.
